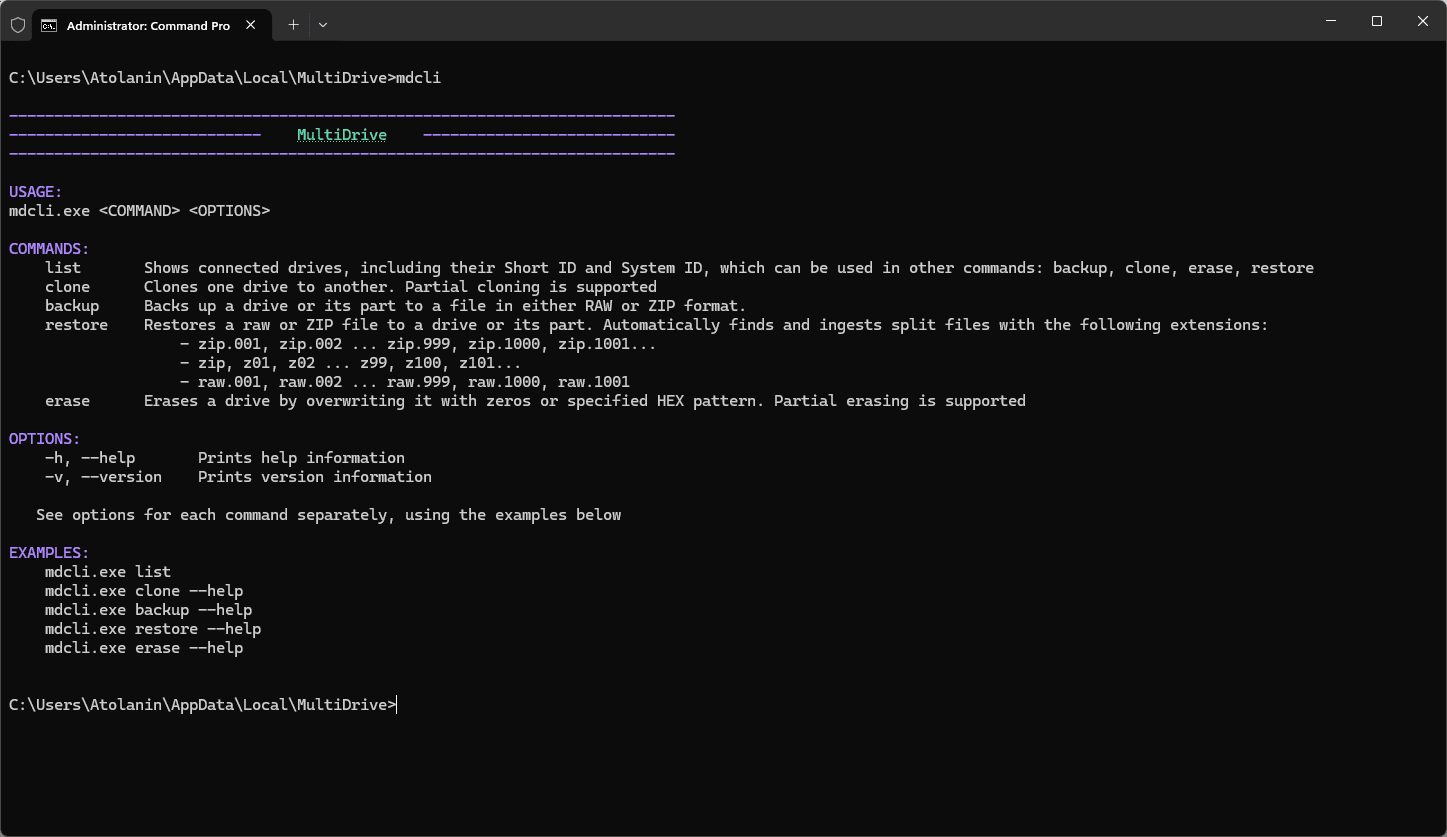
Backup, Clone, Erase Drives Using Command Prompt
MultiDrive is a free, easy-to-use disk management software with a powerful command line interface. Perfect for system administrators and advanced users. Works in Windows 10 and 11.
You can deploy MultiDrive silently across multiple machines using CLI parameters, or install it via Windows Package Manager (winget).
MultiDriveSetup.exe /s /d=c:\MyFolderwinget install multidriveLet's review the examples and explore how to utilize the command-line interface (CLI) in MultiDrive.
Backup Hard Drive from Command Prompt
Usage:
mdcli.exe backup [source] [target] <OPTIONS>
Example:
mdcli backup d1 E:\myfolder\backup.zip
Benefits:
- Backup to RAW, ZIP, ZSTD formats
- On-the-fly compression for ZIP and ZSTD
- Data integrity checks using various hash algorithms: MD5, SHA1, SHA256, SHA512
- The option to split the target backup file into segments
Detailed guide:
Clone Hard Drive from Command Prompt
Usage:
mdcli.exe clone [source] [target] <OPTIONS>
Example:
mdcli clone d1 d3
Benefits:
- As fast as your hardware allows
- Data integrity checks using various hash algorithms: MD5, SHA1, SHA256, SHA512
- The option to specify byte offset for both source and target drives
- Automatically mounts the target drive partitions in Windows after cloning
Detailed guide:
Wipe Hard Drive from Command Prompt
Usage:
mdcli.exe erase [target] <OPTIONS>
Example:
mdcli erase d3
MultiDrive Benefits:
- Irreversible and secure data erasure
- Partial erasing is supported
- Specify the HEX byte pattern to fill the drive with
Detailed guide:
How to launch MultiDrive with a command line interface
From the MultiDrive window:
- Download and install MultiDrive.
- Launch MultiDrive.
- In the top right corner, click the menu icon and select Launch CLI.
From the Windows Command Prompt:
- Download and install MultiDrive.
- Launch the Windows Command Prompt in the Administrator mode: Press Win + X and then select Terminal (Admin).
- In the Command Prompt, run the mdcli.exe from the MultiDrive folder. For example, type:
d:\multidrive\mdcli.exe
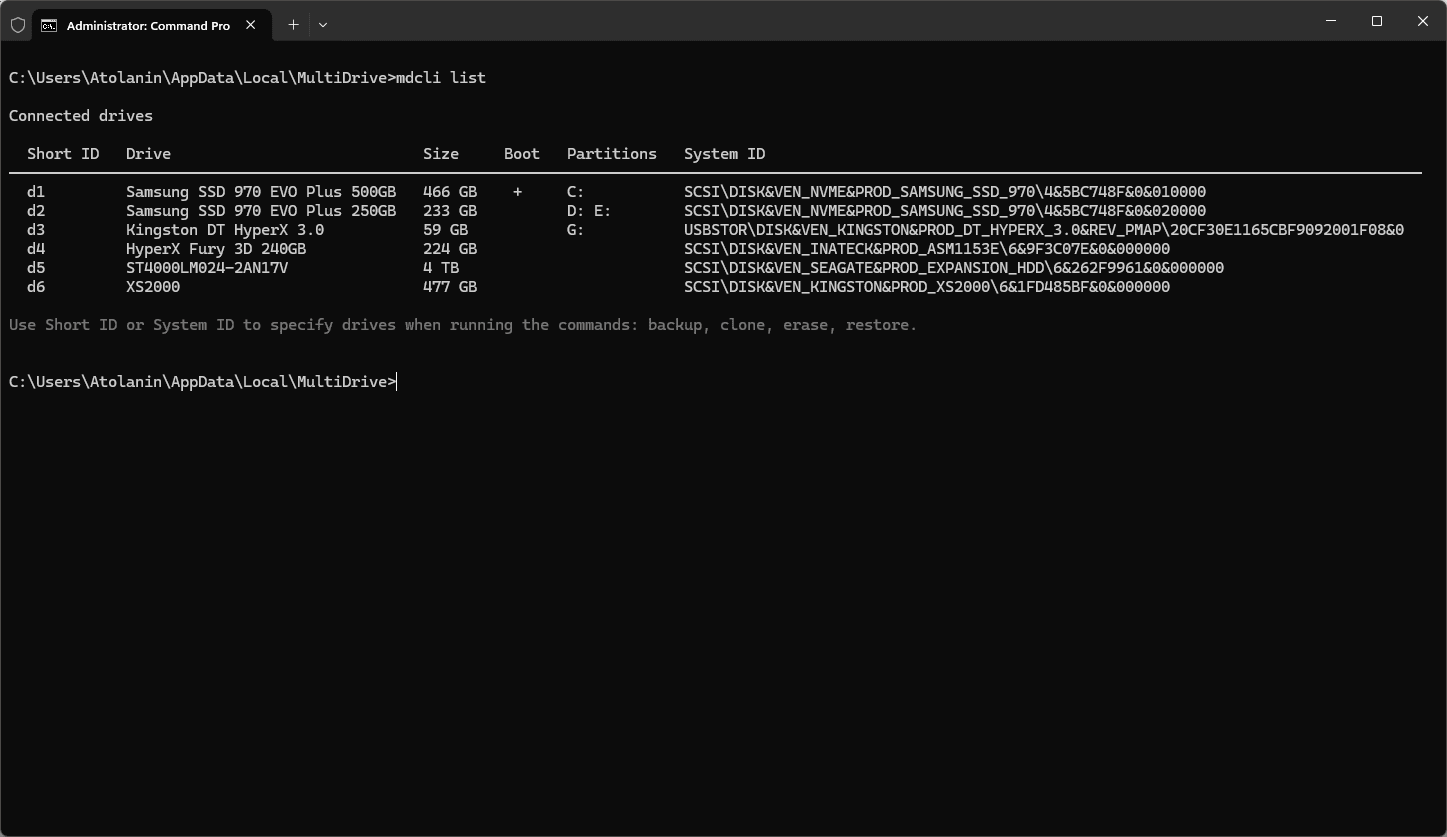
Tip: Use the list command to show all connected drives:
The drive list includes their Short ID and System ID, which can be used in other commands: backup, clone, erase, restore.
How to Create Backup from Command Prompt in MultiDrive
Here's a step-by-step guide for using the command prompt to backup a drive in MultiDrive.
The 'backup' command
The mdcli.exe backup command backs up a drive or its part to a file in RAW, ZIP, or ZSTD format.
The 'backup' command syntax
mdcli.exe backup [source] [target] <OPTIONS>
Arguments for the 'backup' command
[source] The drive from which bytes are backed up
[target] The target file for storing a backup
For [source] and [target] arguments, use the drive's Short ID or System ID reported by the list command, for example: d1, d2, d3…
Options for the 'backup' command
| Option | Default | Description |
|---|---|---|
| -y, --yes | Bypasses prompts by automatically answering 'yes' to all questions | |
| -b, --byte_offset <BYTE_OFFSET> | 0 | The starting byte offset on the source drive where the backup process will begin |
| -c, --byte_count <BYTE_COUNT> | The number of bytes of the source drive to back up | |
| -z, --zip | Compress the target backup file to ZIP format on the fly (compression level: 2) | |
| -a, --zstd | Compress a target backup file to ZSTD format on-the-fly (compression level: 1) | |
| -p, --split <SPLIT_SIZE> | 0 | Divide the target backup file by <SPLIT_SIZE> into file segments |
| -q, --hash <HASH_TYPE> | None | The hash type to calculate for integrity checks: MD5, SHA1, SHA256, SHA512 |
| -s, --source <SOURCE> | An alternative way to specify the drive from which bytes are backed up | |
| -t, --target <TARGET> | An alternative way to specify the target file for storing backup | |
| -u, --share-user <SHARE_USER> | Username for network share authentication | |
| -w, --share-pass <SHARE_PASS> | Password for network share authentication |
Examples of command line backup
# Back up Drive #1 to a RAW file
mdcli backup d1 E:\myfolder\backup.raw

# Back up Drive #1 to a ZIP file with compression
mdcli backup d1 E:\myfolder\backup.zip

# Back up a source Drive #2 to a target ZIP file with compression
mdcli backup -s d2 -t E:\folder\backup.zip -z

# Back up a source Drive #1 to the target folder
mdcli backup -s d1 -t E:\folder\

# Back up a source Drive #1 with the offset of 1 million bytes to a zip file, split into segments of 2 GB each:
mdcli backup d1 E:\folder\backup.zip -b 1M -c 10G --zip --split 2G

# Back up a source Drive #2 to a network share folder with ZSTD compression and network share authentication specified
mdcli backup -s d2 -t "\\nas\my dir\backup.zst" --share-user corp\operator --share-pass P@ssw0rd!
How to Clone Disk from cmd
Here's how to clone a hard drive using the command prompt with the MultiDrive command line interface.
The 'clone' command
The mdcli.exe clone command clones one drive to another, creating an exact bit-by-bit replica of the source drive on the target one.
The 'clone' command syntax
mdcli.exe clone [source] [target] <OPTIONS>
Arguments for the 'clone' command
[source] Drive from which bytes are cloned
[target] Drive to which bytes are cloned
For [source] and [target] arguments, use the drive's Short ID or System ID reported by the list command, for example: d1, d2, d3…
Options for the 'clone' command
| Option | Default | Description |
|---|---|---|
| -y, --yes | Bypasses prompts by automatically answering 'yes' to all questions | |
| -b, --byte_offset <BYTE_OFFSET> | 0 | The starting byte offset for both the source and target drives |
| -c, --byte_count <BYTE_COUNT> | The number of bytes to clone from the source to target | |
| -q, --hash <HASH_TYPE> | None | The hash type to calculate for integrity checks: MD5, SHA1, SHA256, SHA512 |
| -m, --mount | Automatically mounts partitions of the target drive in Windows after the task completes | |
| -s, --source <SOURCE> | An alternative way to specify the drive from which bytes are cloned | |
| -t, --target <TARGET> | An alternative way to specify the target drive to which bytes are cloned |
Examples of using the 'clone' command
# Clone Drive #1 to Drive #3
mdcli clone d1 d3

# Clone a source Drive #1 to a target Drive #3
mdcli clone -s d1 -t d3

# Clone 1 TB from Drive #3 with the offset of 500 MB to a target Drive #4, mount Drive #4 to Windows after cloning is complete
mdcli clone d3 d4 -b 500M -c 1T -m

# Clone 1 TB from a source Drive #3 with the offset of 500 MB to a target Drive #4, calculate SHA1 hash to verify data integrity
mdcli clone -s d3 -t d4 -b 500M -c 1T -q SHA1
How to Wipe Hard Drive from Command Prompt
MultiDrive offers a secure erase CLI command to completely wipe hard drives, SSDs, USB flash drives or SD cards.
The 'erase' command
The mdcli.exe erase command erases a drive by overwriting it with zeros or a specified HEX pattern. Partial erasing is supported.
The 'erase' command syntax
mdcli.exe erase [target] <OPTIONS>
Arguments for the 'erase' command
[target] Target drive to erase
For the [target] argument, use the drive's Short ID or System ID reported by the list command, for example: d1, d2, d3…
Options for the 'erase' command
| Option | Default | Description |
|---|---|---|
| -y, --yes | Bypasses prompts by automatically answering 'yes' to all questions | |
| -b, --byte_offset <BYTE_OFFSET> | 0 | The starting byte offset on the target drive where the erasing process will begin |
| -c, --byte_count <BYTE_COUNT> | The number of target drive bytes to erase | |
| -p, --pattern <PATTERN> | 00 | What HEX byte pattern to fill the drive with during the erase process |
| -m, --mount | Automatically mounts partitions of the target drive in Windows after the task completes | |
| -t, --target <TARGET> | An alternative way to specify the target drive for erasing | |
| -f, --format <FILESYSTEM> | Format the drive after erasing with the specified file system: exFAT or NTFS. Only works when erasing the entire disk (without --byte_offset or --byte_count options). |
Examples of using the 'erase' command
# Erase Drive #3 by filling it with the 'FF' byte pattern
mdcli erase -t d3 --pattern FF

# Erase 1 gigabyte from Drive #3 by filling it with the '9A7B' byte pattern
mdcli erase d3 -p 9A7B -b 1G -c 30G
CLI automation guides
Step-by-step articles for drive operations using mdcli.exe and scripting.