How to Back Up a Computer to an External Hard Drive
Quick answer
- Make sure you have enough free space on your external hard drive.
- Download the MultiDrive installer and the bootable WinPE image.
- Create a bootable USB drive.
- Boot from the USB drive with WinPE.
- Back up your drive using MultiDrive.
Backing up your computer to an external hard drive is the simplest way to protect your files, apps, and even your entire operating system from a failed disk, ransomware, or accidental deletion.
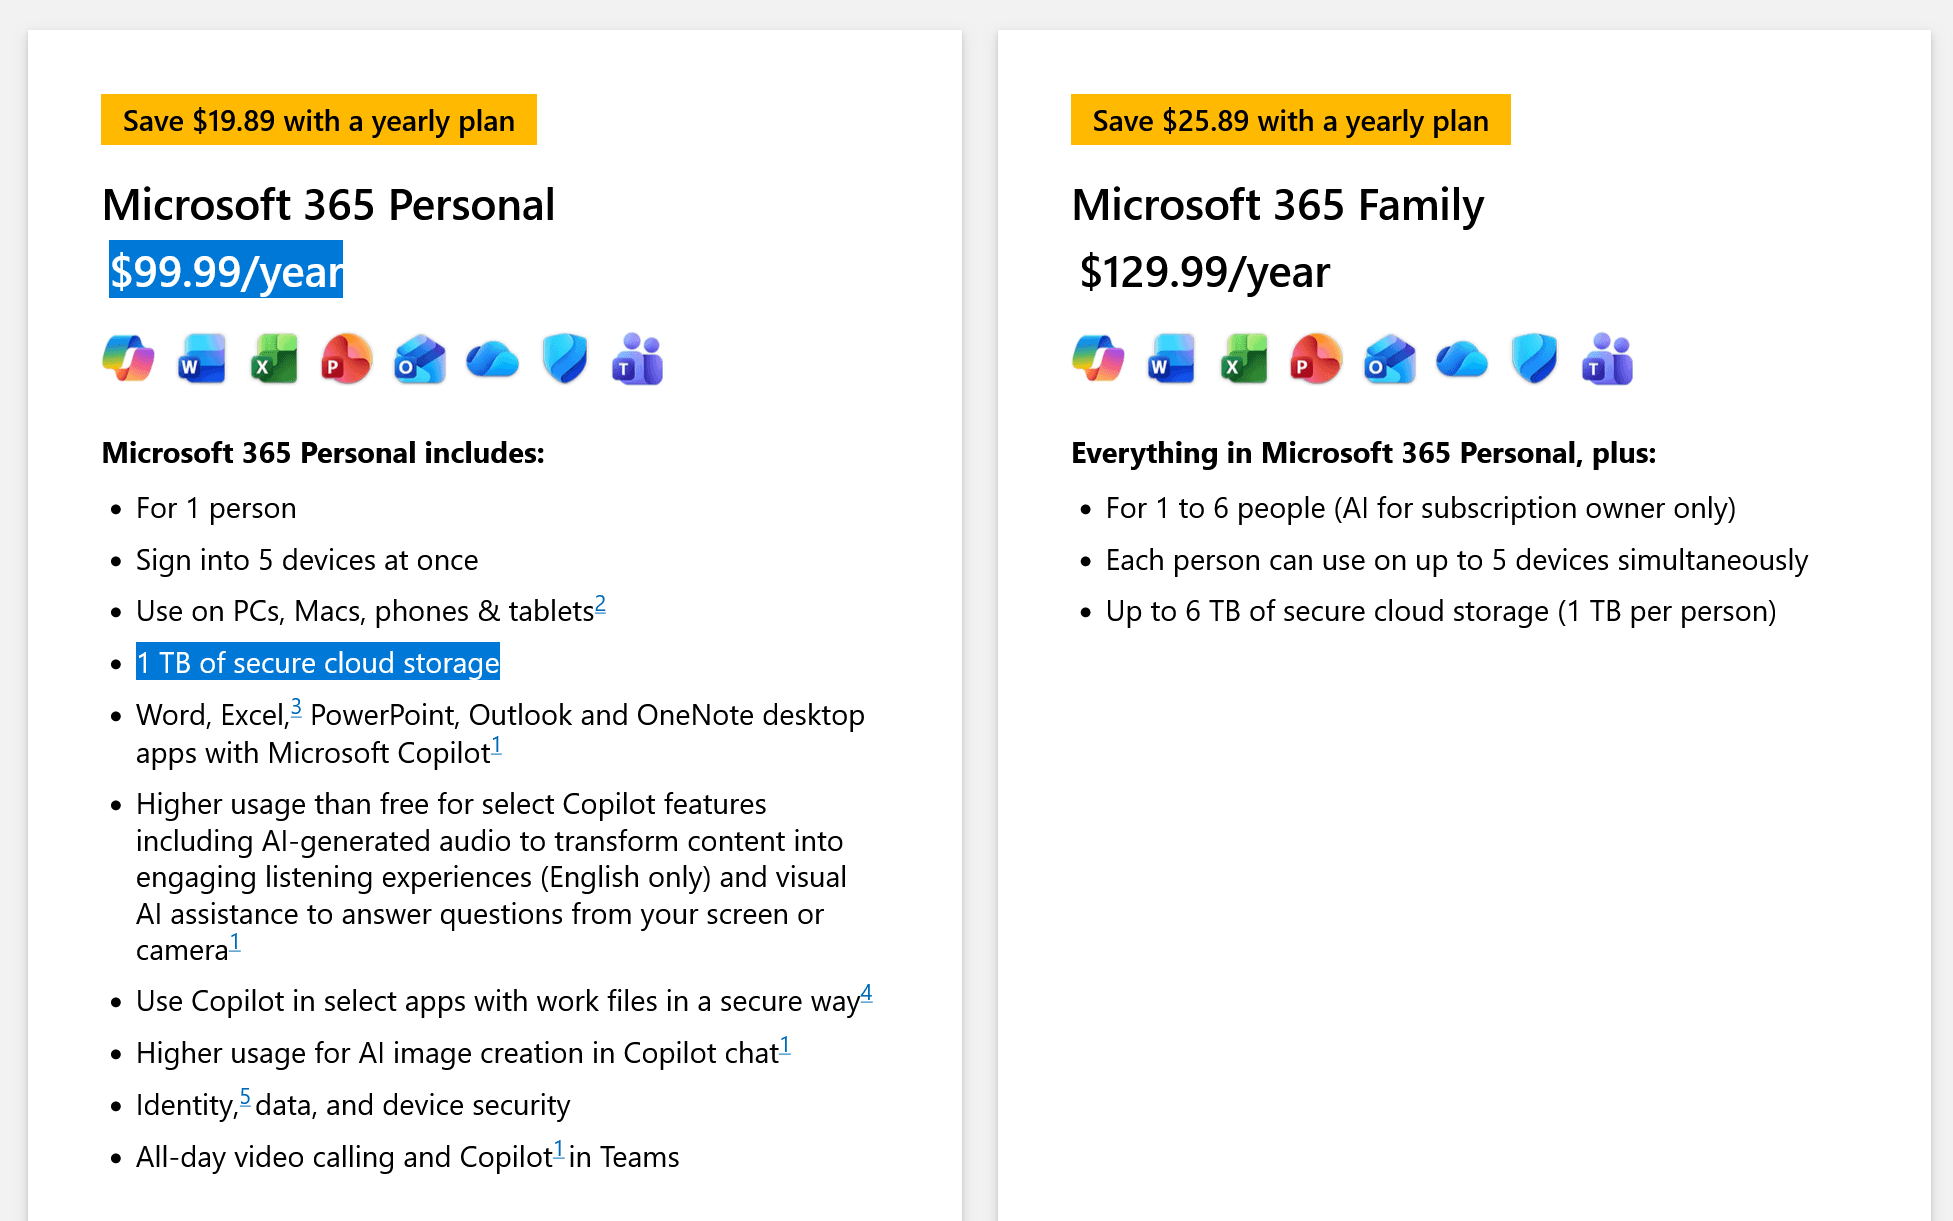
Windows 11 and 10 offer free built-in tools for backing up either selected folders (File History) or the entire PC (System Image). However, Microsoft has marked them as legacy and is pushing its paid OneDrive cloud backup service instead, which costs $99.99 per year (or $9.99 per month) for 1 TB in the Microsoft 365 Personal subscription plan (as of July 2026).
This article provides a detailed overview of five free backup methods. We will go step by step through the preparation stage, the backup process, and how to restore your data from the backup when needed.
Quick path to fully back up system and secondary data drives
Want to skip the preparation stage and cut to the chase? Here are your quick steps:
- Make sure you have enough free space on your external hard drive.
- Download the MultiDrive installer and the bootable WinPE image (both are 100% free).
- Create a bootable USB drive: install MultiDrive, go to Restore, select the downloaded WinPE ZIP file as a Source and a blank USB drive (2 GB or larger) as a Target, then click the Restore button.
- Boot from the USB drive: restart your PC, enter the BIOS/UEFI by pressing Del, F2, F10, or F12 key, then select your USB drive as the boot device. WinPE loads and MultiDrive starts automatically.
- Back up your system drive: in the MultiDrive window, go to Backup, select your system drive as the Source and your external hard drive as the Target, choose the ZSTD format for the best balance of speed and compression, then click Backup.
- Back up your secondary drive in parallel (optional): while the first task is still running, start a backup of your secondary drive using the same steps. Watch the progress of both tasks on the Dashboard, where MultiDrive also shows a time estimate.
- After the backup is complete: power down your PC, disconnect the WinPE USB and the external hard drive, then start your PC normally. Store your backup drive in a safe place.
In this article
- What do you need to back up? File copying vs Full drive image
- Quick comparison of 5 free backup methods
- What's the difference between full drive image (backup) and clone?
- How to prepare your external hard drive for backup
- Create full backups of system and secondary data drives with MultiDrive
- Method 1: Full system drive backup with MultiDrive (WinPE)
- Method 2: Full backup of a secondary data drive with MultiDrive
- Method 3: Full drive backup with Windows System Image
- Method 4: Creating file backups with Windows File History
- Method 5: Creating file backups by manual copying
- How to check your USB version
- How to restore an individual file from a MultiDrive backup with 7-Zip
What do you need to back up? File copying vs Full drive image
Choosing a backup method that is right for you depends on what you actually need to back up.
Full drive image
Full drive image is a complete, sector-by-sector copy of an entire drive saved as a single file. It captures everything at once – Windows, your installed apps, settings, accounts, and all your files – along with the partition layout, so you can restore your computer to the exact state it was in and boot straight back into it.
The downside is that a full drive image requires much more free space than simple file copying.
Use a Full Drive Image if: You have a complex setup with heavily customized software, saved passwords, and local applications, and you want to be able to recover from a dead hard drive without losing a single setting.
In this article, we cover three free methods of creating a full drive image:
- Full drive backup with MultiDrive (for both system and secondary data drives)
- Windows built-in System Image
File copying
File copying (also called file-level backup) means saving copies of your individual files and folders, like your documents, photos, and downloads, onto the external drive.
Use File Copying if: You have limited storage space on the external drive, only care about your personal photos and projects, use web-based apps, and don't mind spending a day reinstalling Windows and your favorite programs manually if your computer crashes.
In this article, we cover two free file-level backup methods:
Quick comparison of 5 free backup methods
| Method | 1, 2. MultiDrive full image (system and secondary data drive) | 3. Windows System Image | 4. File History | 5. Manual file copy |
|---|---|---|---|---|
| What gets backed up | The entire drive sector-by-sector: every partition, OS, apps, and free space (or a custom sector/partition range) | The whole Windows install: system + boot/EFI + recovery partitions, plus any extra volumes you select | Selected user folders only; not the OS or apps | Only the files/folders you pick |
| Output format(s) | ZSTD, ZIP, or RAW image file, all open/standard formats, no vendor lock-in | VHDX disk-image files in a WindowsImageBackup folder + XML metadata | Plain timestamped file copies in a browsable FileHistory folder | Plain files/folders, native format, no container |
| Compression | Yes: ZSTD (fast, good ratio, ~4-5× faster than ZIP), ZIP (best space saving, slowest, ~20-50%). | Light, captures only used space and moderately compresses the VHDX | None, stored as plain copies | None, unless you archive a file manually |
| Automation / scheduling | No by default, but possible via CLI + Windows Task Scheduler | No by default, but possible via Windows Task Scheduler | Automatic on a schedule (adjustable from every 10 min to every 24 hours) | No, but you can set a reminder on your phone |
| Keeps old versions? | No incremental/version chain. Each backup is a full standalone image. You can keep several dated image files yourself | Limited, usually keeps the latest image. Older ones get overwritten as space runs low | Yes, keeps multiple timestamped versions. You can roll a file back to an earlier state | No, copies overwrite, or you manage versions by hand |
| Pause / resume (large backups) | Yes, you can pause/resume any backup anytime, and resume from the failure point even after a crash | No. If the process fails, you start over | No. Runs in the background, can be turned off/on. | File Explorer's copy dialog has a Pause button, but no reliable resume after a crash or disconnect |
| Restore an individual file? | No by default. Restores the whole image to a target drive. But it is possible to restore an individual file from a RAW backup file with 7-Zip | No, restore overwrites the whole drive. | Yes, you can browse a file's versions and restore the current or an older one | Yes, just copy the one you need back |
| Full-system ("bare-metal") recovery | Yes, a full image restores the entire drive with OS, apps, partitions, folders, and files | Yes, restores the whole system to the same or a replacement drive | No, personal files only | No |
| Handles failing / bad-sector drives | Strong – resets the drive controller, retries with longer timeouts, skips unreadable blocks (fills with zeros) and keeps going; built for drives with errors | Poorly – tends to fail outright on read errors | Poorly – relies on normal file access; bad sectors cause errors/skips | Poorly – copy usually errors on the first unreadable file |
| Best suited for | A complete, compressed, portable, scriptable snapshot of a whole disk (including a failing one), with open formats and no lock-in – archives, migrations, imaging drives with bad sectors | Whole-system disaster recovery – getting Windows, apps, and settings back exactly after a crash or drive failure | Ongoing, automatic version history of personal working files – "I overwrote this doc, give me yesterday's copy" | A handful of important documents/photos you want as plain, directly accessible copies; quick ad-hoc backups |
What's the difference between full drive image (backup) and clone?
A full drive backup image is a file that contains an exact copy of your source drive, and it is saved on another physical, network, or cloud storage device. MultiDrive supports RAW (uncompressed), ZIP, and ZSTD (compressed) formats for backup files.
A full drive clone is another physical drive that is an exact copy of your source drive, including all partitions, folders, files, and empty or unallocated space. Drive clones do not use data compression.
To better understand the differences, check our explainer Disk Cloning vs Backup vs Imaging.
How to prepare your external hard drive for backup
Before you start, make sure you're using the right external hard drive, and set it up the right way. A little preparation now means you won't run out of space mid-backup, or discover only after a drive failure that your backup drive isn't compatible with the computer you need to restore to.
SSD or HDD?
Both work fine for backups, and the choice mostly comes down to price versus convenience.
- HDD (hard disk drive) is cheaper per TB of storage, which matters if you're backing up a large drive or want to keep several backup versions. HDDs are more reliable for long-term storage. The trade-off is that HDDs are heavier, noisier, and slower than SSDs.
- SSD (solid-state drive) costs more per TB, but it's lighter, faster, and completely silent – no spinning platters, no moving parts to fail from a drop or bump.
If your backup drive will live on a desk and rarely travel, the low cost per TB and long-term reliability of an HDD are hard to beat. If it needs to go in a bag or you want faster backup and restore times, an SSD is worth the premium.
External USB drive or repurposed internal SATA drive?
External USB drive: Most external hard drives and portable SSDs already come with a built-in USB connection – plug them in and you're ready to go.
Internal SATA drive with USB enclosure: Alternatively, you can repurpose an old internal drive as your backup drive – for example, the SSD you removed after moving Windows to a new drive. Connect it externally using a SATA-to-USB (or NVMe-to-USB) enclosure or dock. This is a good way to get extra use out of hardware you already own instead of buying a new drive.
If the old drive still holds data that you don't need, wipe it clean with MultiDrive's free Erase feature.
USB version: How fast is fast enough?
The USB version that both your PC and external drive support directly affects how long your backup takes.
- Choose a drive that supports USB 3.0 or higher. Older USB 2.0 drives are dramatically slower and will turn a routine backup into an overnight job.
- USB 3.2 Gen 2x2 is currently the fastest widely available standard for external hard drives and portable SSDs, at up to 20 Gbps.
- If your PC supports USB4 or Thunderbolt, a handful of premium external SSDs now reach up to 40 Gbps. But for most backup purposes, USB 3.2 already outruns what a spinning HDD can write to anyway, so it's not worth chasing for HDD-based backups.
Not sure which USB version your ports or drive actually support? See How to check your USB version below.
Drive formatting: NTFS or exFAT?
How you format the external drive determines which computers can read it.
- NTFS is the native Windows file system. Choose this if your backup drive will only ever be used with Windows PCs. Built-in Windows backup tools, like System Image and File History, require NTFS. For guidance, see How to format a USB drive to NTFS.
- exFAT works across Windows, macOS, and Linux. Choose this if you might need to read the backup on a Mac or Linux machine too. For guidance, see How to format a USB drive to exFAT.
Avoid formatting the drive as FAT32 for a full drive image – it caps individual file sizes at 4 GB, which is far too small for a backup file. If you do need FAT32 for compatibility with older devices, MultiDrive's split-file option can divide a large backup into smaller segments that fit under that limit.
Storage capacity: How much do you need?
This depends on which kind of backup you're making:
- Full drive image: aim for an external drive with at least the same capacity as the drive you're backing up or larger. Compressed formats like ZSTD and ZIP usually produce a file noticeably smaller than the source drive, since empty space compresses very efficiently, but sizing for the full drive keeps you safe rather than relying on that margin.
- File copies: size the drive to the total size of the files you're copying, plus some headroom for future files.
MultiDrive doesn't do incremental backups, so every backup you keep is a separate, full-size file. If you'd like to keep more than one backup version over time, a larger drive gives you the room to do that.
Drives we recommend for storing backups
Based on Atola's more than 20 years of experience in data recovery, here are external drives that hold up well for backup use:
SSDs: lighter, faster, and completely silent
Samsung Portable SSD T7 USB 3.2
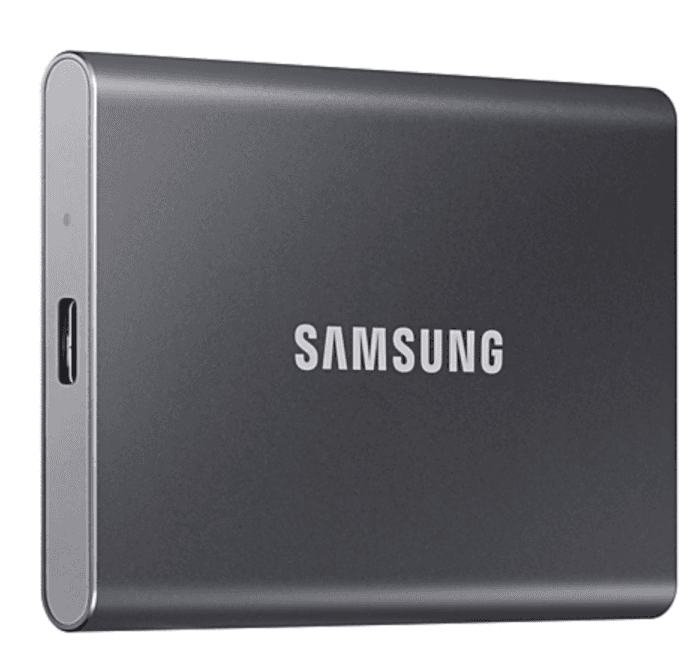
Type: USB SSD
USB version: 3.2 Gen2
USB connector: Type-C
Speed: up to 1,050 MB/s
Capacity: 500 GB / 1 TB / 2 TB / 4 TB
Price for 1 TB: 100 USD
Dimensions: 85 mm x 57 mm x 8 mm
Weight: 58 g
Samsung Portable SSD T9 USB 3.2 Gen2x2
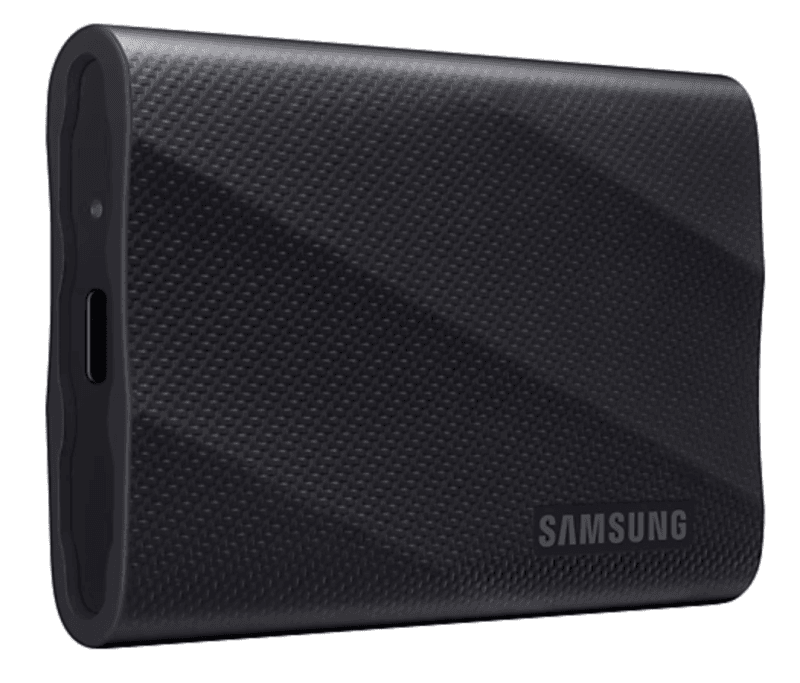
Type: USB SSD
USB version: 3.2 Gen2x2
USB connector: Type-C
Speed: up to 2,000 MB/s
Capacity: 1 - 4 TB
Price for 1 TB: 115 USD
Dimensions: 88 mm x 60 mm x 14 mm
Weight: 122 g
Kingston DataTraveler Max USB 3.2 Gen2
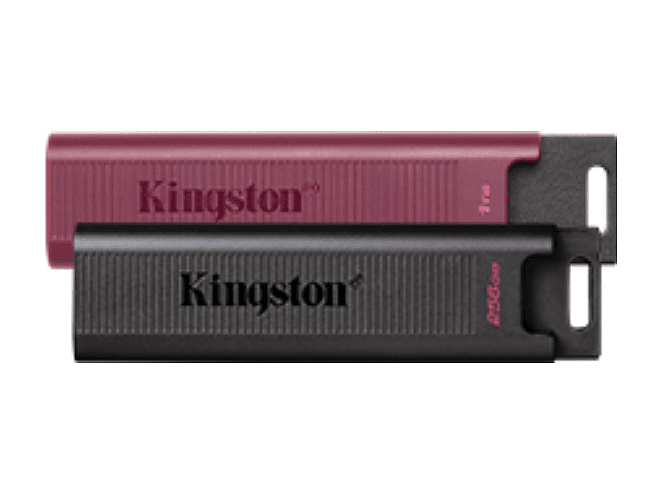
Type: USB Flash
USB version: 3.2 Gen2
USB connector: Type-A / Type-C
Speed: up to 1,000 MB/s
Capacity: 256 GB / 512 GB / 1 TB
Price for 1 TB: 120 USD
Dimensions: Type-C: 82 x 22 x 9 mm / Type-A: 91 x 22 x 9 mm
Weight: Type-C: 12 g / Type-A: 14 g
HDDs: cheaper per TB and more reliable
Seagate Backup Plus Portable Hard Drive 5 TB
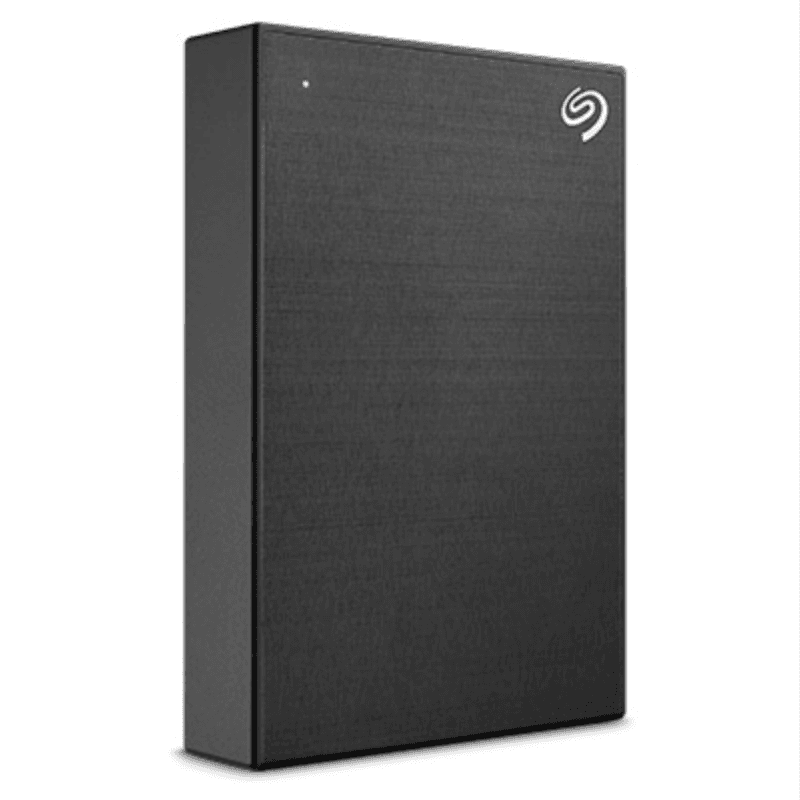
Type: USB HDD
USB version: 3.0
USB connector: Type-A
Typical speed: ~120 MB/s
Capacity: 4 TB / 5 TB
Price for 5 TB: 120 USD (24 USD per 1 TB)
Dimensions: 115 mm × 80 mm × 21 mm
Weight: 265 g
Seagate Expansion Desktop Hard Drive 12 TB
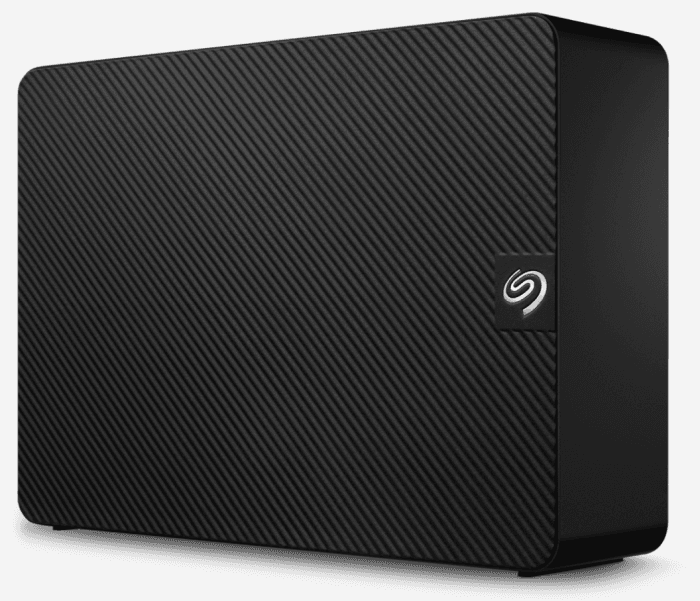
Type: USB HDD
USB version: 3.0
USB connector: Type-A
Typical speed: ~120 MB/s
Capacity: 4 - 24 TB
Price for 12 TB: 360 USD (30 USD per 1 TB)
Dimensions: 42 mm × 179 mm × 125 mm
Weight: 1176 g
Create full backups of system and secondary data drives with MultiDrive
The first two methods of full-drive backups (for system and secondary drives) use MultiDrive, a free tool developed by Atola Technology.
Before you jump into the step-by-step instructions for either one, this chapter covers what MultiDrive does well, where it isn't the right choice, which backup format to pick, and roughly how long the process takes.
MultiDrive ownership disclosure
MultiDrive is made by Atola Technology, the same company publishing this guide – a tech company with more than 20 years of experience in data recovery and storage device management. We recommend it here because we build it, but everything in this chapter, including where MultiDrive isn't the best fit, is meant to help you pick the right free tool for your situation, not just ours.

Why MultiDrive?
- Full drive image: captures the entire drive, sector by sector, not just selected files.
- Open formats, no vendor lock-in: ZSTD, ZIP, and RAW are all open, standard formats. Restore with MultiDrive or any compatible third-party tool.
- Backs up drives with bad sectors: if MultiDrive hits an unreadable block, it resets the drive, retries, and if the block still fails, skips it and fills that space with zeros – preserving the correct file size and offsets instead of failing the whole backup.
- Pause and resume anytime: stop a backup to free up resources or step away, then pick up where you left off.
- Safe resume after a real interruption: a loose cable or power outage won't force you to start over; the backup process will continue from the exact same place.
- Extract a single file without a full restore: from RAW, ZIP, or ZSTD backups you can browse and pull out individual files with 7-Zip or other compatible archivers (RAW is the simplest workflow; see the walkthrough below).
- Free, with no ads, no registration, and no hidden payments.
When MultiDrive isn't the right fit
MultiDrive is a strong general-purpose backup tool, but it won't suit you in the following situations:
- You want fully automatic backups of a few folders. MultiDrive backs up on demand, not on a recurring schedule out of the box. Windows File History is simpler if you just want your Documents or Pictures folder backed up automatically.
- You want incremental or versioned backups. MultiDrive always creates a complete backup of the whole drive or range you select – it doesn't back up only what's changed. If you want to automate recurring full backups, you can combine MultiDrive's CLI with Windows Task Scheduler.
- You'd rather not create a WinPE USB, and only need a one-off system image. Windows System Image can image your running system drive without any extra USB drive, though with its own trade-offs.
Choosing a backup format: ZSTD, ZIP, or RAW
MultiDrive can save your backup in three formats:
- ZSTD (ZStandard): compressed and fast, 4-5 times faster than ZIP with similar space savings. The right choice for most backups.
- ZIP: also compressed, but noticeably slower than ZSTD. Choose it if you need the backup to open in virtually any third-party archiver, since ZIP support is more universal.
- RAW: an uncompressed, exact copy of the drive. It takes up the most space, but it's the fastest to restore, and it's the format you'll need if you ever want to extract a single file with 7-Zip instead of restoring the whole thing.
Typical compression with ZSTD or ZIP produces a backup file roughly 30–70% smaller than RAW, depending on how compressible your files already are (photos and videos, for instance, compress far less than documents and spreadsheets).
For a detailed comparison, see RAW, ZIP, or ZSTD: Backup File Formats.
How long will the backup take?
The backup time depends on the following factors:
- The read speed of your source drive and the write speed of your external drive. The slower of the two is your bottleneck.
- Your USB connection. USB 3.0 vs. USB 3.2 Gen 2x2 can make a several-times difference in transfer speed (see How to check your USB version).
- The format you choose. RAW writes faster since there's no compression step; ZSTD is a close second while shrinking the file; ZIP is the slowest of the three.
- How much data is actually on the drive. MultiDrive backs up the full drive at the sector level, but empty space compresses almost instantly with ZSTD or ZIP, so a mostly-empty drive backs up faster than its raw capacity would suggest.
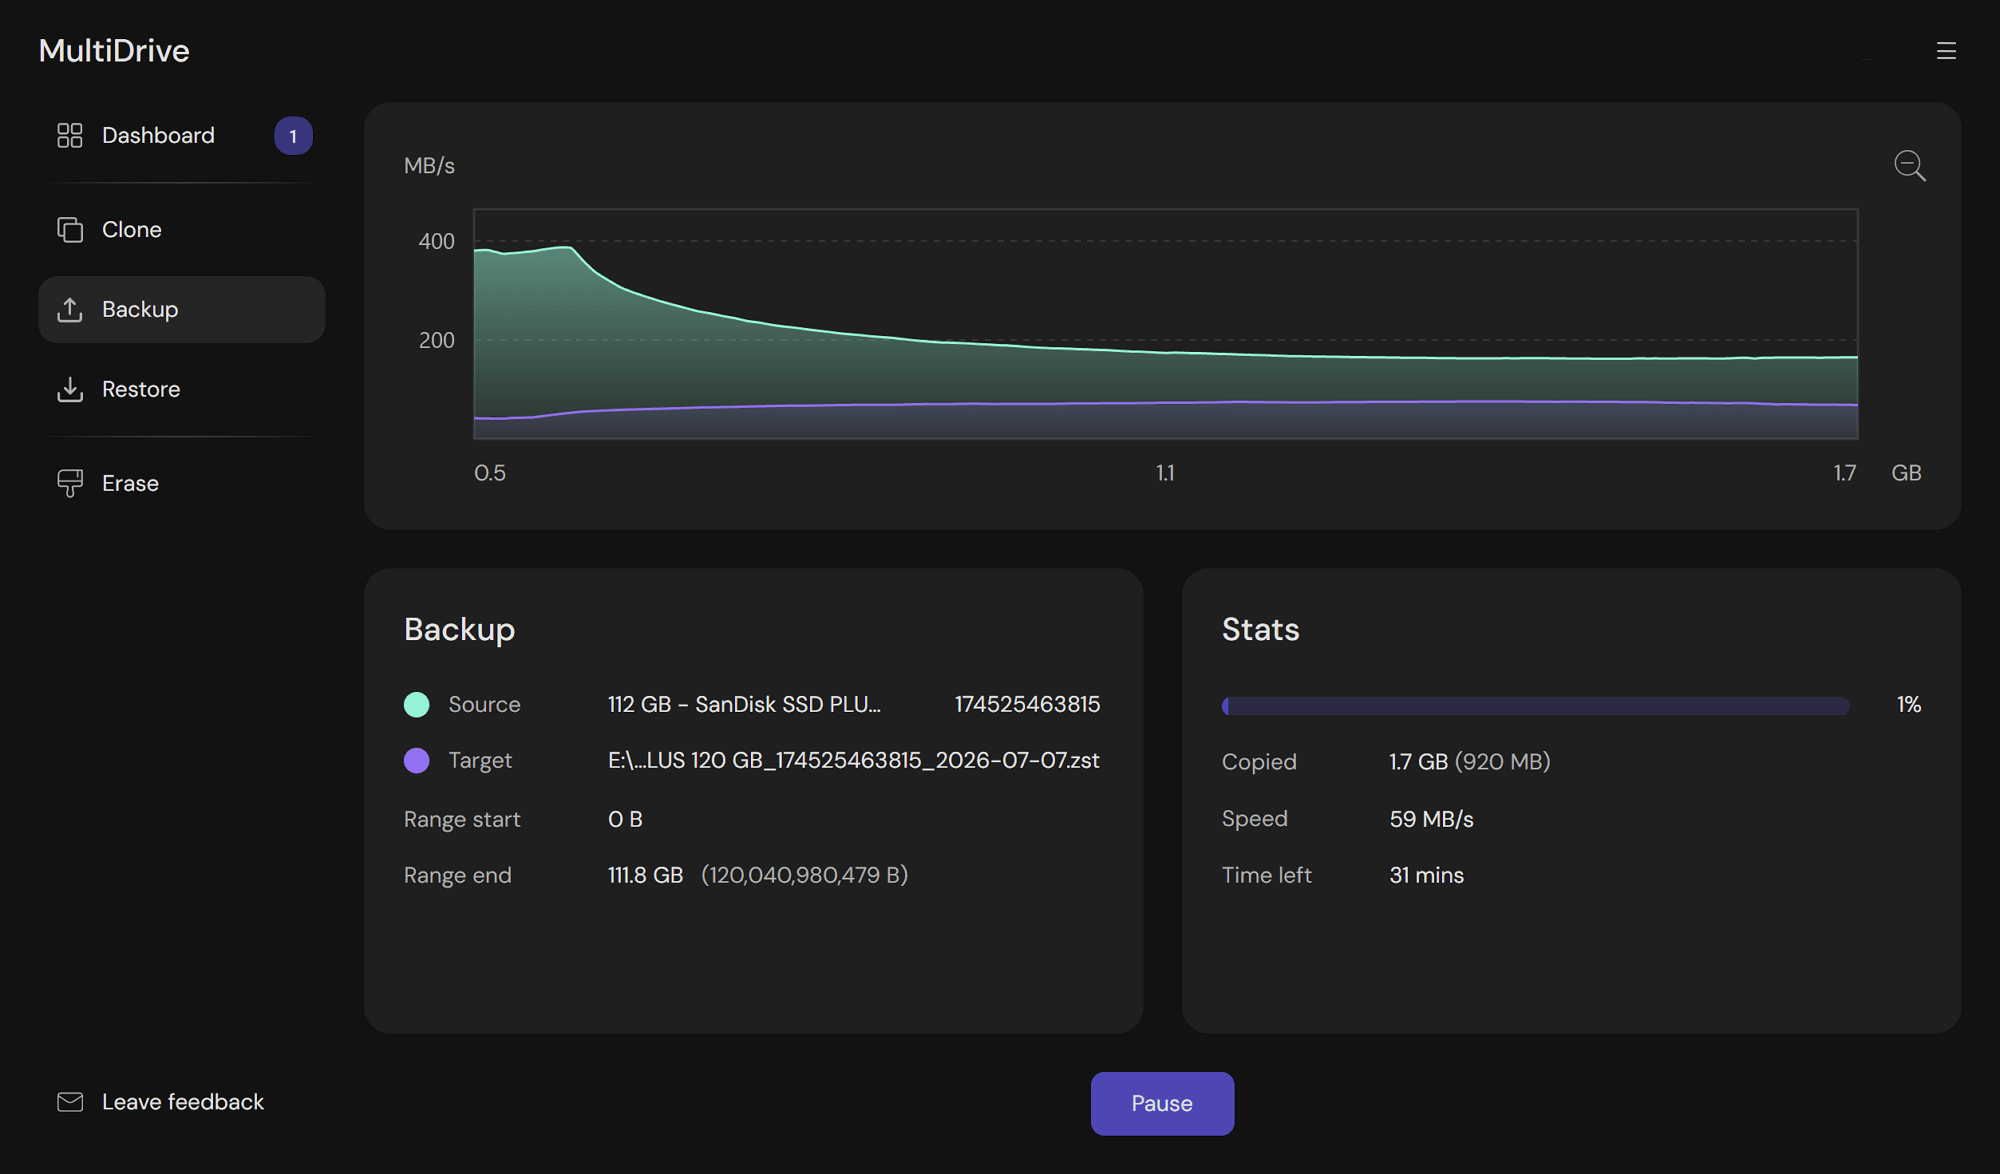
Once a backup starts, MultiDrive shows you a live estimate: the Stats panel displays progress, current speed, and time remaining, updating in real time as the backup runs.
Actual time also varies by drive health, interface bandwidth, and concurrent workload.
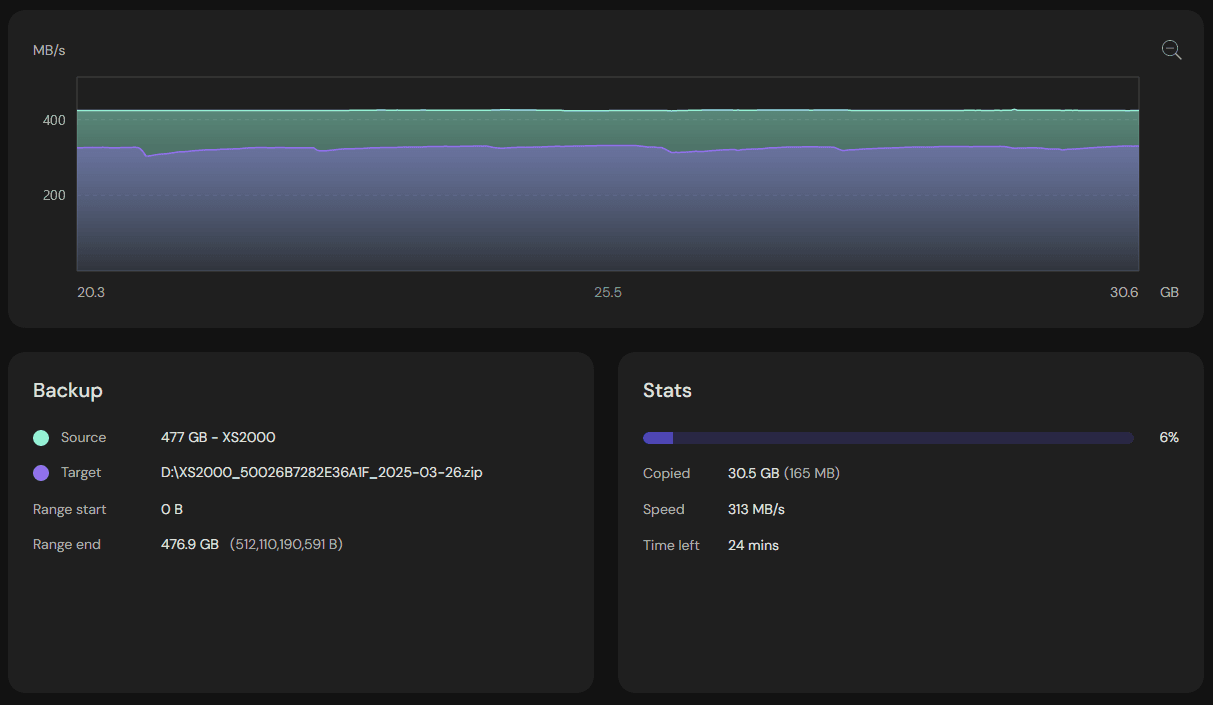
Benchmark example (our lab)
- Scenario: 1TB NVMe SSD (source) to SATA SSD (target), RAW format
- Result: ~28 minutes
- Environment: Windows 11 Pro 25H2, Intel Core i7, 32GB RAM
Method 1: Full system drive backup with MultiDrive (WinPE)
This method covers backing up your system drive itself – the one Windows is actively running from.
For what MultiDrive does well, which backup format to choose, and how long to expect the process to take, see the previous chapter. This section picks up directly with the steps specific to a system drive.
WinPE stands for Windows Preinstallation Environment. It is a lightweight version of Windows designed to boot and run entirely from a USB flash drive or optical disc. It was originally created by Microsoft to deploy new Windows installations and troubleshoot PCs.
Why WinPE? Windows constantly writes to the system disk while it's running (background services, page file updates, logs), so a live, sector-level image of that drive can end up inconsistent, or fail to restore into a working system. WinPE offers a reliable way to image your system drive by booting from a USB drive and running MultiDrive, while Windows itself is completely stopped.
Stage 1: Create the MultiDrive WinPE USB
For this stage, in addition to your external drive, you will need a blank USB flash drive that is 2 GB or larger. Make sure it is empty or back up its data, because the flash drive will be completely erased in the process.
- Download the MultiDrive WinPE bootable image (available as a ZIP or an ISO version).
- Download and install MultiDrive itself.
- Create the bootable USB:
- If you downloaded the ZIP: open MultiDrive (on your normal, working PC), go to Restore, select the WinPE ZIP file as the Source and your blank USB flash drive as the Target, then click Restore.
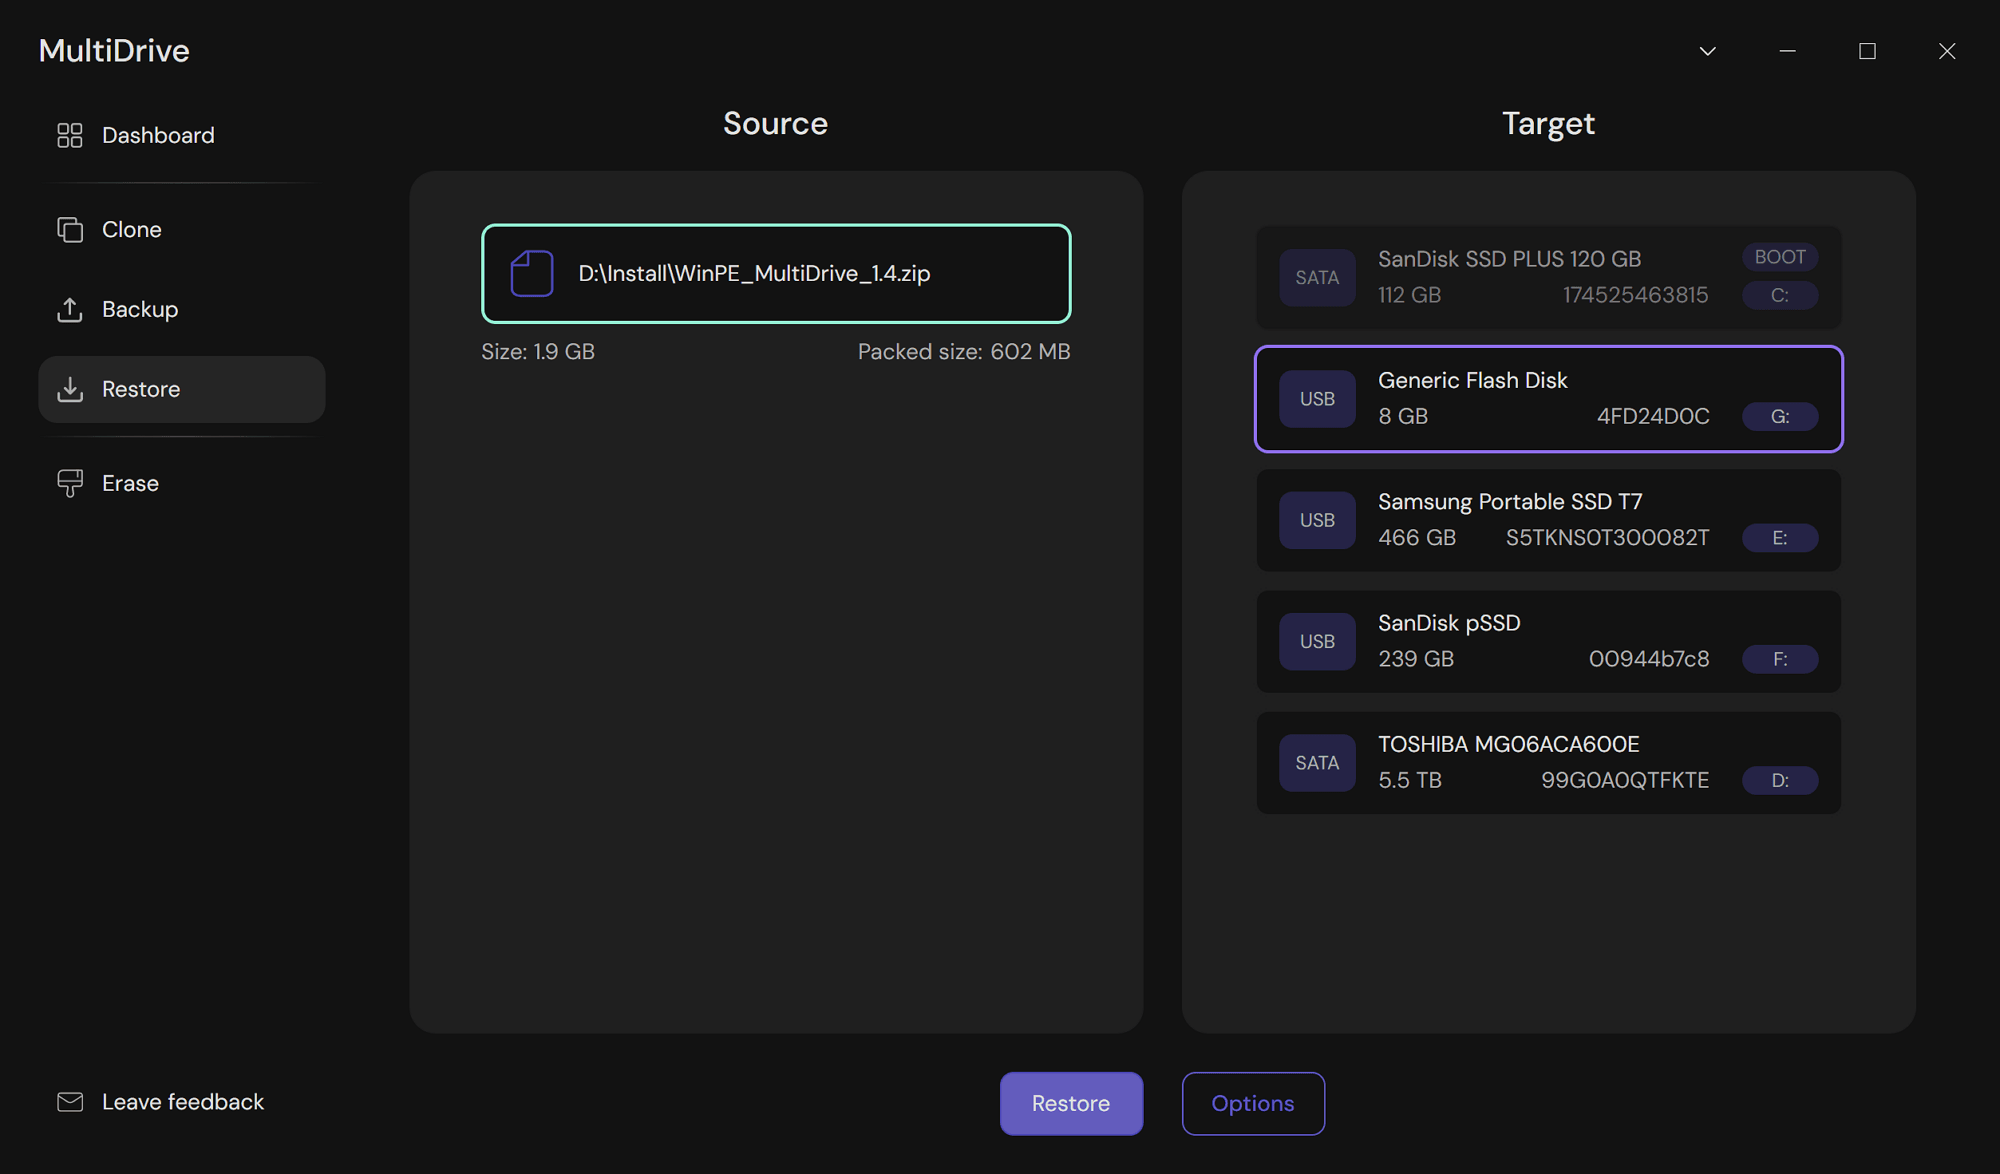
- If you downloaded the ISO: flash it onto the USB drive using a tool like Rufus or Ventoy.
Stage 2: Boot from the USB drive
- Plug the WinPE USB into the PC you want to back up.
- Restart the PC.
- As it boots, press the key that opens your PC's boot menu or BIOS/UEFI settings (usually F8, F12, Del, or Esc, depending on your motherboard manufacturer).
- Select the WinPE USB drive to boot. If the PC refuses to boot from it, you may need to temporarily disable Secure Boot in your BIOS/UEFI settings.
- Your PC boots into WinPE, and MultiDrive launches automatically.
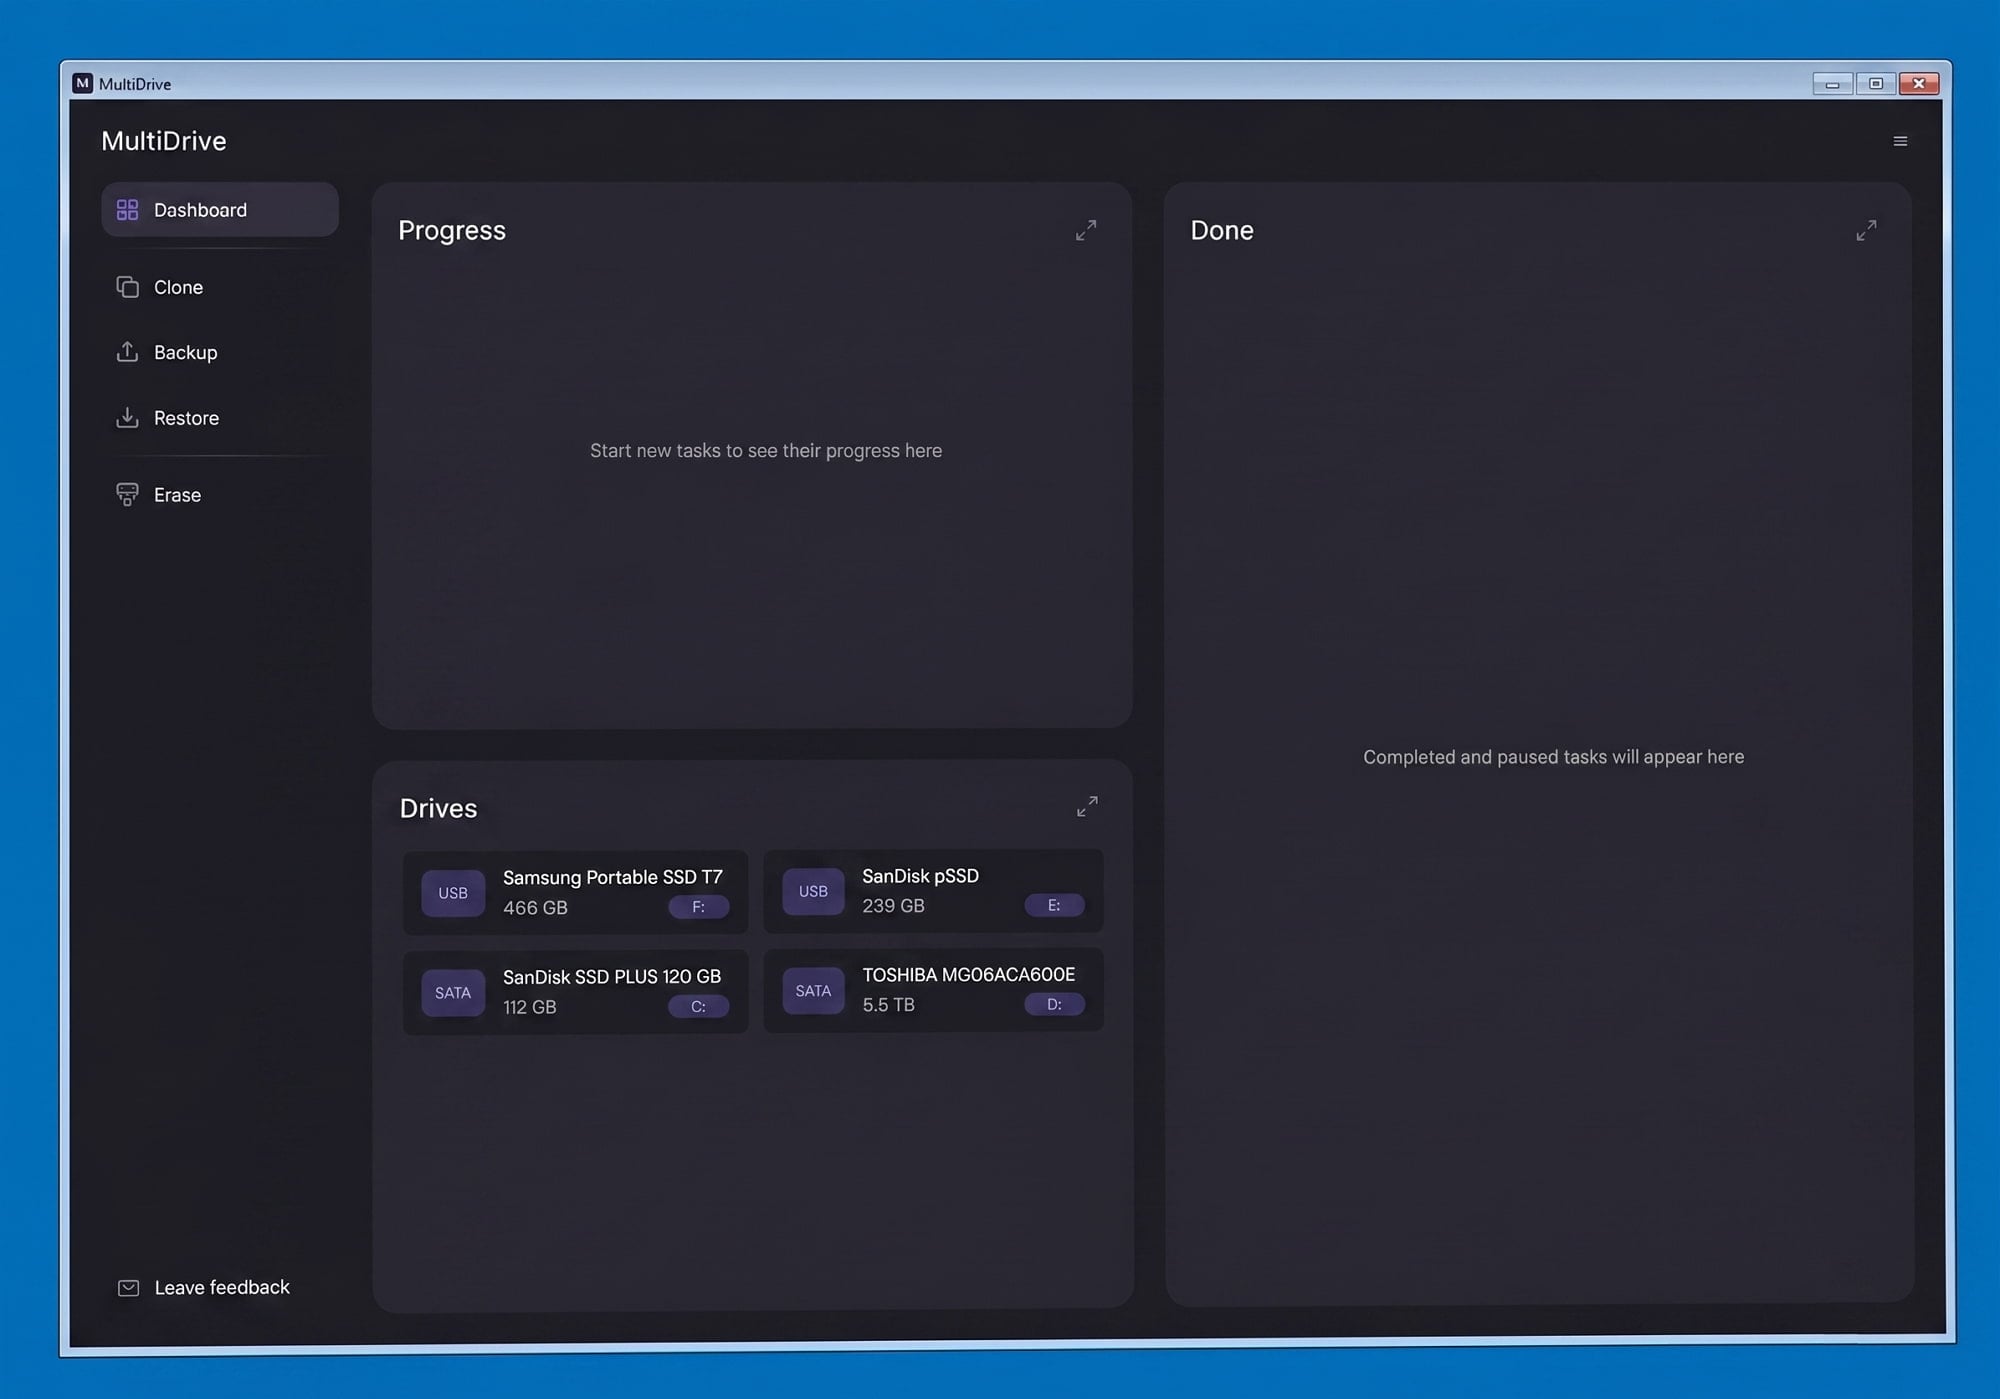
Stage 3: Back up your system drive
- Connect your external hard drive, where you want to store backups, to the PC. Make sure the drive has a suitable file system and enough free space.
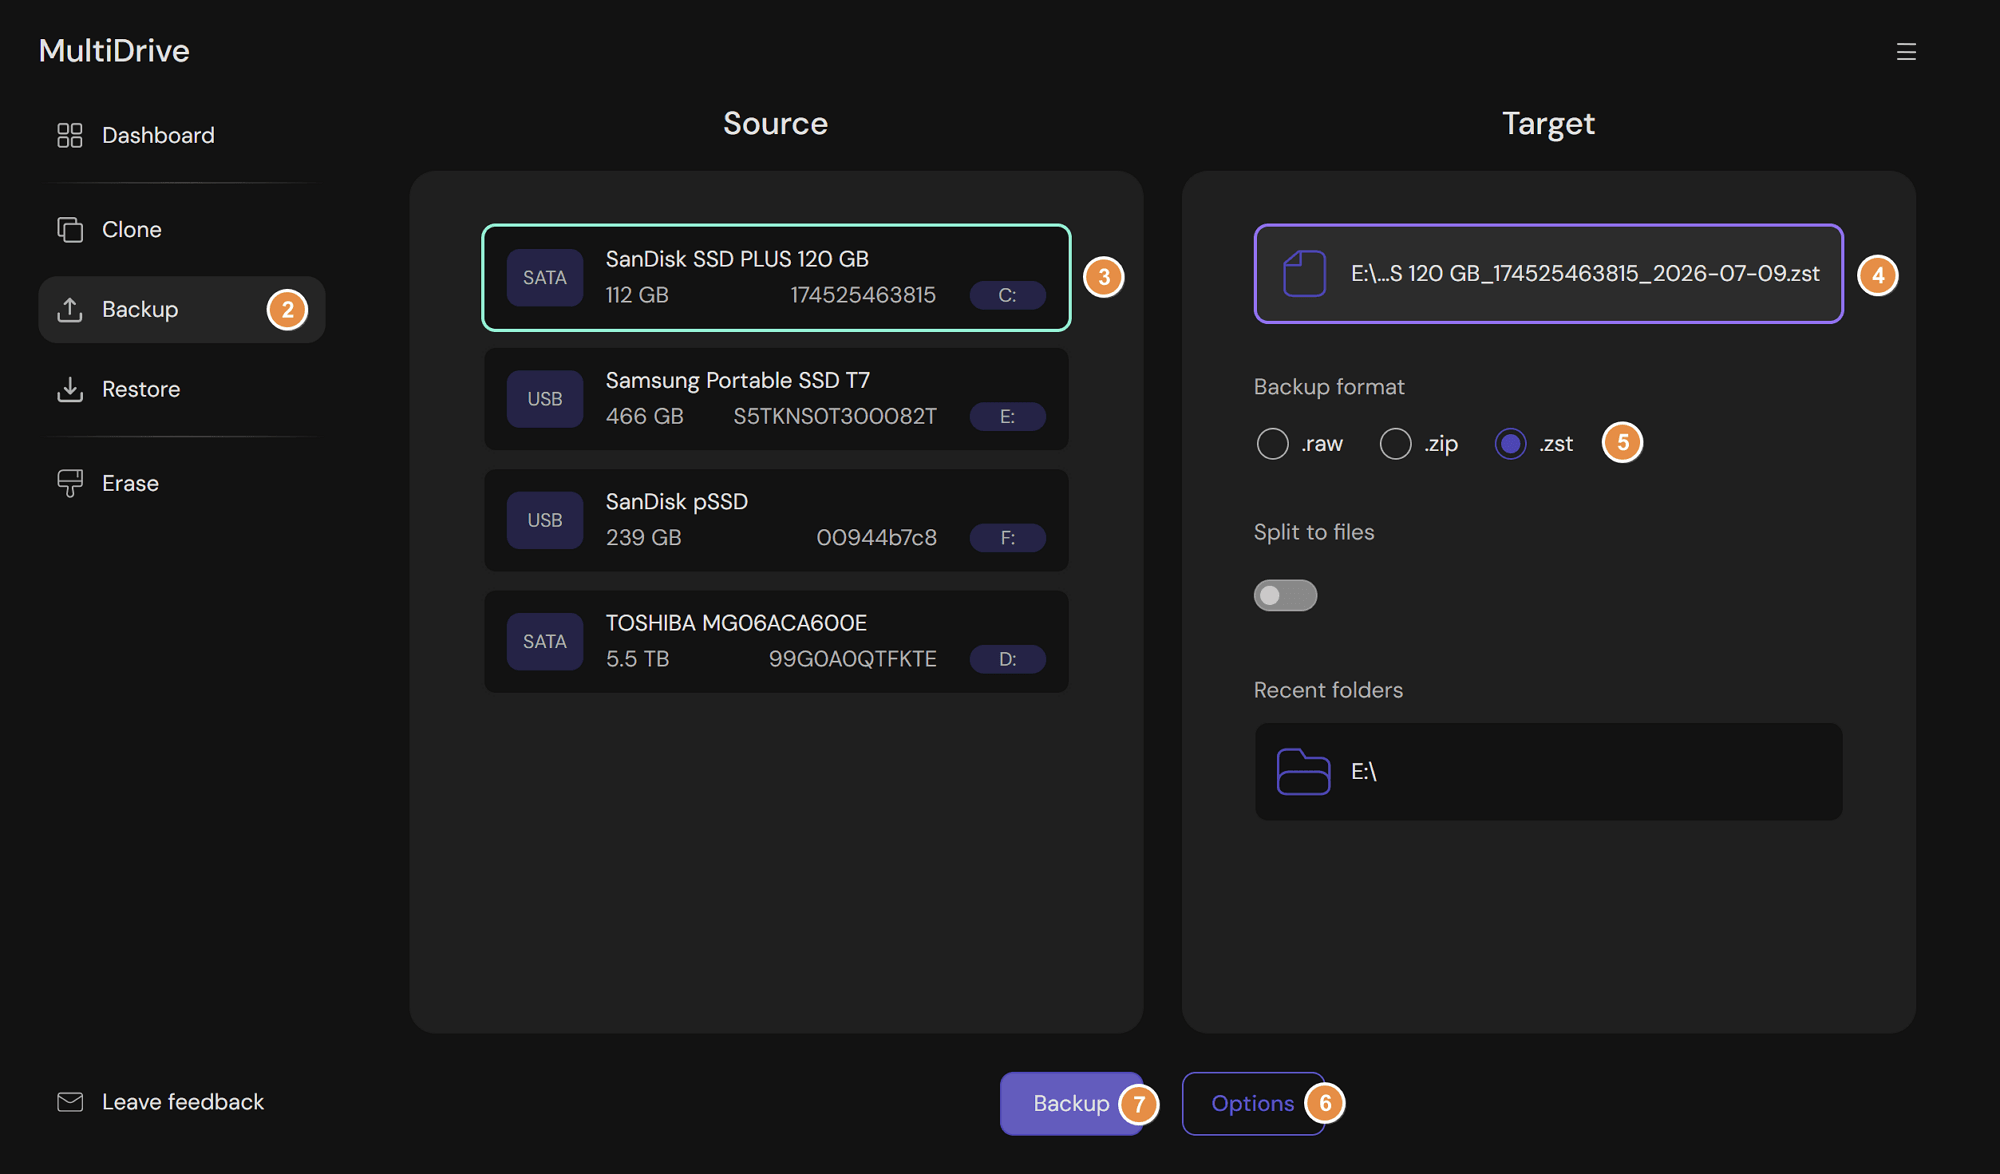
- In MultiDrive, go to Backup.
- Select your system drive as a Source.
- Select your external drive as a Target.
- Select the format of the resulting backup file: RAW, ZIP, or ZSTD.
- Optional: Click Options to enable hash verification (for example, SHA256), which generates a checksum of the backed-up data so you can confirm nothing was corrupted during the operation.
- Click the Backup button.
- MultiDrive starts the backup process and shows you the progress and the time estimate.
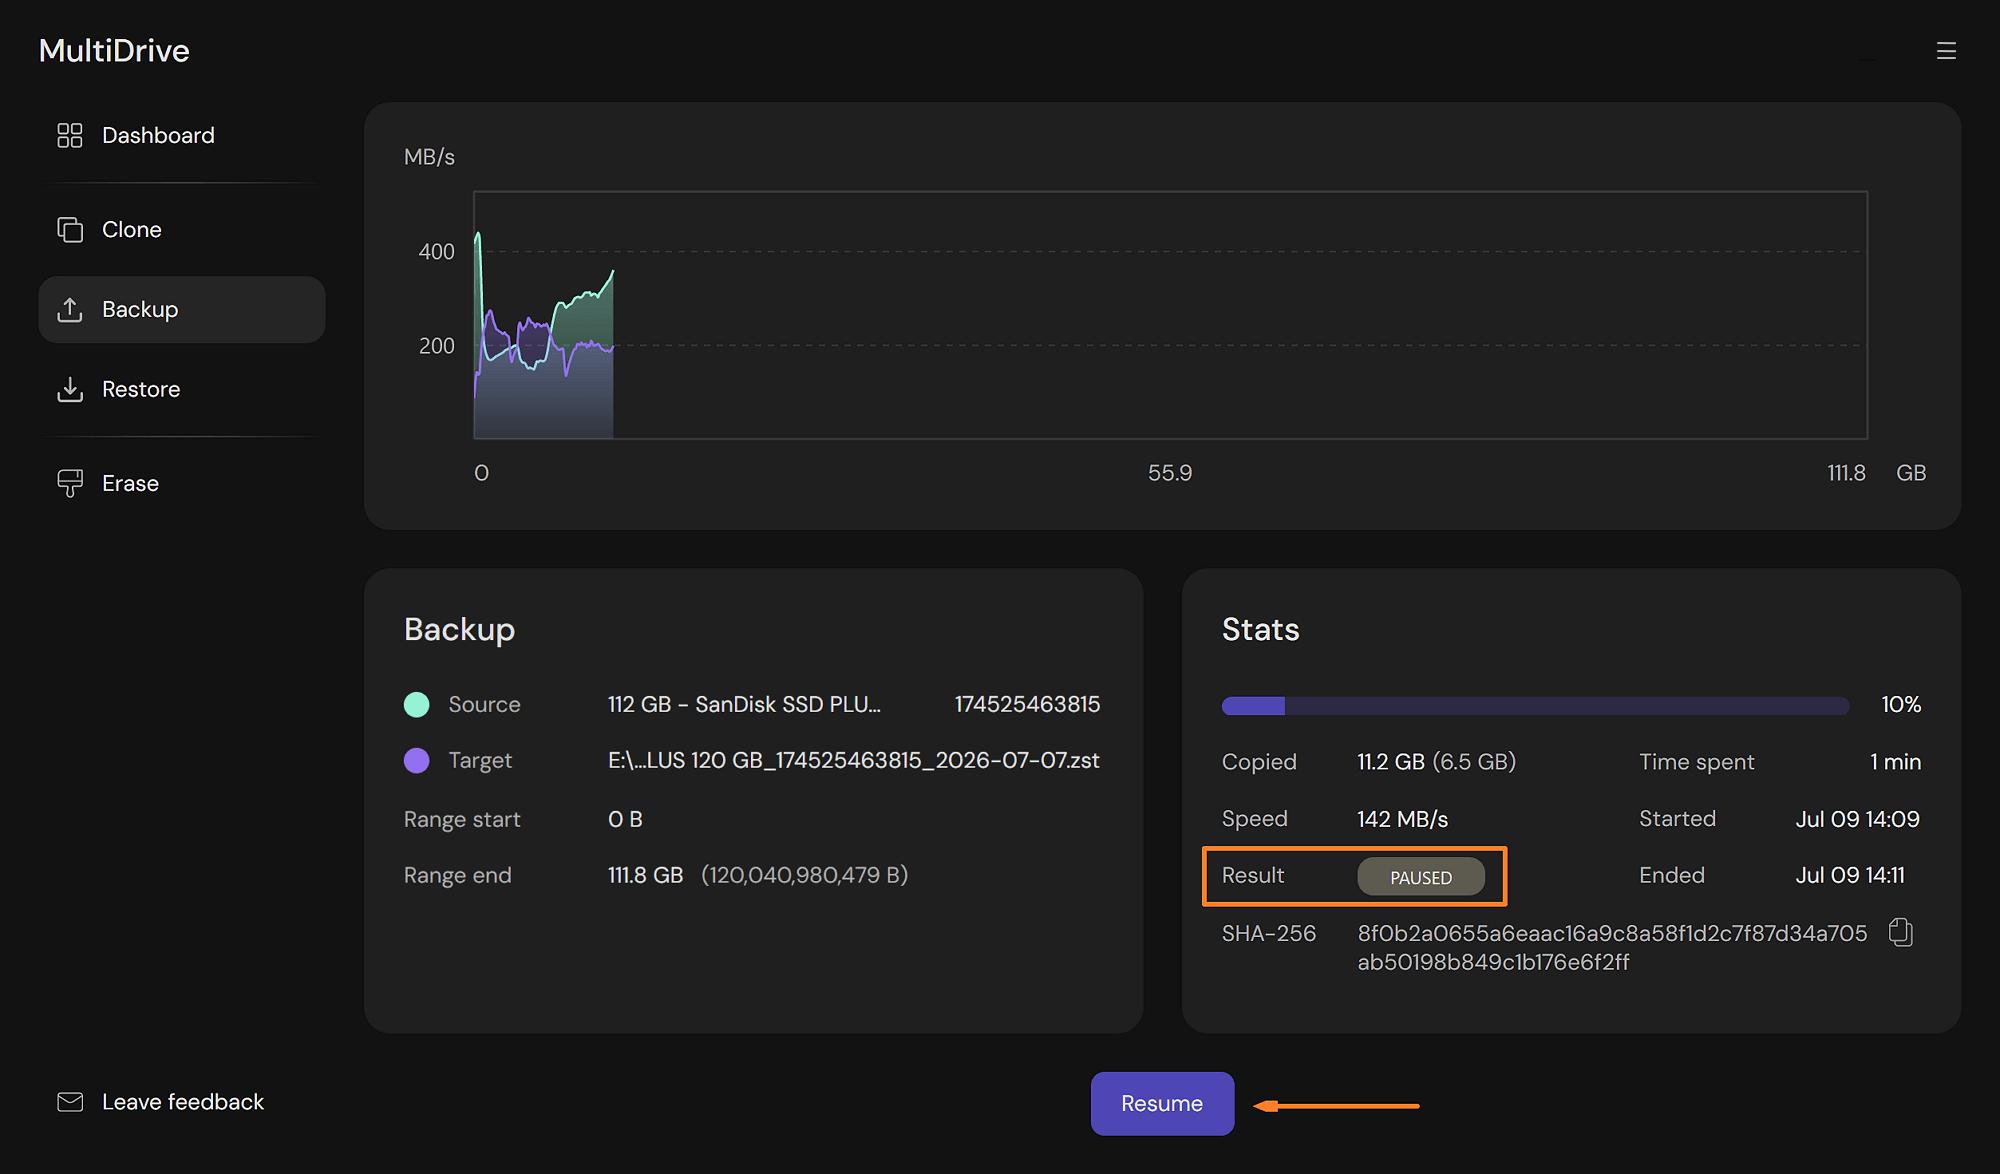
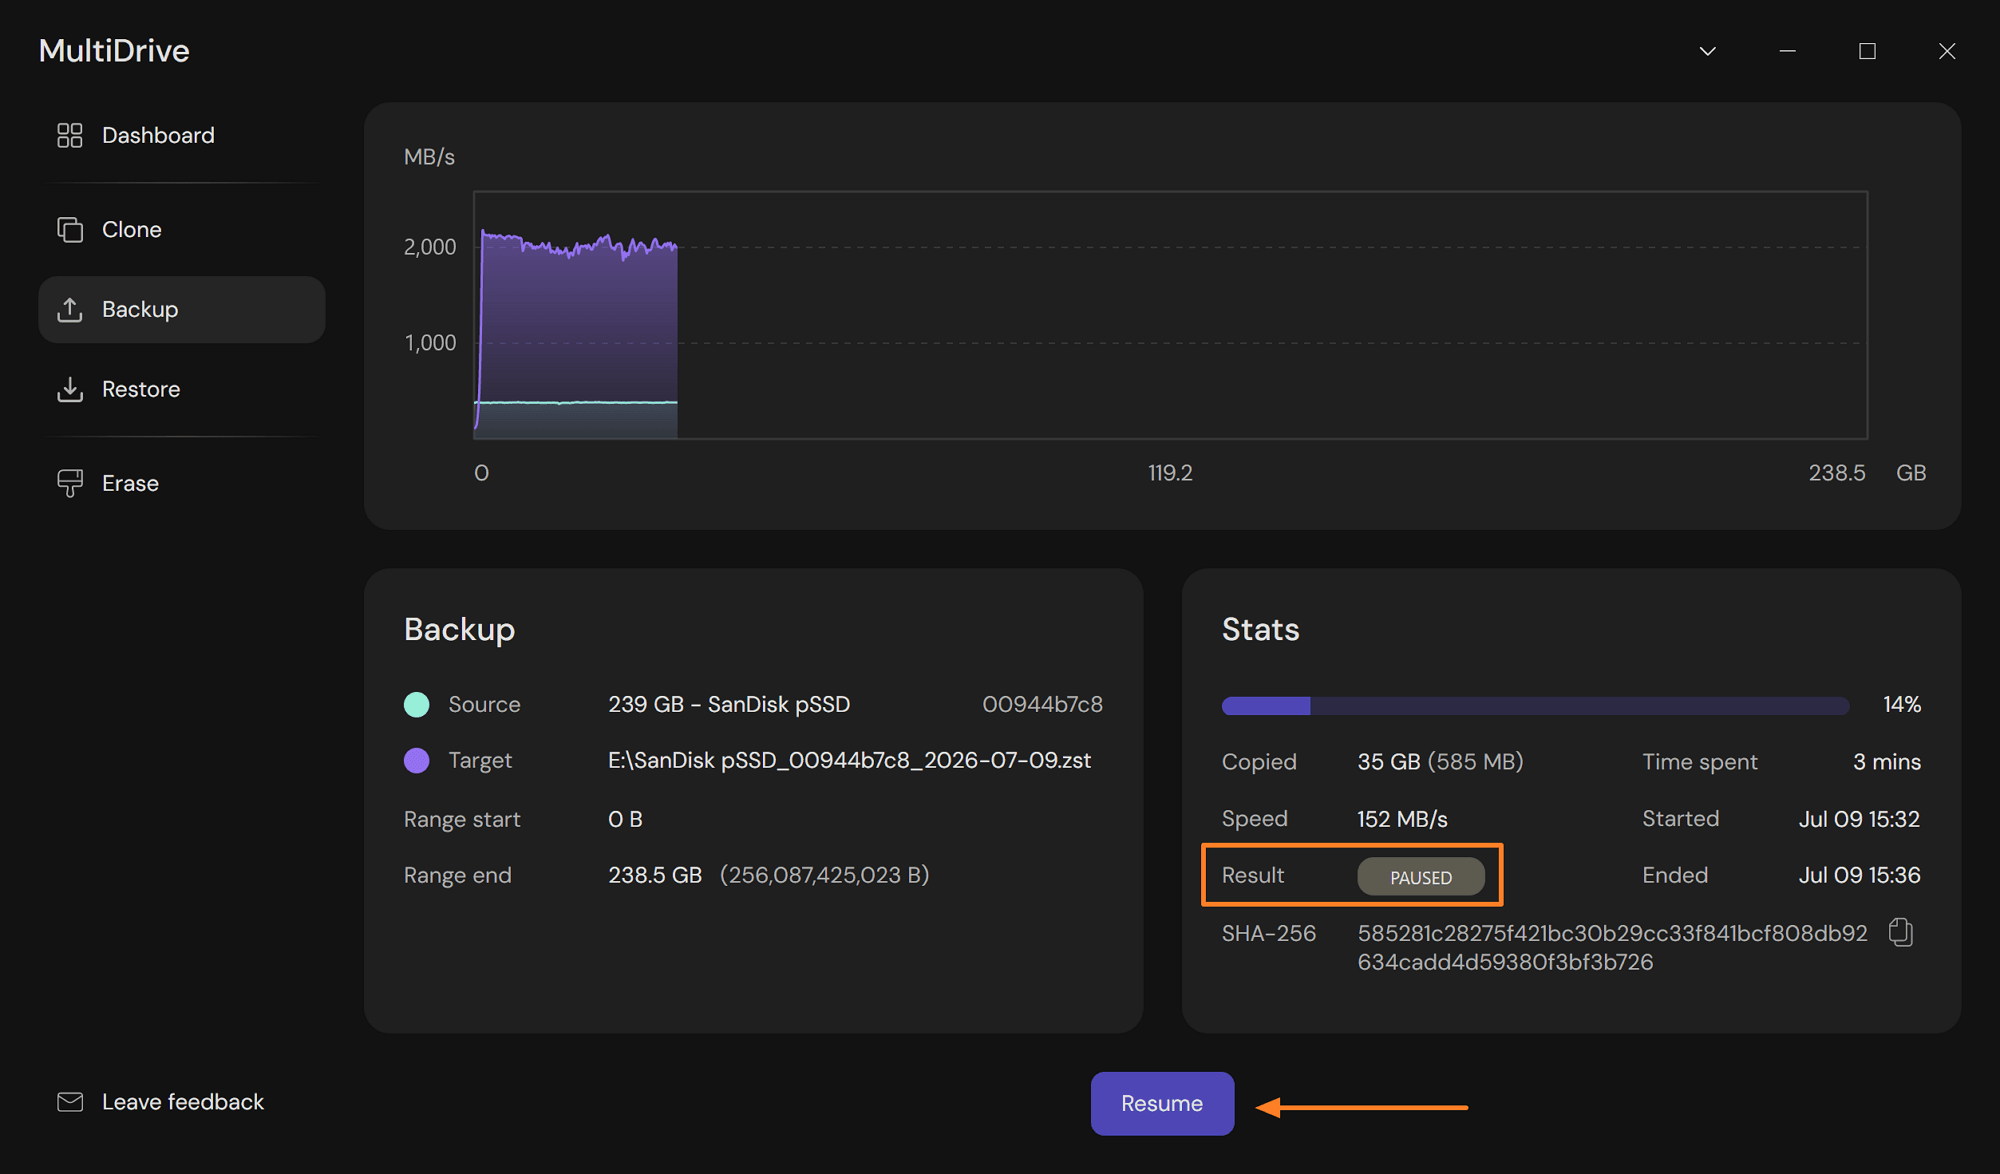
- Optional: Pause the backup at any point and then resume it without losing progress:
- On the backup screen, click the Pause button.
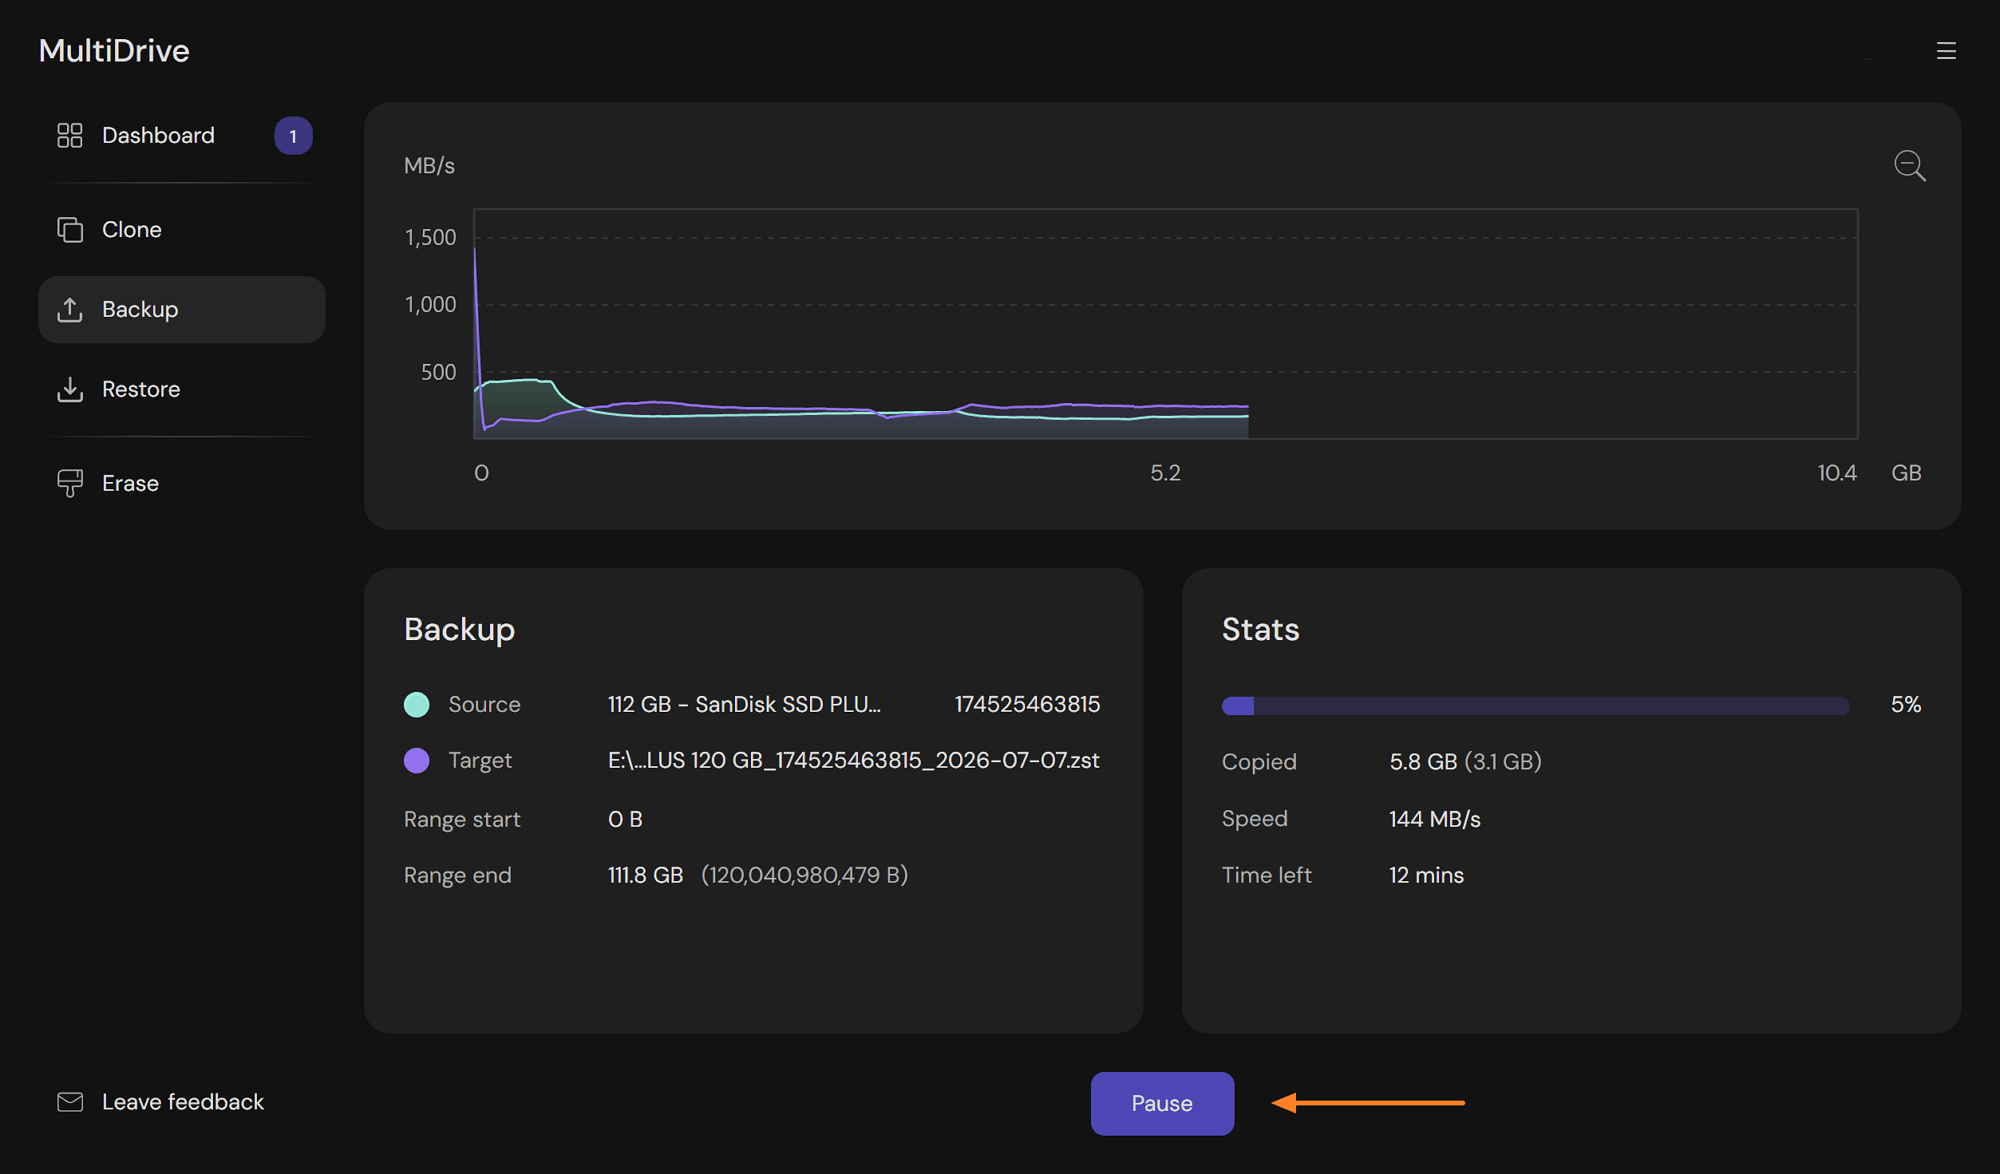
- On the Dashboard, select the paused task and click Resume.
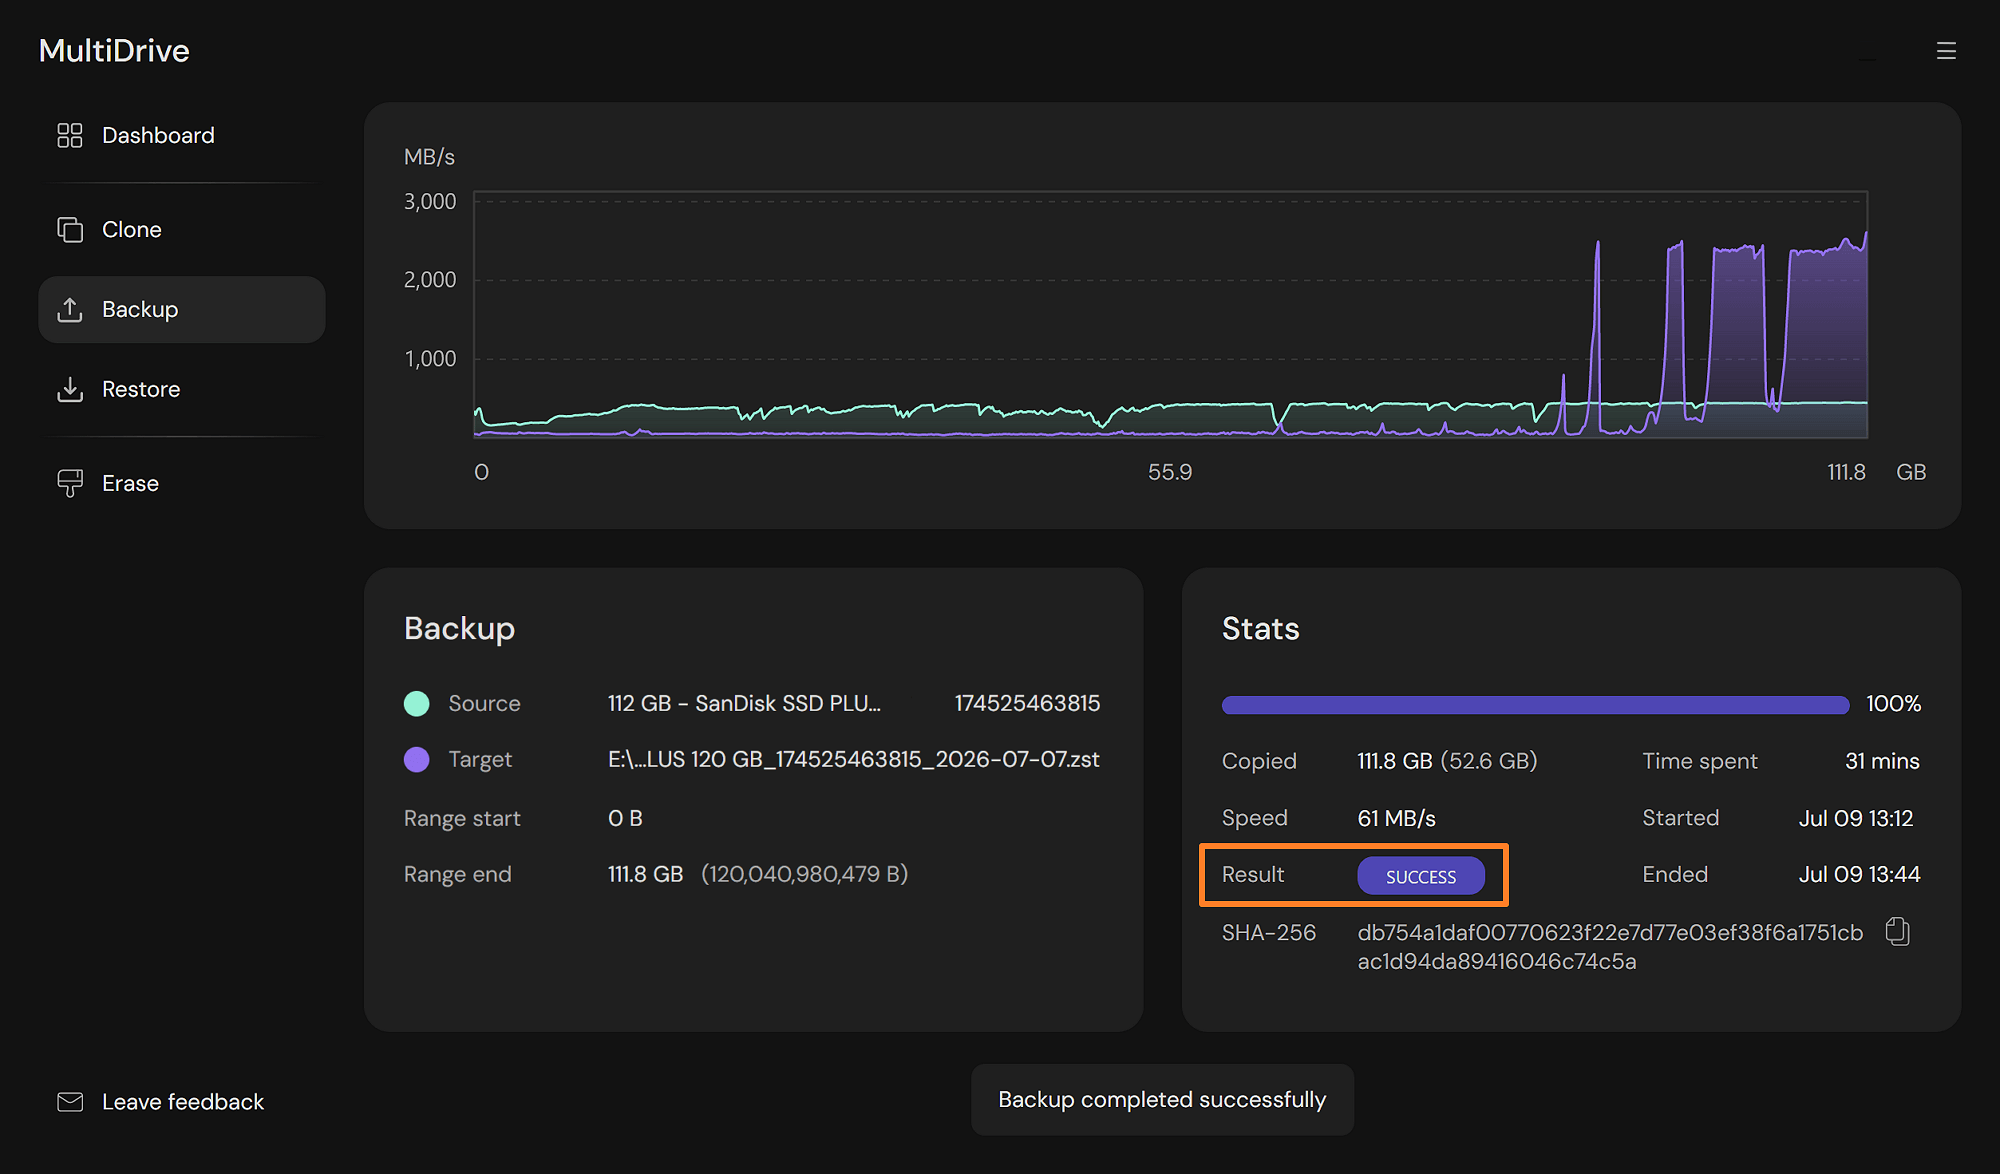
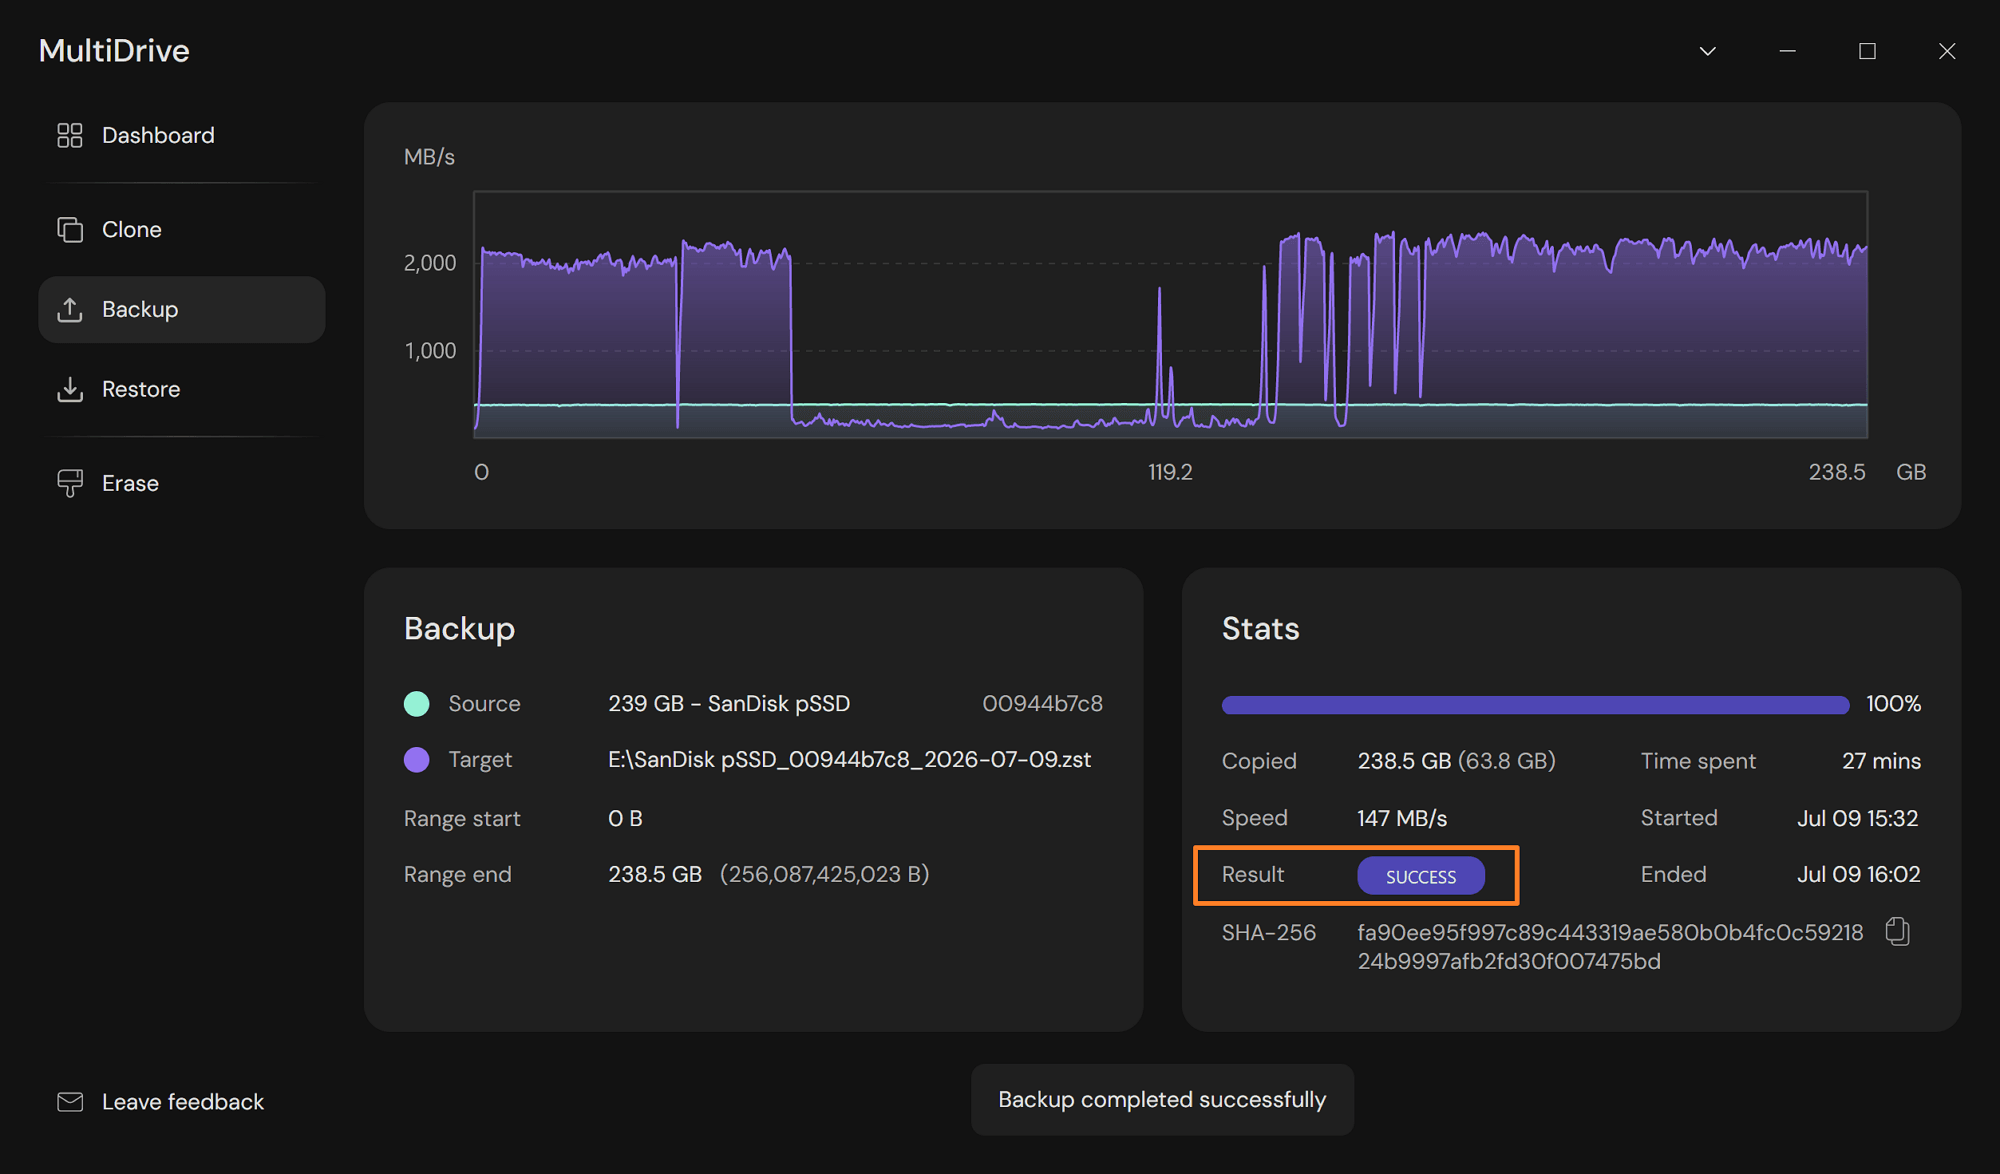
- When the backup progress reaches 100%, MultiDrive displays the Success badge on the Backup screen. If you enabled hash verification, MultiDrive displays the hash value that you can copy.
Stage 4: After the backup
- Once MultiDrive shows the task as complete, power off your PC and disconnect the WinPE USB.
- Power the PC back on. It will boot normally into Windows.
- In File Explorer, confirm the backup file is on your external drive.
- Safely eject your external hard drive:
- Click the USB icon in the system tray (bottom right of the screen).
- Select Eject [Your Drive Name] and wait for the confirmation message.
- After the confirmation, unplug the drive safely.
- Store the external drive in a safe place.
Restore a system drive from a backup with MultiDrive
- Connect your external drive with backups.
- Plug the WinPE USB into the PC.
- Restart the PC.
- As it boots, press the key that opens your PC's boot menu or BIOS/UEFI settings (usually F8, F12, Del, or Esc, depending on your motherboard manufacturer).
- Select the WinPE USB drive to boot. If the PC refuses to boot from it, you may need to temporarily disable Secure Boot in your BIOS/UEFI settings.
- Your PC boots into WinPE, and MultiDrive launches automatically.
- Go to Restore.
- Select your backup file on an external drive as a Source.
- Select your system drive as a Target. Double-check the selection, as the Target will be completely overwritten with the contents of the Source file.
- Click the Restore button.
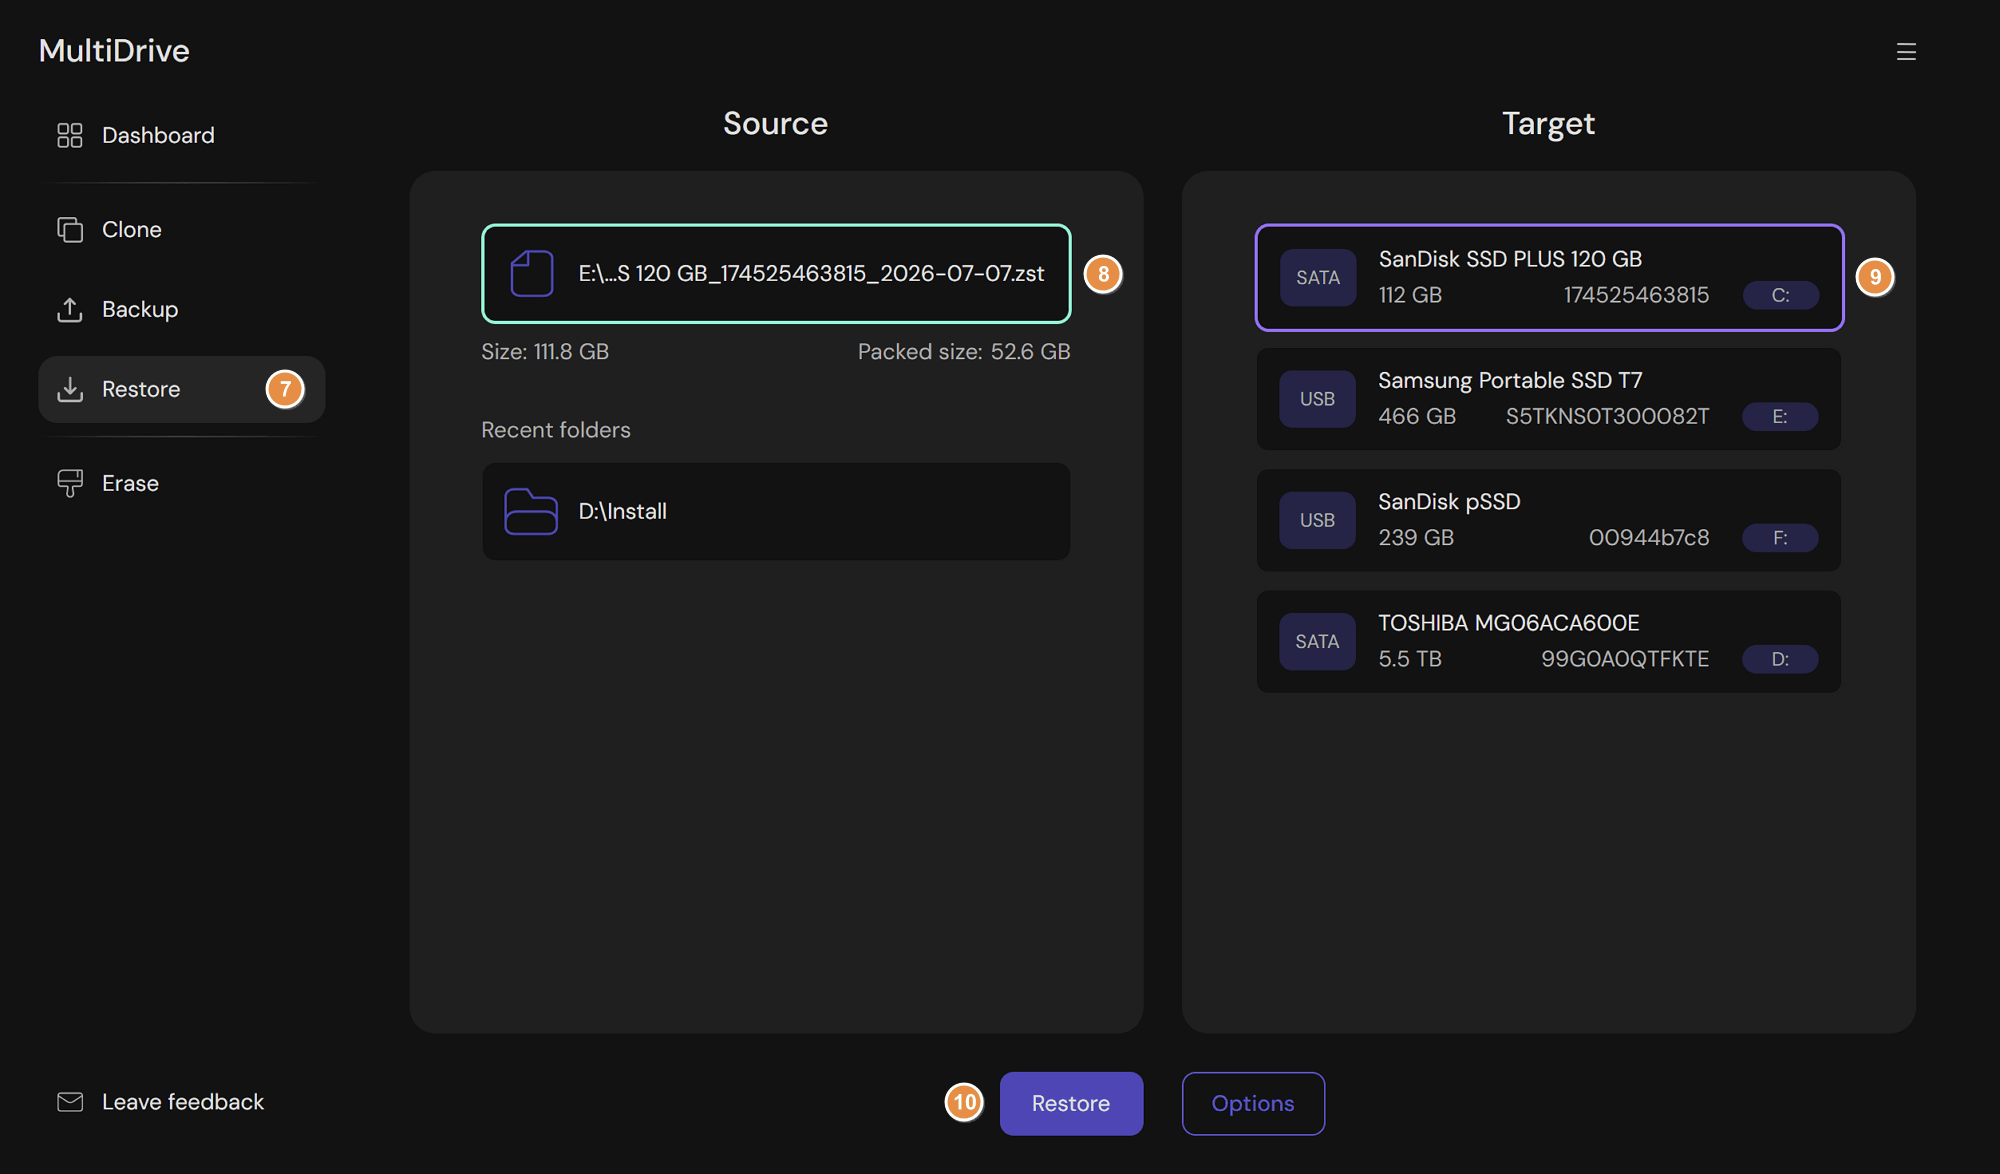
- When the restore progress reaches 100%, MultiDrive displays the Success badge on the Restore screen.
- Once MultiDrive shows the task as complete, power off your PC and disconnect the WinPE USB.
- Power the PC back on. It will boot normally into Windows.
If the restored system drive won't boot, check our troubleshooting guide.
Method 2: Full backup of a secondary data drive with MultiDrive
Best for: a data or storage drive that isn't your running Windows disk.
No bootable USB needed for this method.
For what MultiDrive does well, which backup format to choose, and how long to expect the process to take, see the previous chapter.
To create a full backup of a secondary data drive, follow these steps:
- Connect your external hard drive, where you want to store backups, to the PC. Make sure the drive has a suitable file system and enough free space.
- Download and install MultiDrive.
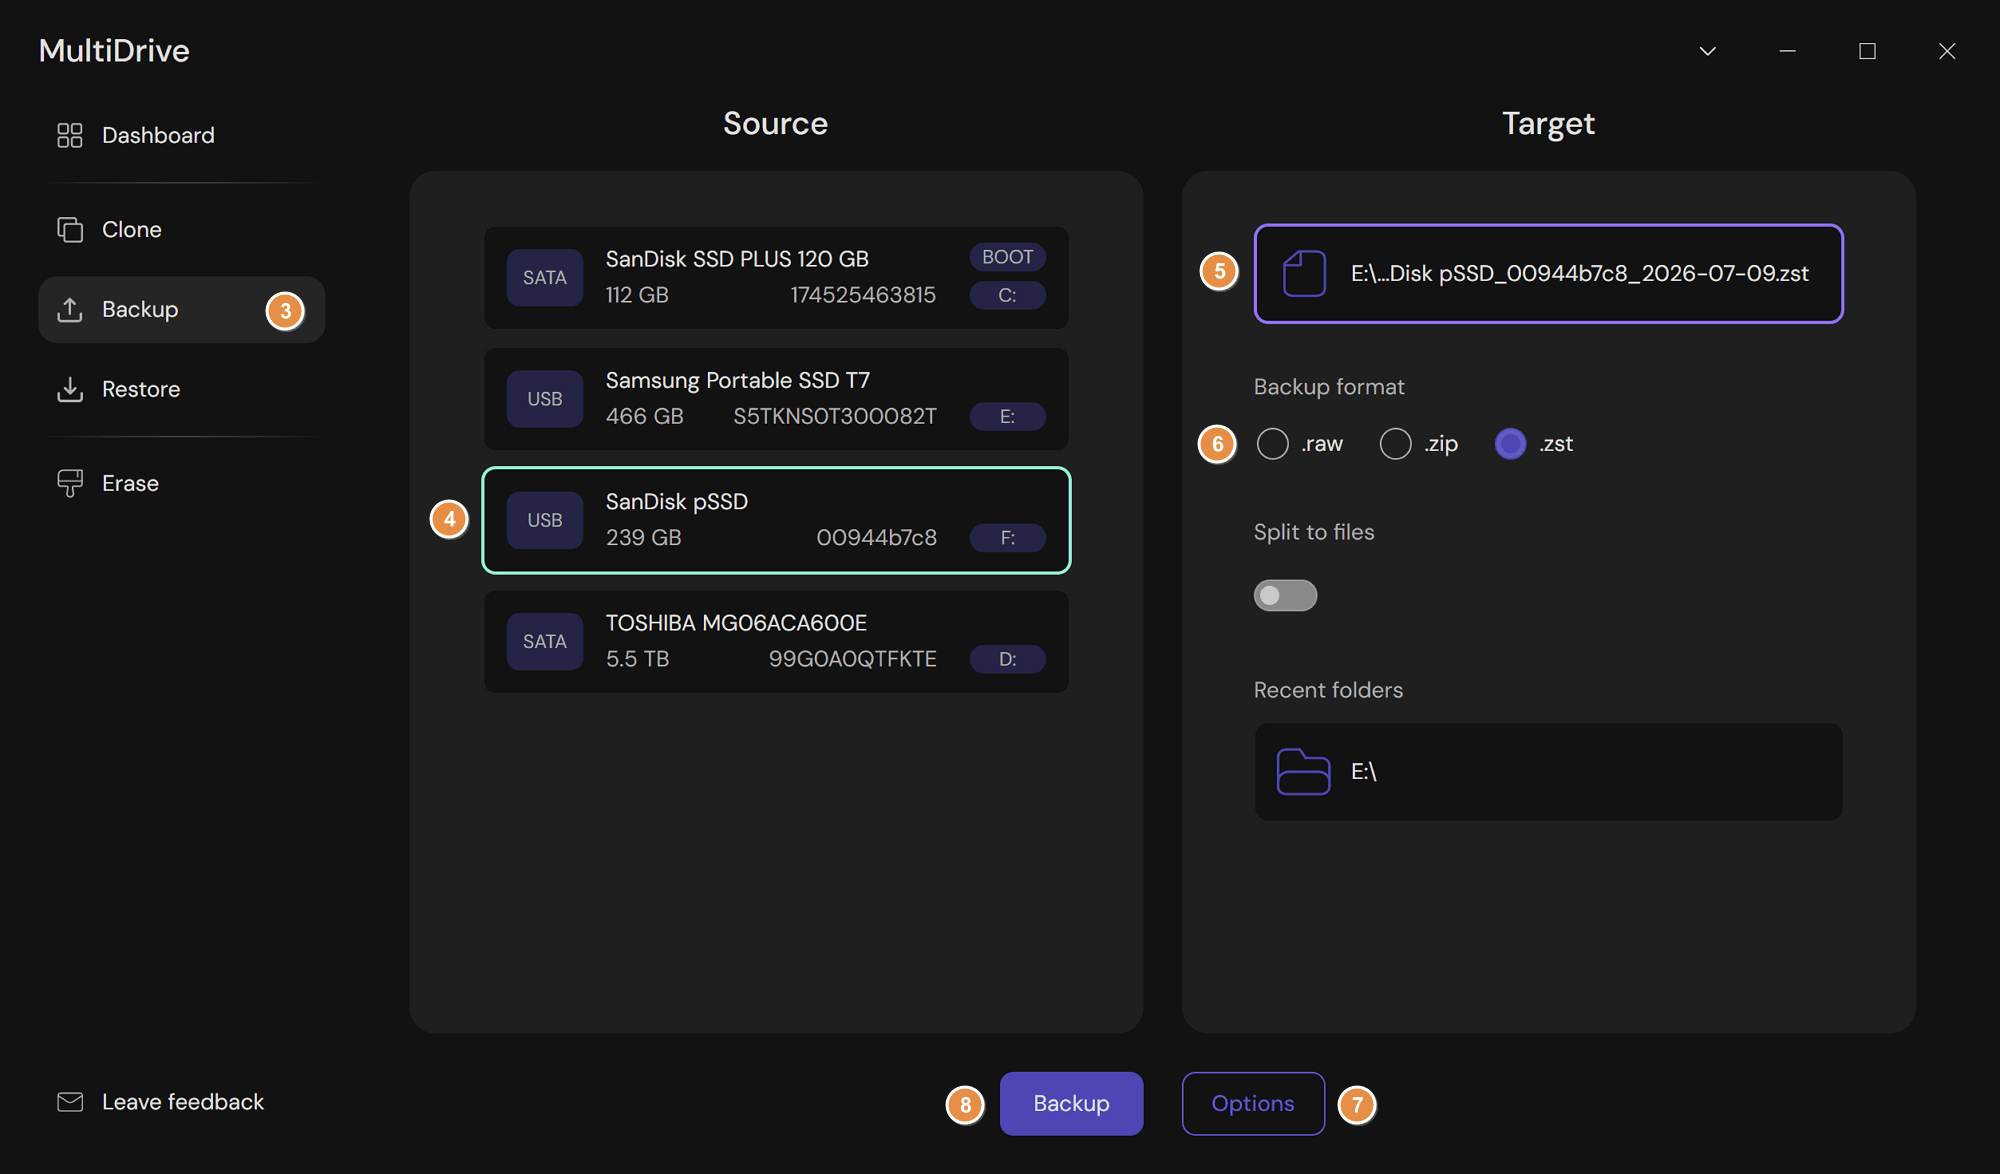
- Launch MultiDrive and go to Backup.
- Select your secondary data drive as a Source.
- Select your external drive as a Target.
- Select the format of the resulting backup file: RAW, ZIP, or ZSTD.
- Optional: Click Options to enable hash verification (for example, SHA256), which generates a checksum of the backed-up data so you can confirm nothing was corrupted during the operation.
- Click the Backup button.
- MultiDrive starts the backup process and shows you the progress and the time estimate.
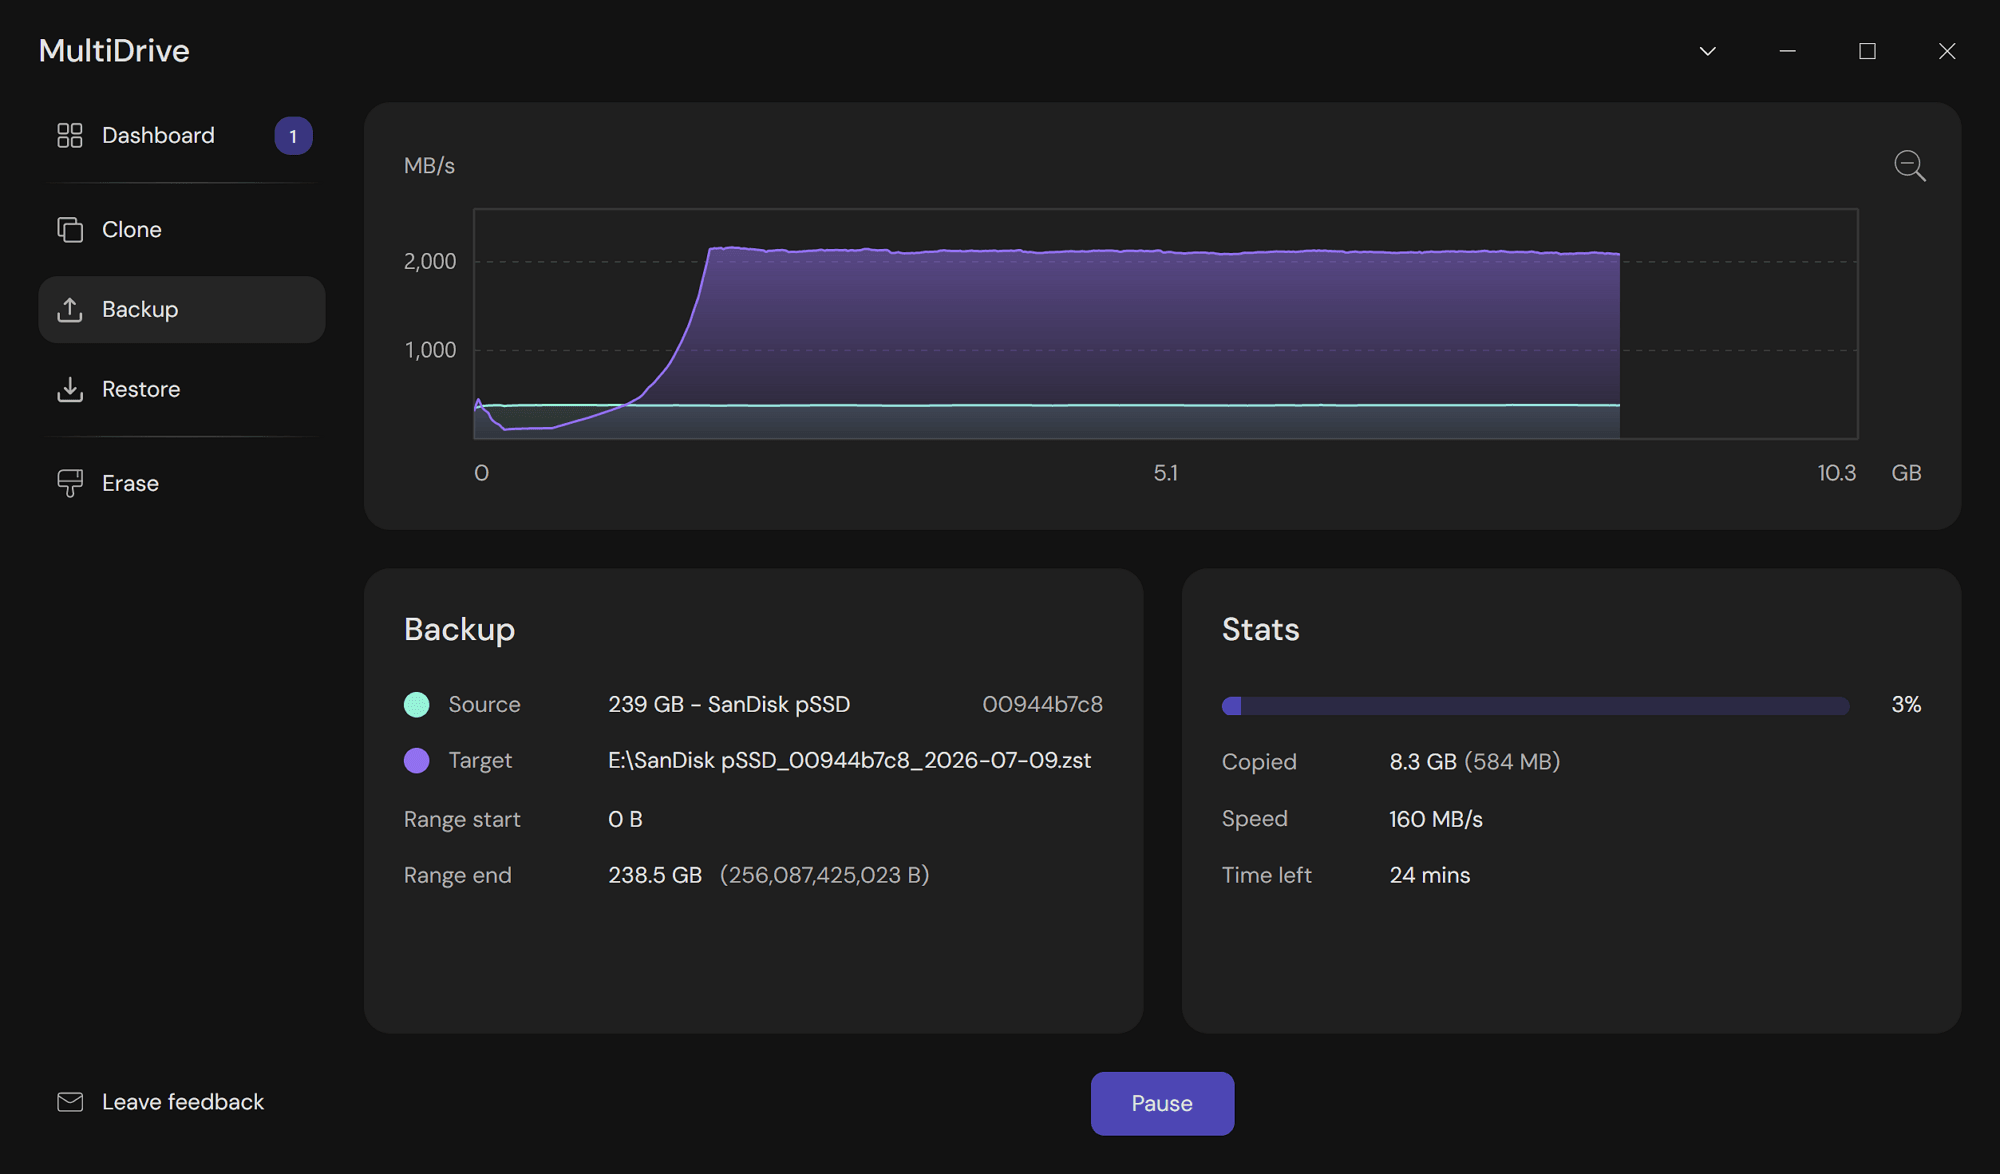
- Optional: Pause the backup at any point and then resume it without losing progress:
- On the backup screen, click the Pause button.
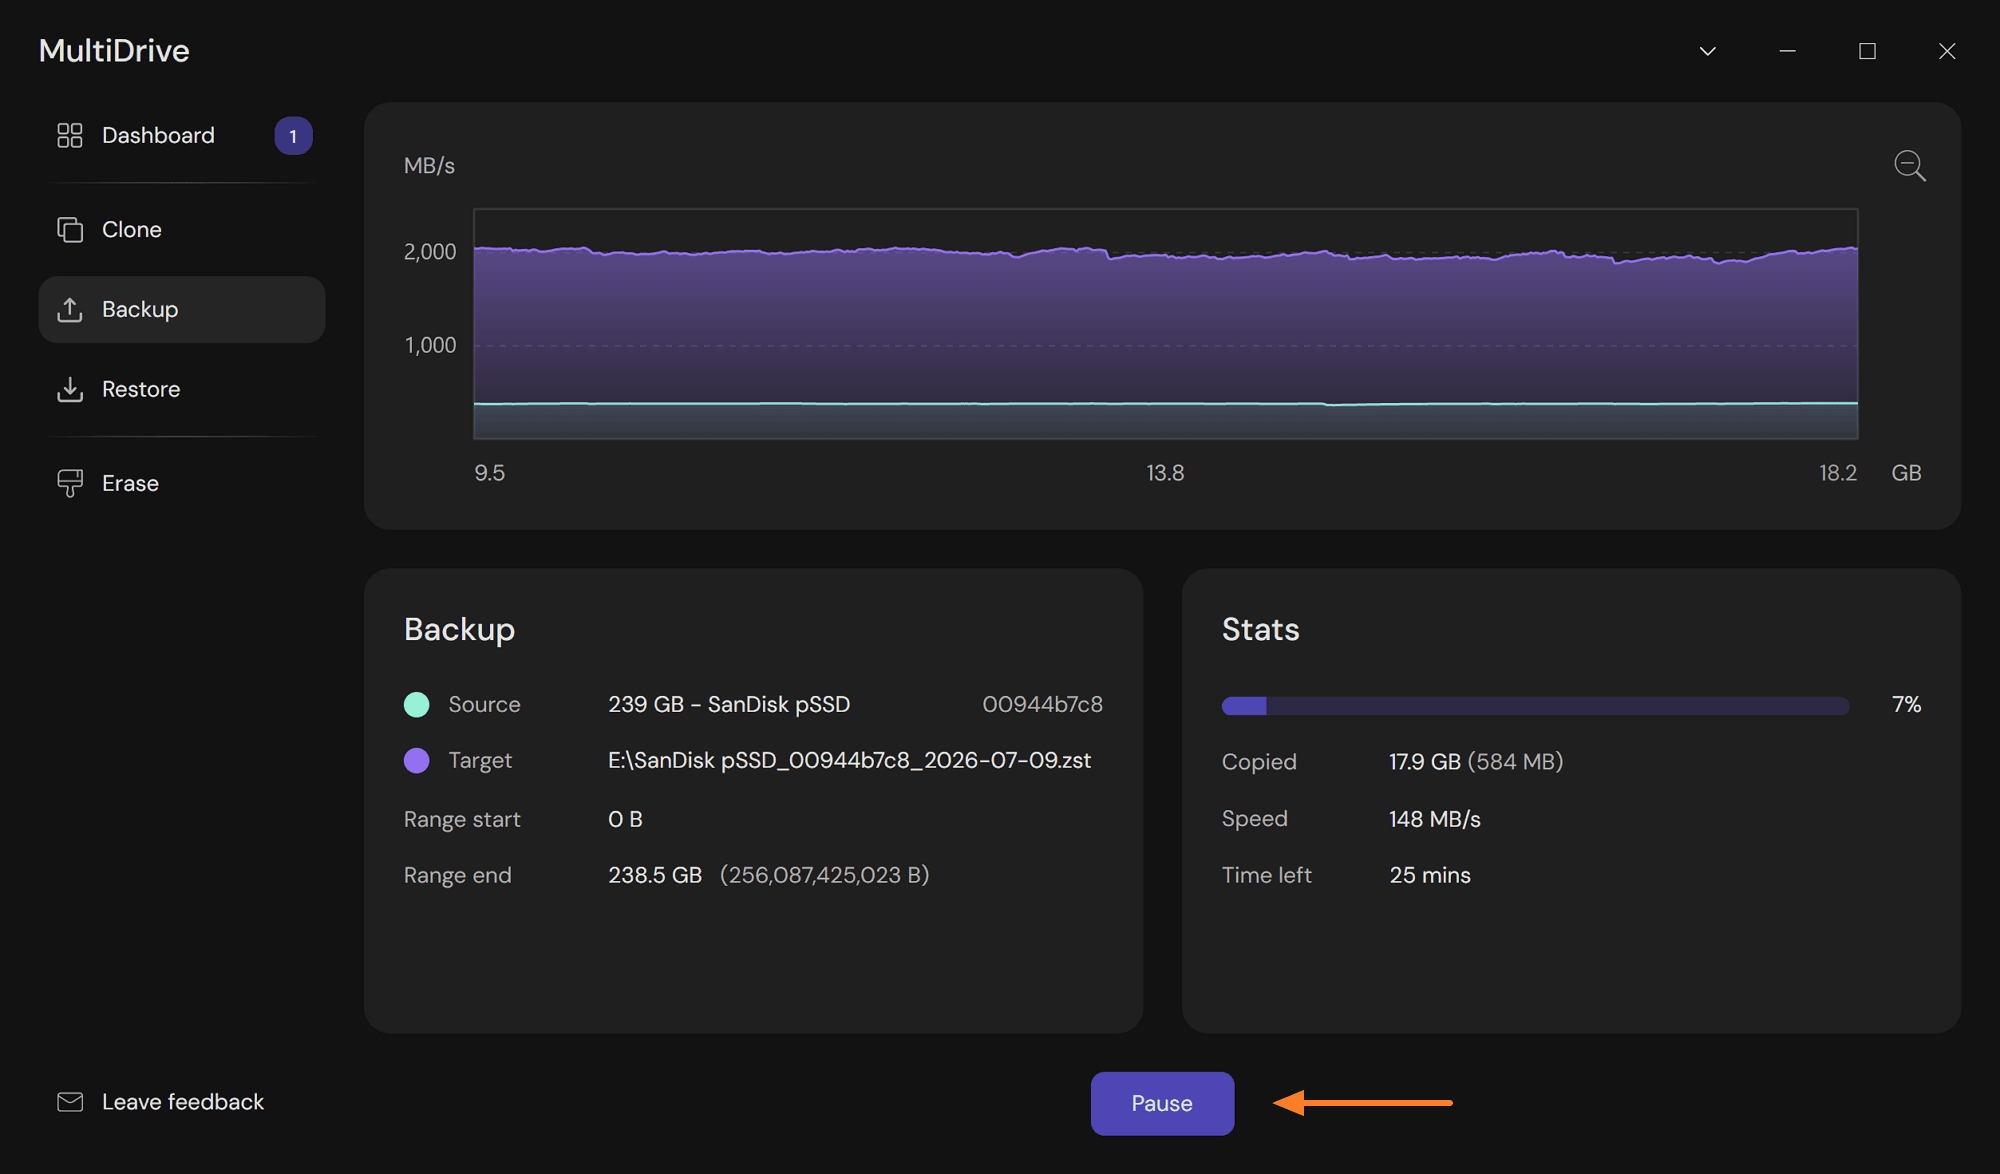
- On the Dashboard, select the paused task and click Resume.
- When the backup progress reaches 100%, MultiDrive displays the Success badge on the Backup screen. If you enabled hash verification, MultiDrive displays the hash value that you can copy.
- In File Explorer, confirm the backup file is on your external drive.
- Safely eject your external hard drive.
- Store the external drive in a safe place.
Restore a secondary data drive from a backup with MultiDrive
- Connect your external drive with backups.
- In Windows, run MultiDrive and go to Restore.
- Select your backup file as a Source.
- Select your secondary drive as a Target. Double-check the selection, as the Target will be completely overwritten with the contents of the Source file.
- Click the Restore button.
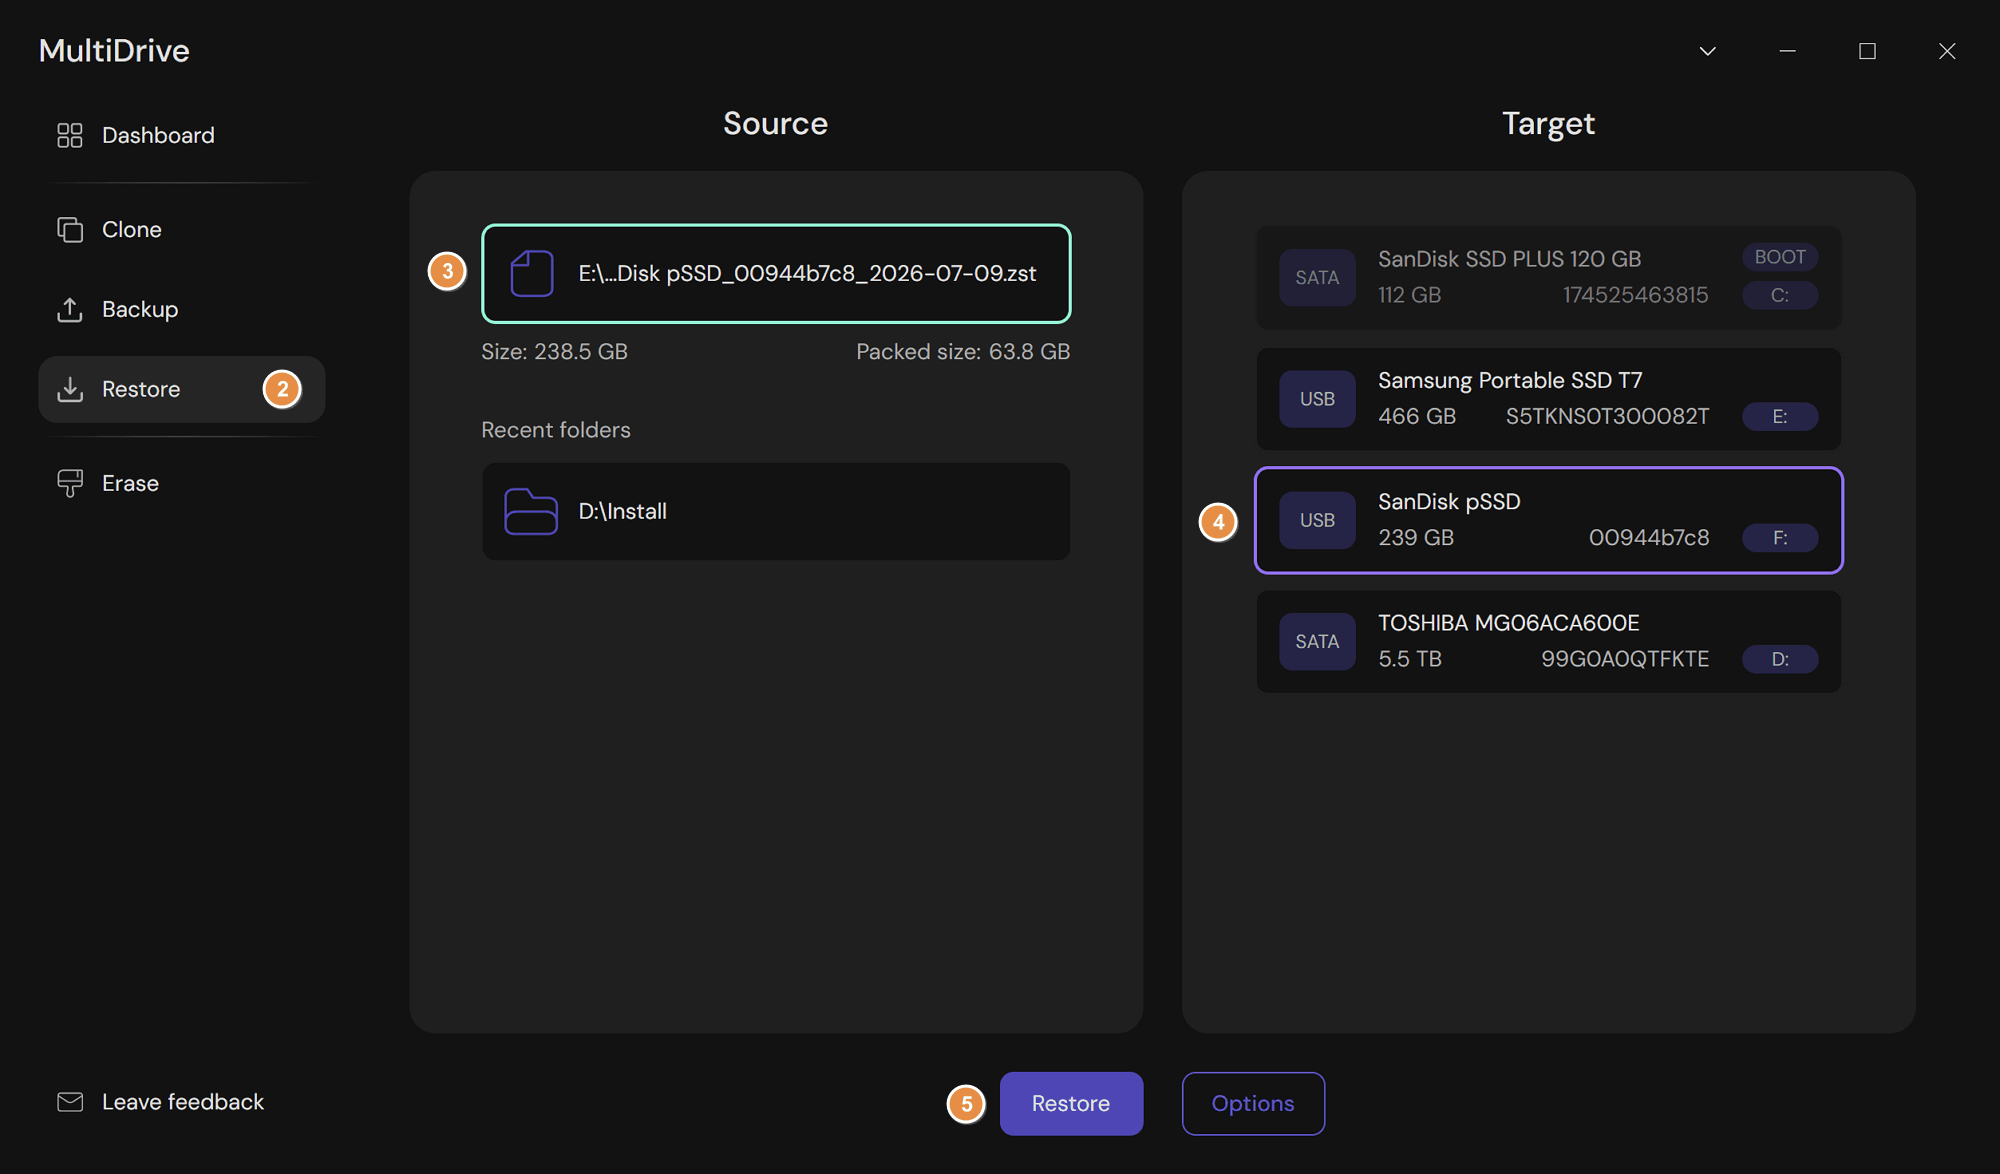
- When the restore progress reaches 100%, MultiDrive displays the Success badge on the Restore screen.
Method 3: Full drive backup with Windows System Image
Windows has a built-in full-system imaging tool called Backup and Restore (Windows 7). It is still available in Windows 10 and 11, but Microsoft officially calls it legacy and suggests moving your content to a cloud-based backup.
Best for: a full-system image using only the tools already on your PC, no download required.
Pros
- Built into Windows: nothing to download or install.
- Uses Volume Shadow Copy Service (VSS), so it can image your running system drive without needing to boot from separate media first.
- Produces a full-system image, including Windows, apps, settings, and files, that you can restore your whole computer from.
Cons
- Officially deprecated, meaning no updates, bug fixes, or compatibility guarantees.
- Requires an NTFS-formatted destination drive; an exFAT-formatted external drive is not compatible.
- Restore requires you to boot from separate media: Windows Recovery Environment or a recovery USB.
How to create a system image with Windows Backup and Restore
- Connect your external hard drive, where you want to store backups, to the PC. Make sure the drive is formatted to NTFS and has enough free space.
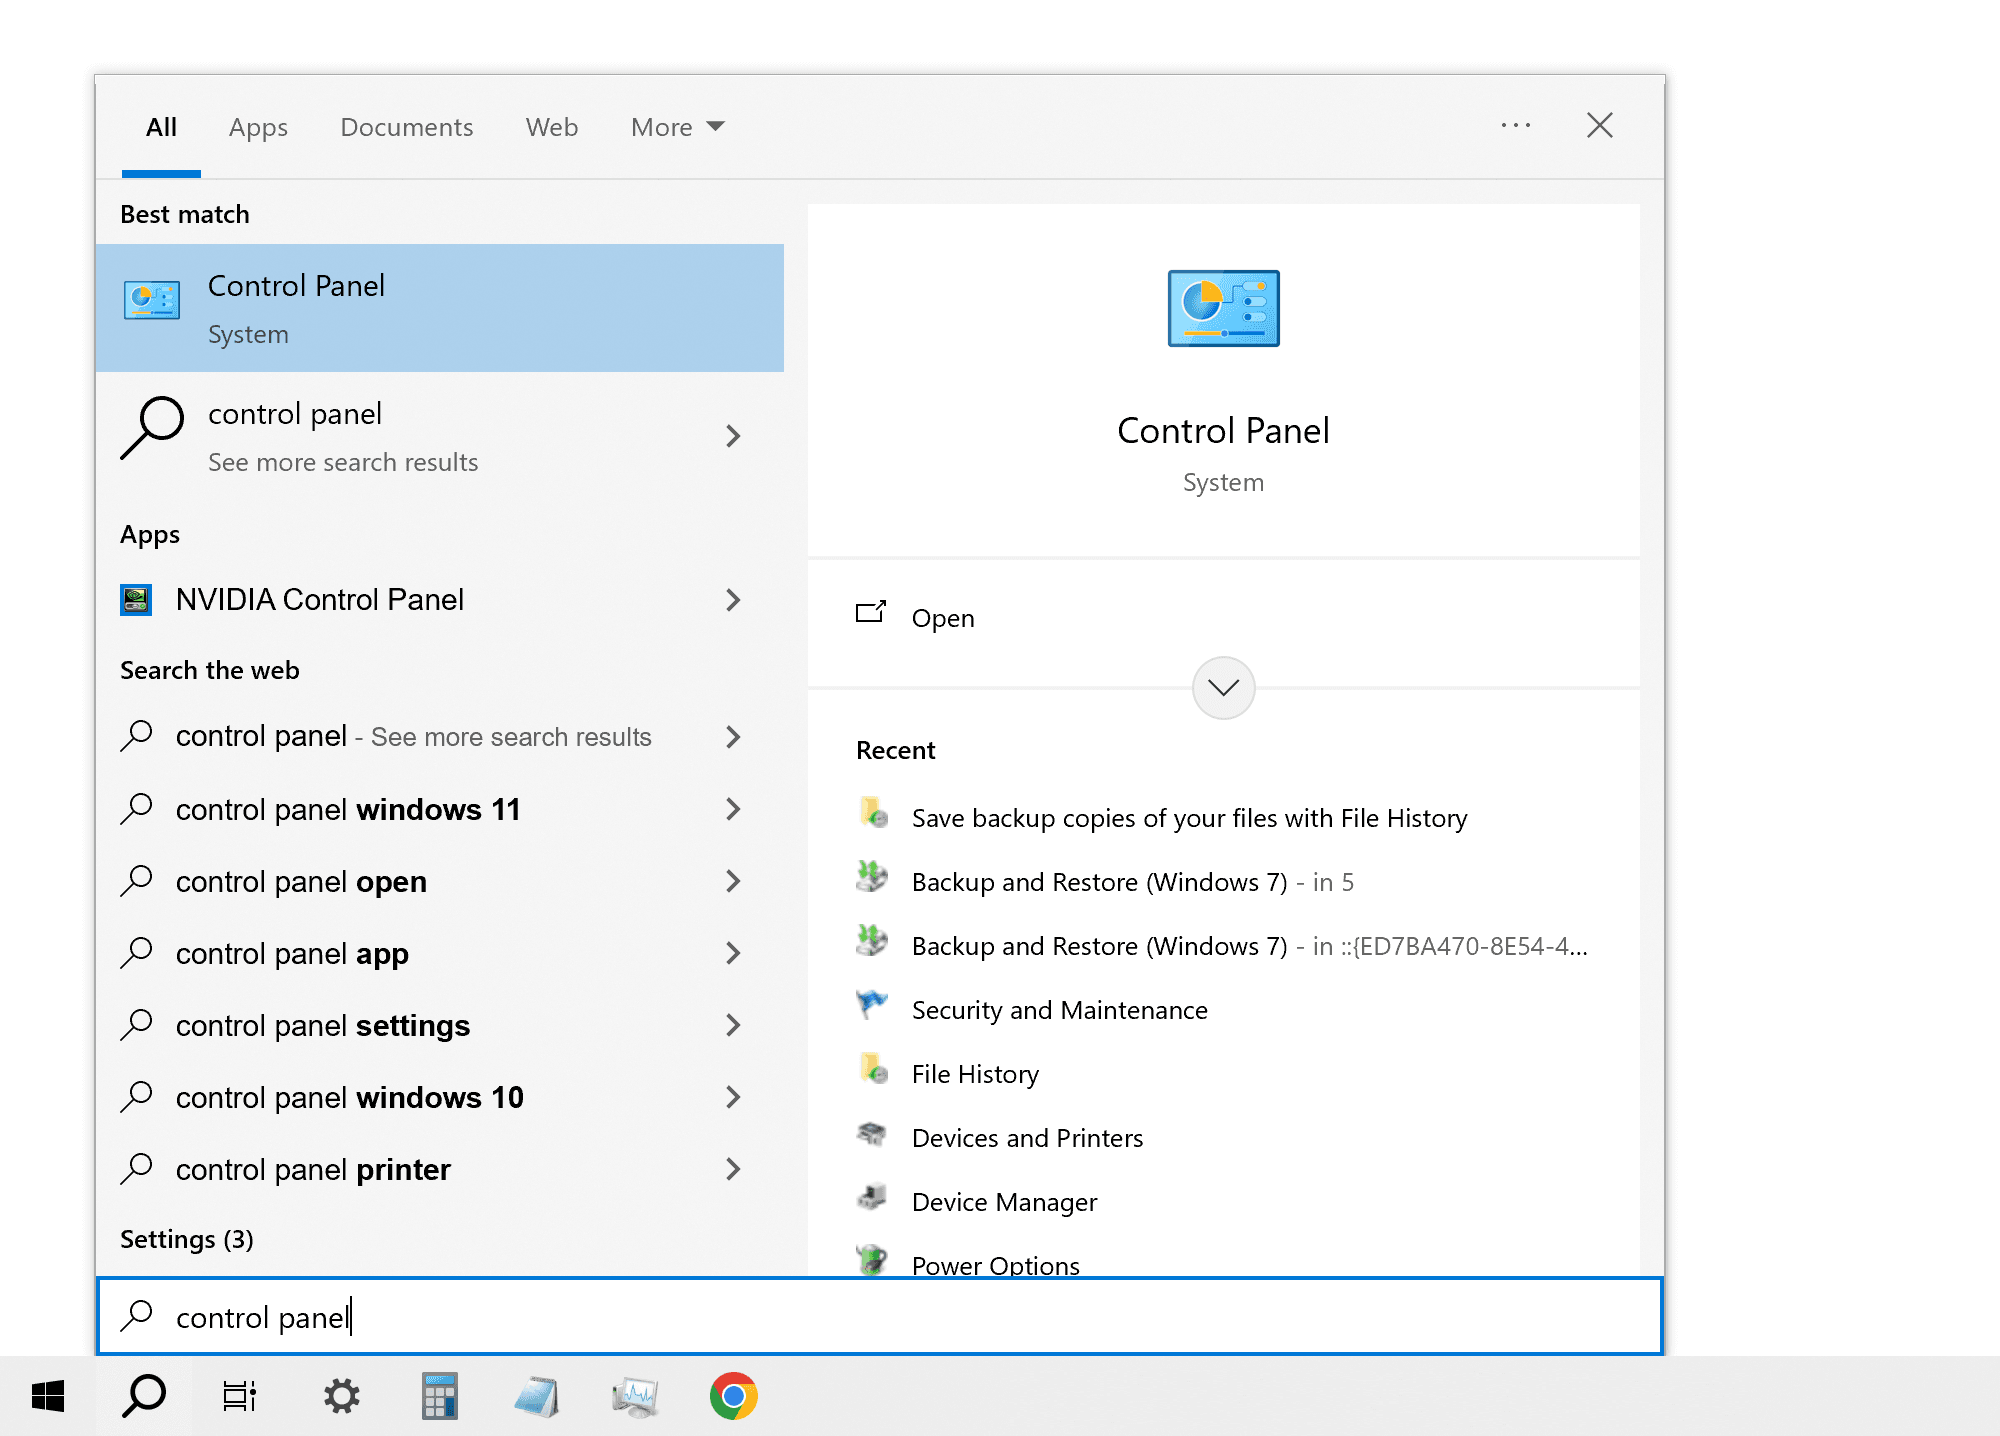
- Open the Control Panel by typing it into the Start Menu search bar.
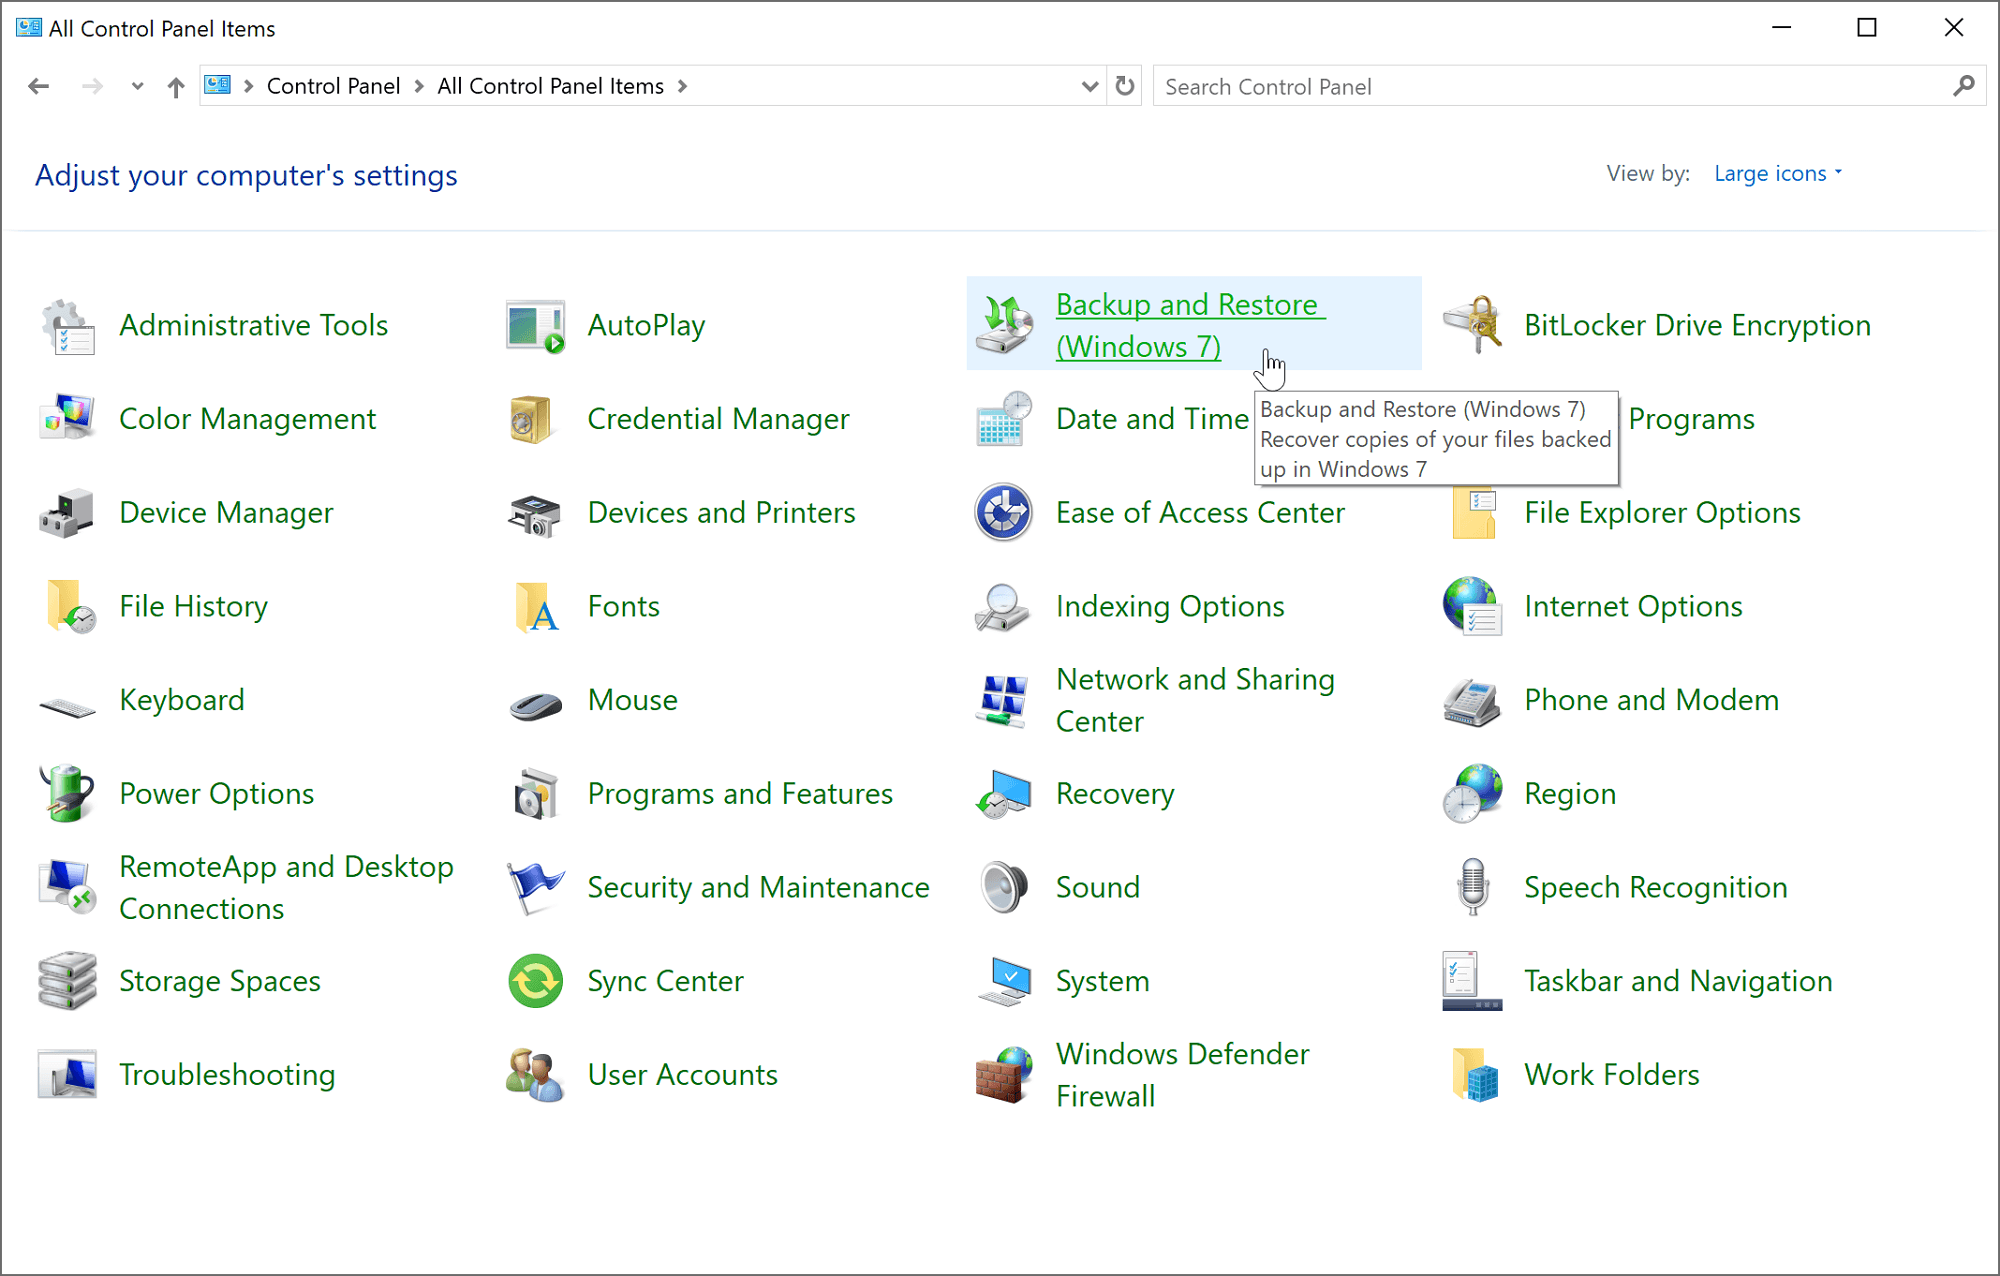
- Go to Backup and Restore (Windows 7) (if Category view is enabled, look under System and Security).
- On the left, click Create a system image, choose On a hard disk and select your external drive.
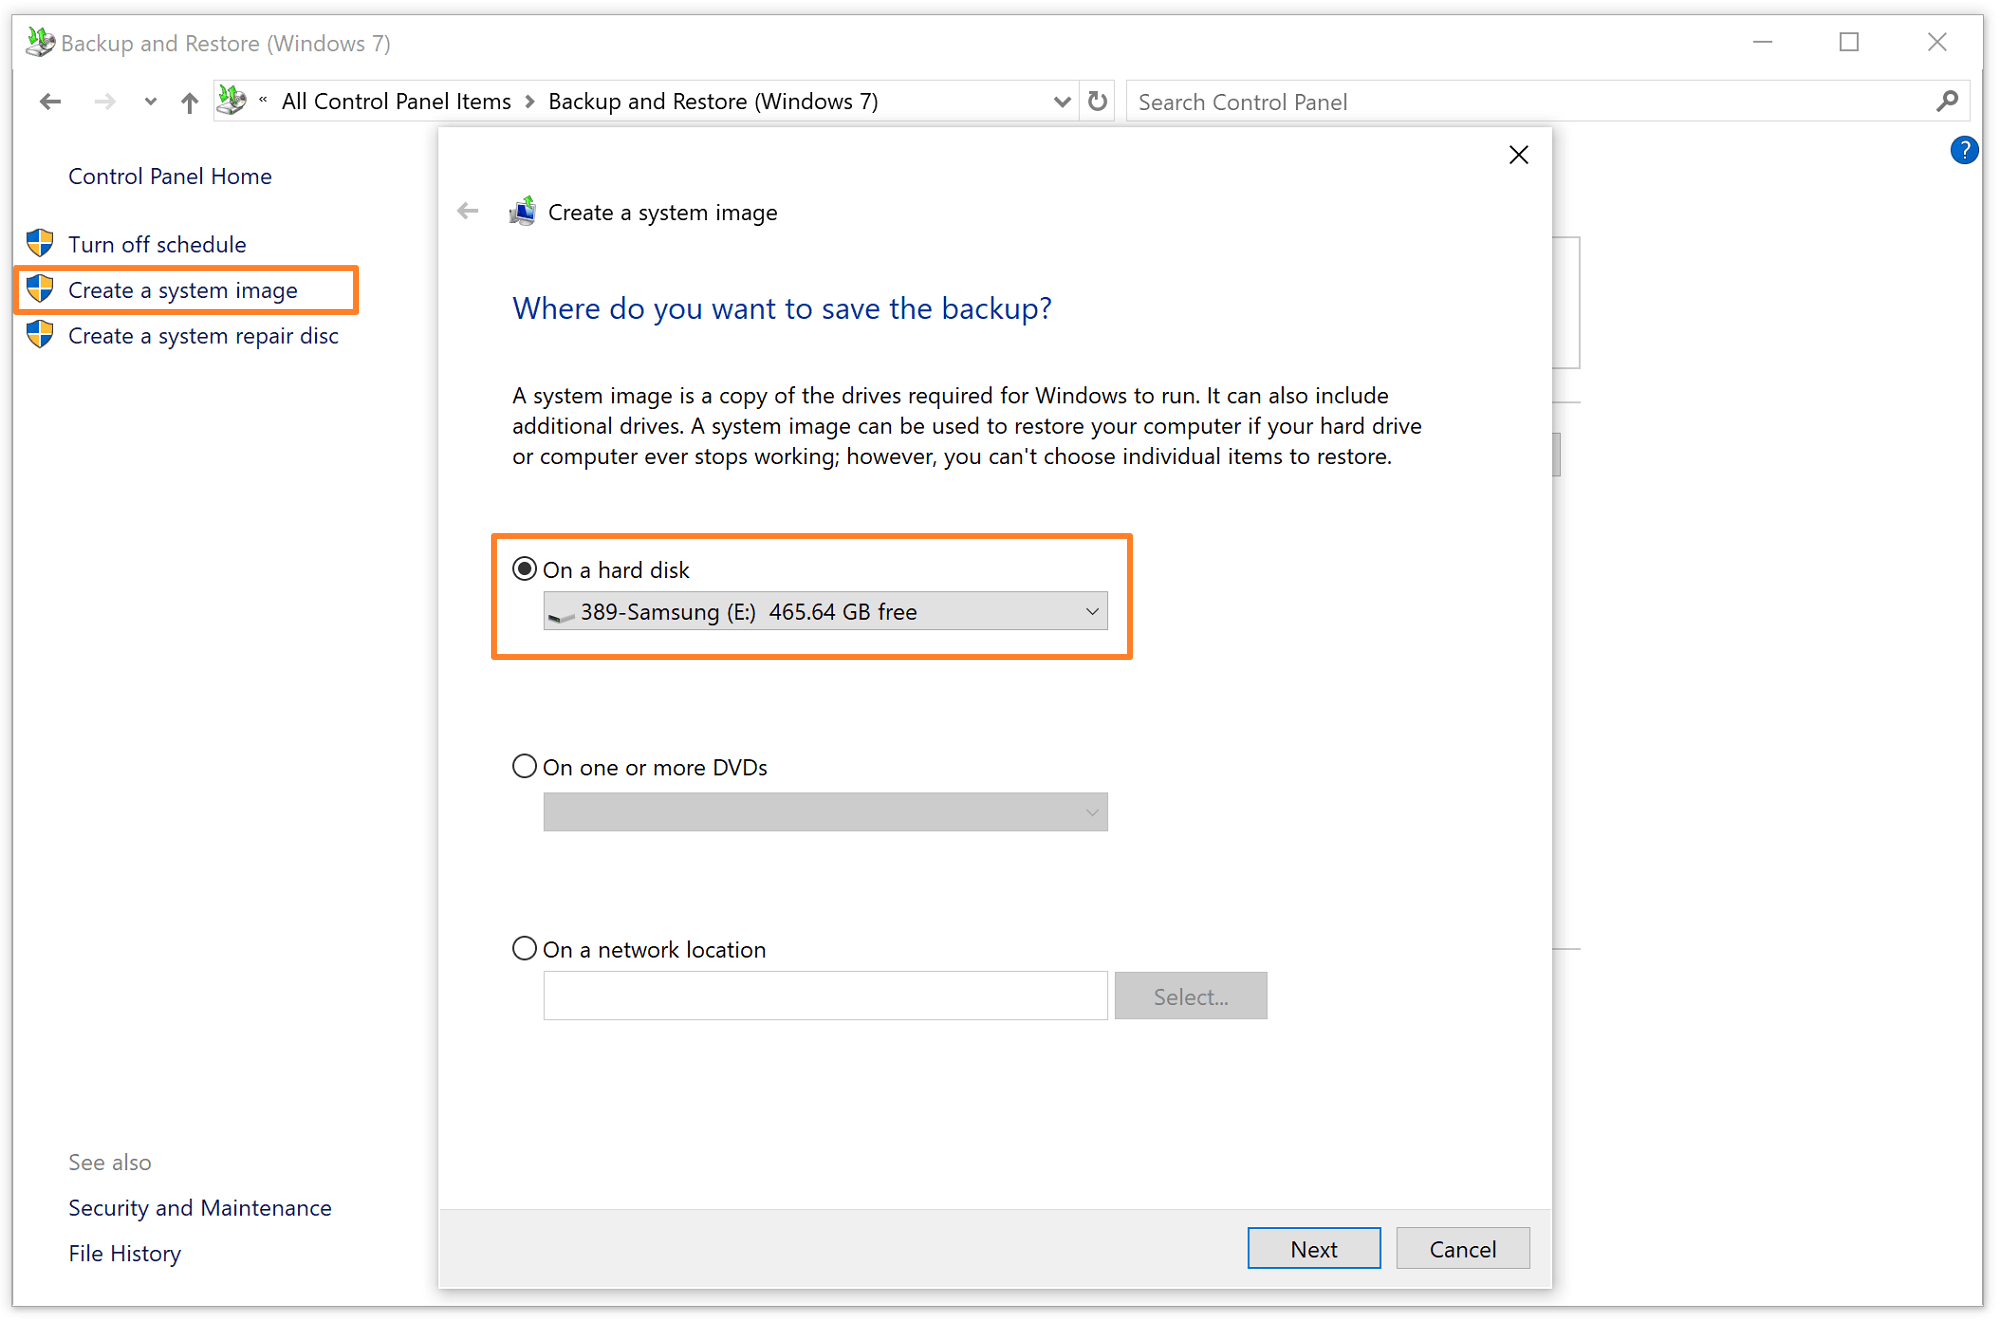
- Click Next, review the drives that will be included, then click Next again.
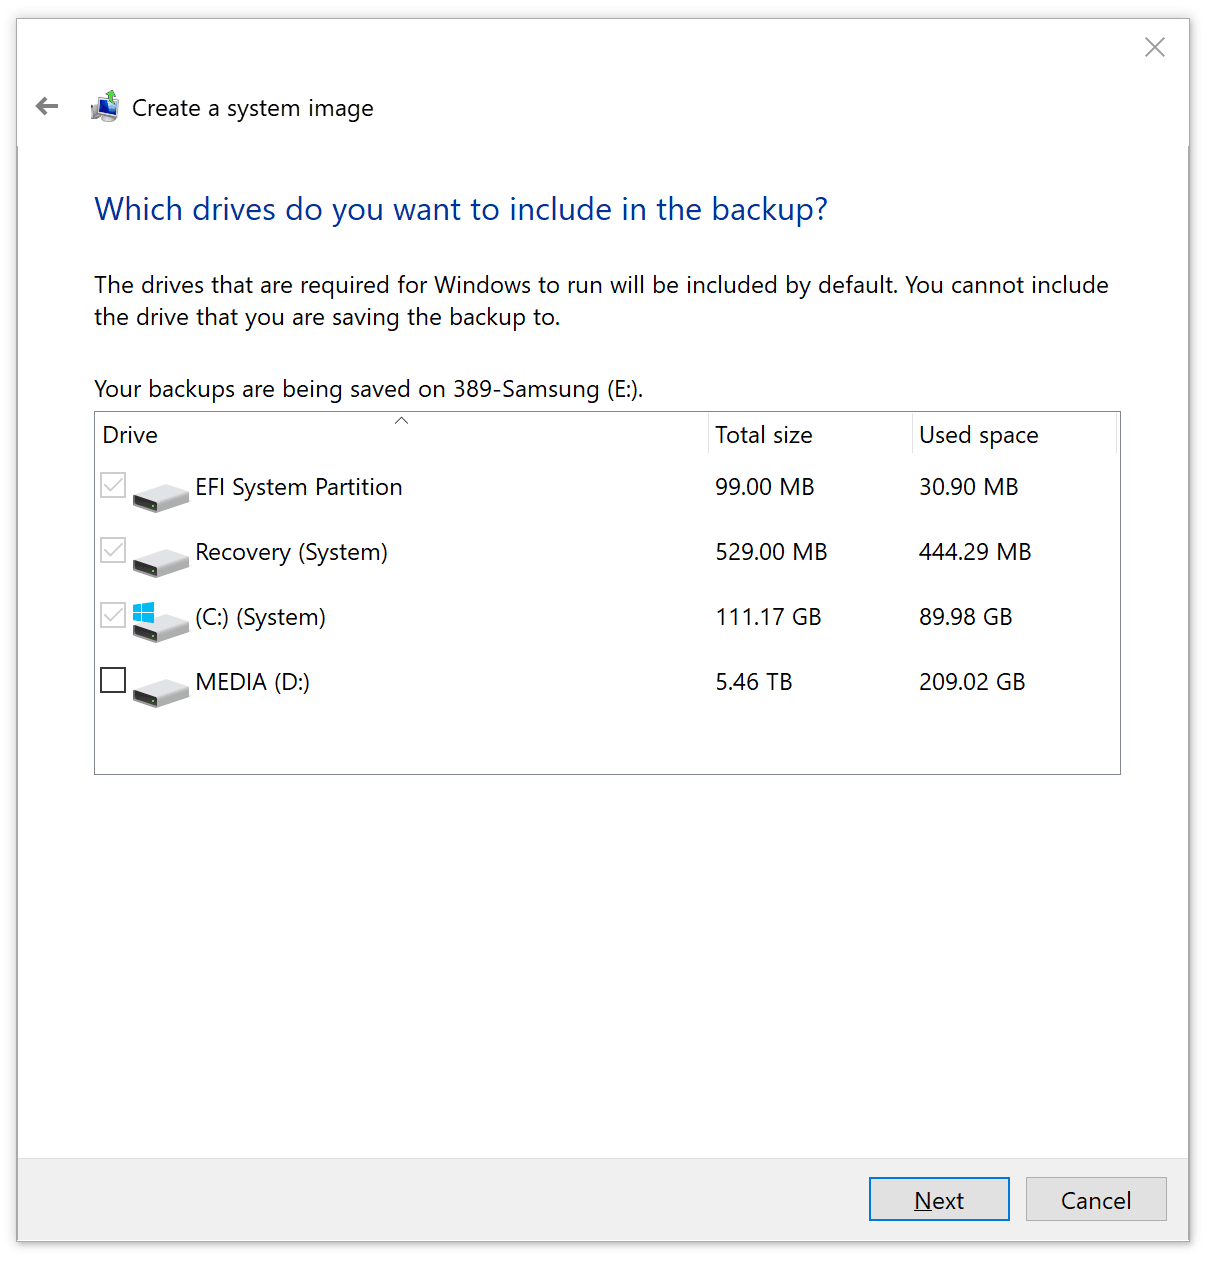
- Click Start backup.
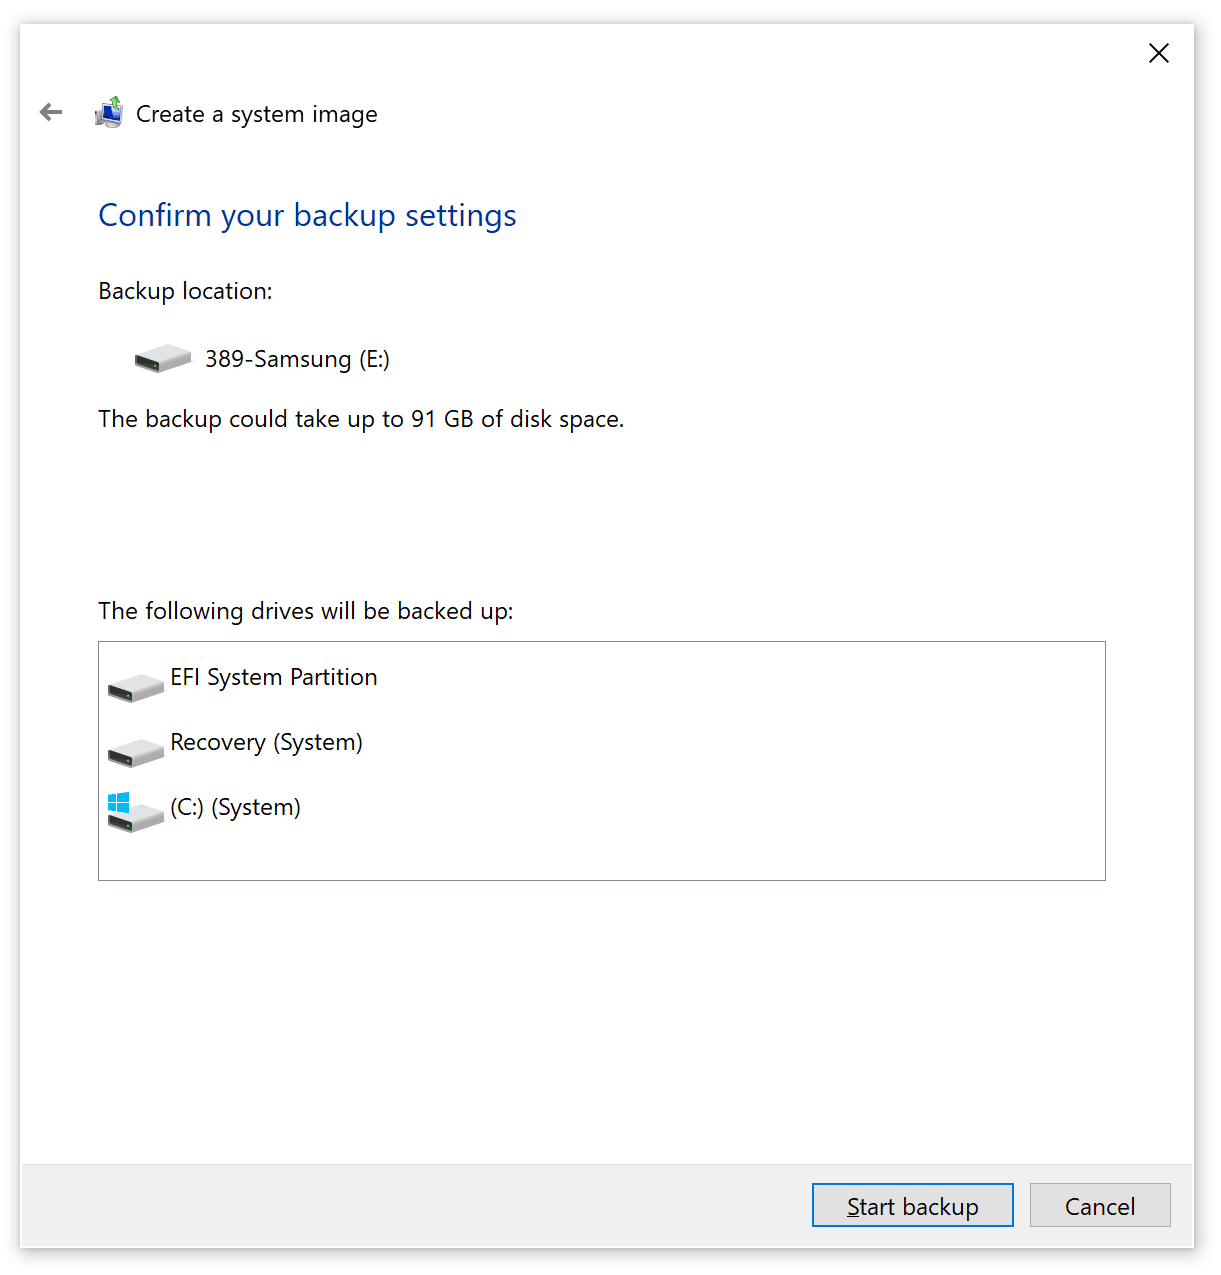
- Do not power down your PC until the backup process is completed.
- When it finishes, Windows will offer to create a system repair disc. Skip this if you already have a Windows recovery USB drive. Otherwise, it's worth making one, since you'll need it to restore the image later.
What to consider
Because Backup and Restore (Windows 7) is deprecated and no longer developed, don't make it your only long-term backup solution. It's a reasonable free option for an occasional, one-off system image using only built-in tools, but for anything you're actually relying on, a maintained tool like MultiDrive (Method 1) or a scheduled File History backup (Method 4) is the safer bet.
Restore data from a backup created with Windows Backup and Restore
Stage 1: Boot in Windows Recovery Environment
During installation, Windows creates a special hidden partition containing the Recovery Environment (WinRE). If the operating system fails to boot three consecutive times, WinRE should launch automatically.
If Windows starts normally, enter the Windows Recovery Environment by following these steps:
- Open the Windows Settings (Win + I)
- In Windows 11, go to System > Recovery. In Windows 10, go to Update and Security > Recovery.
- Under Advanced startup, click Restart now.
Your PC reboots into the blue menu of Windows Recovery Environment.
Stage 2: Restore from system image
In Windows Recovery Environment, do the following:
- Connect your external drive with backups.
- Go to Troubleshoot > Advanced options > System Image Recovery (may be hidden under See more recovery options).
- Select a suitable restore option:
- Use the latest available system image or
- Select a system image (if you have several versions and want to choose the specific one)
- Click Next.
- If you need to format or repartition your disks before the restore, select the appropriate options.
- Click Next, then Finish and confirm that you want to overwrite existing data.
- After the restore process is complete, click Restart now.
Method 4: Creating file backups with Windows File History
File History is a Windows built-in tool that automatically creates versioned copies of selected folders and files on your external hard drive.
Best for: automatic, ongoing backups of your personal folders and files. Set it up once, and it will run in the background.
Pros
- Built into Windows: nothing to download or install.
- Runs automatically on a schedule once configured, so you don't have to remember to back up manually.
- Keeps multiple versions of each file over time, so you can recover an earlier draft, not just the most recent save.
Cons
- Files only. It doesn't capture Windows, your installed apps, or system settings, so it can't restore your whole computer if a drive fails.
- Covers a fixed set of folders by default: Documents, Desktop, Music, Pictures, Videos, and OneDrive folders marked "available offline." Anything outside those has to be added manually, and it's easy to forget a folder and end up with a silent gap in your coverage.
- Doesn't back up encrypted files. If a file uses Windows' Encrypting File System (EFS), File History will skip it and show an error.
- Increasingly de-emphasized by Microsoft in favor of OneDrive-based Windows Backup as the default, cloud-first option.
- Requires that your external drive be constantly connected to the PC.
How to automatically back up your folders and files with Windows File History
- Connect your external hard drive, where you want to store backups, to the PC. Make sure the drive is formatted to NTFS and has enough free space.
- Open the Control Panel by typing it into the Start Menu search bar.
- Select Save backup copies of your files with File History (if Category view is enabled, look under System and Security).
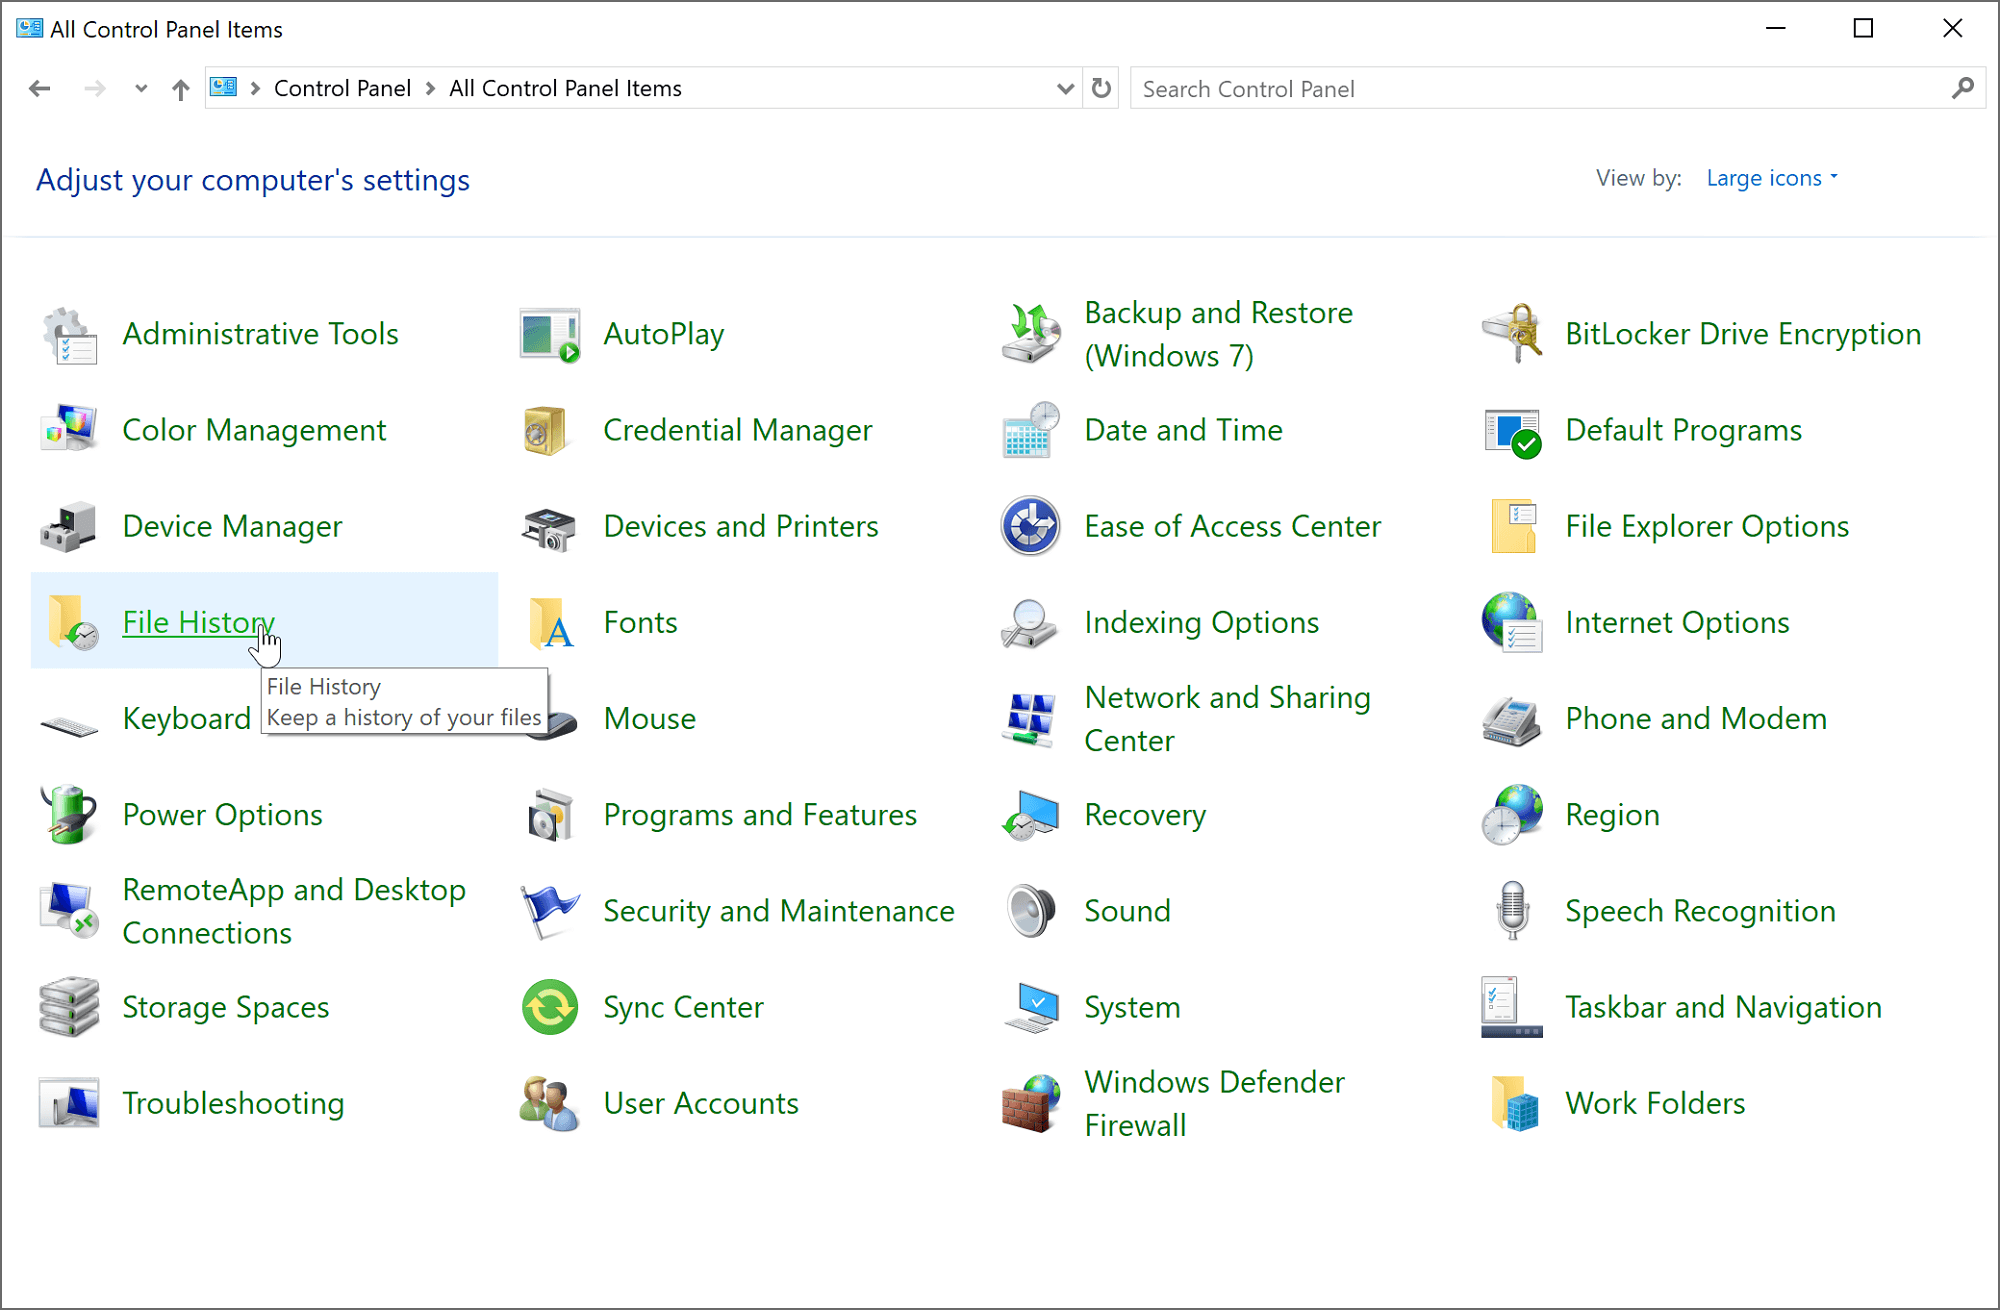
- Click Turn on.
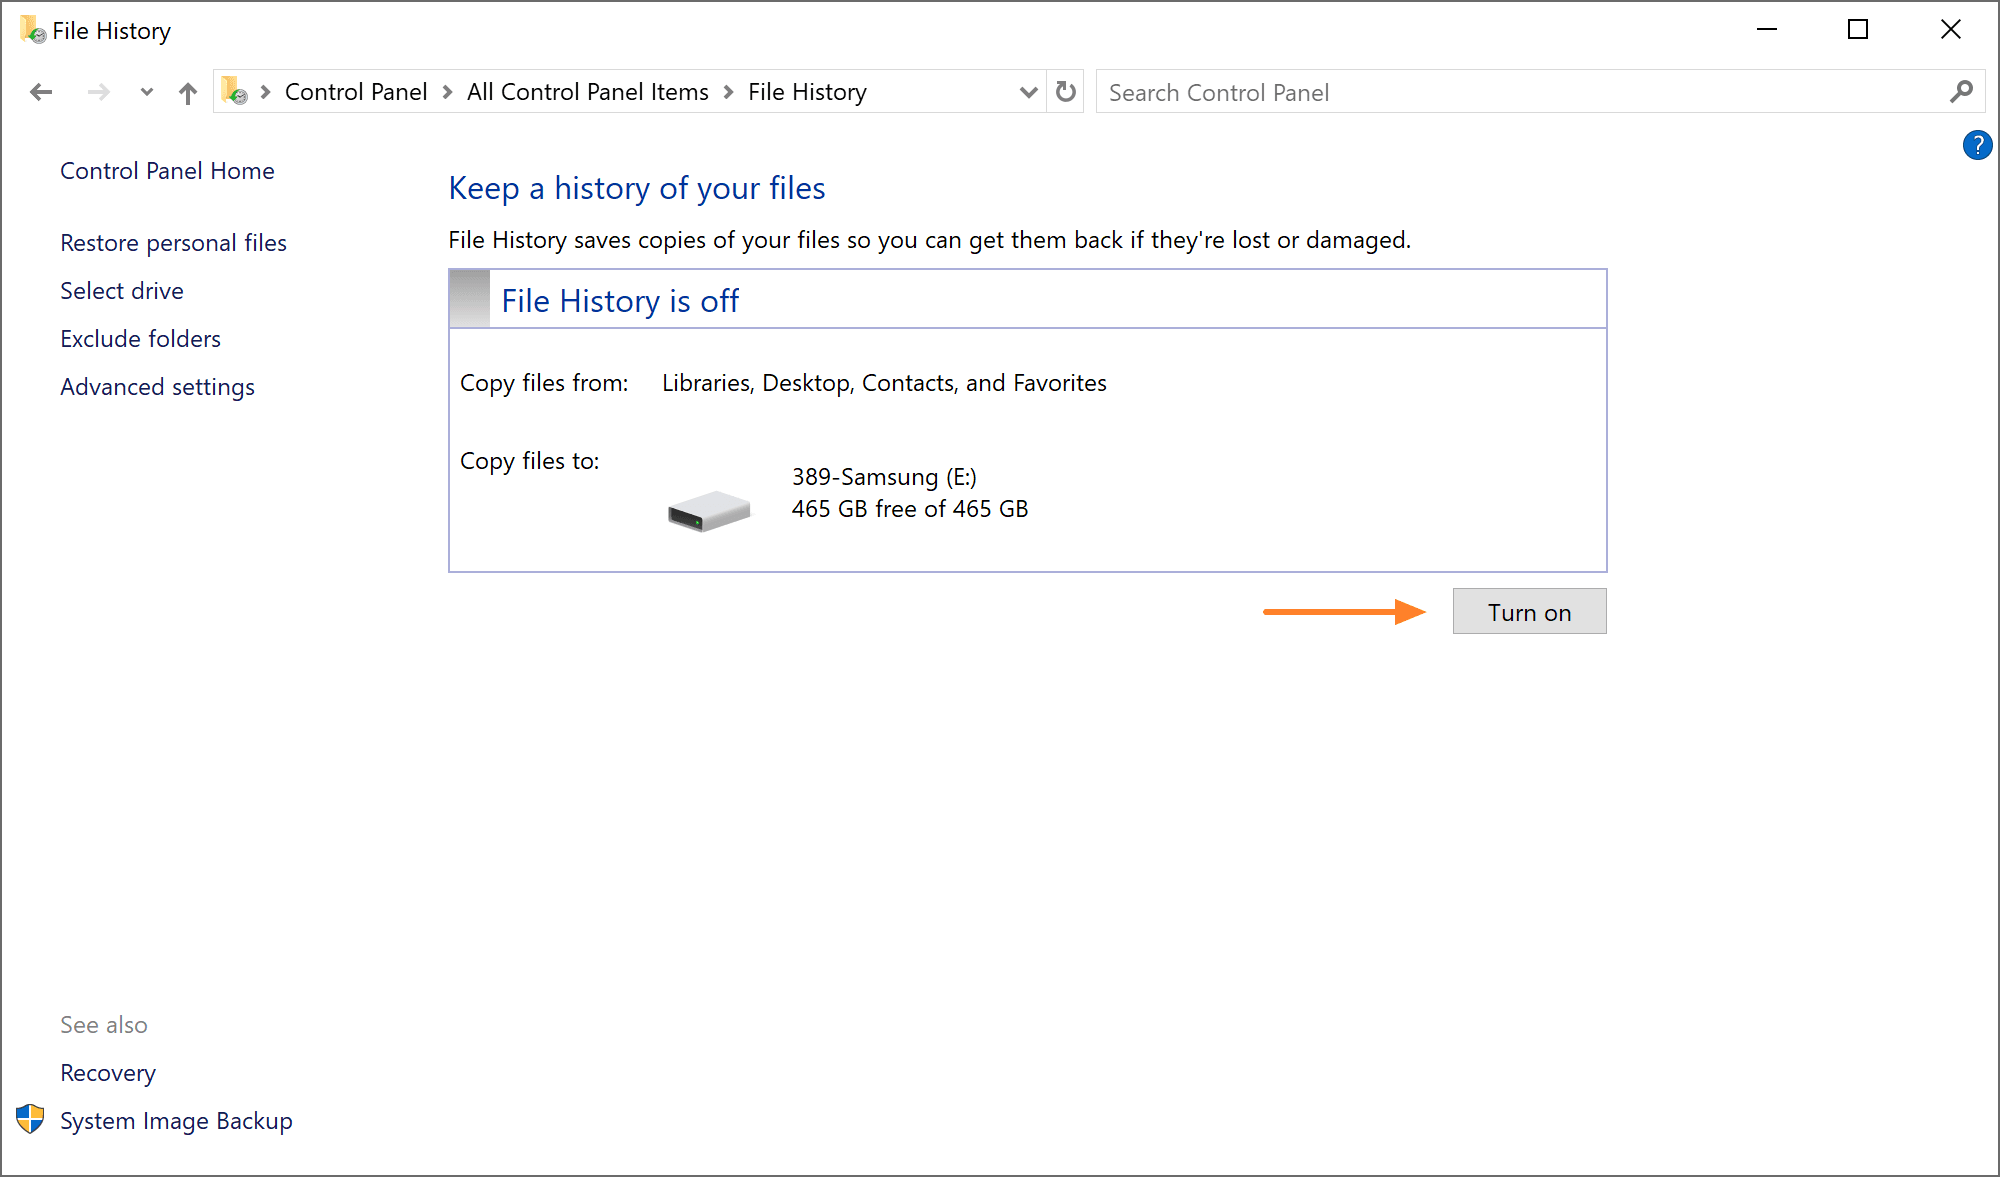
- Choose the external drive where you want to store your backups and click OK.
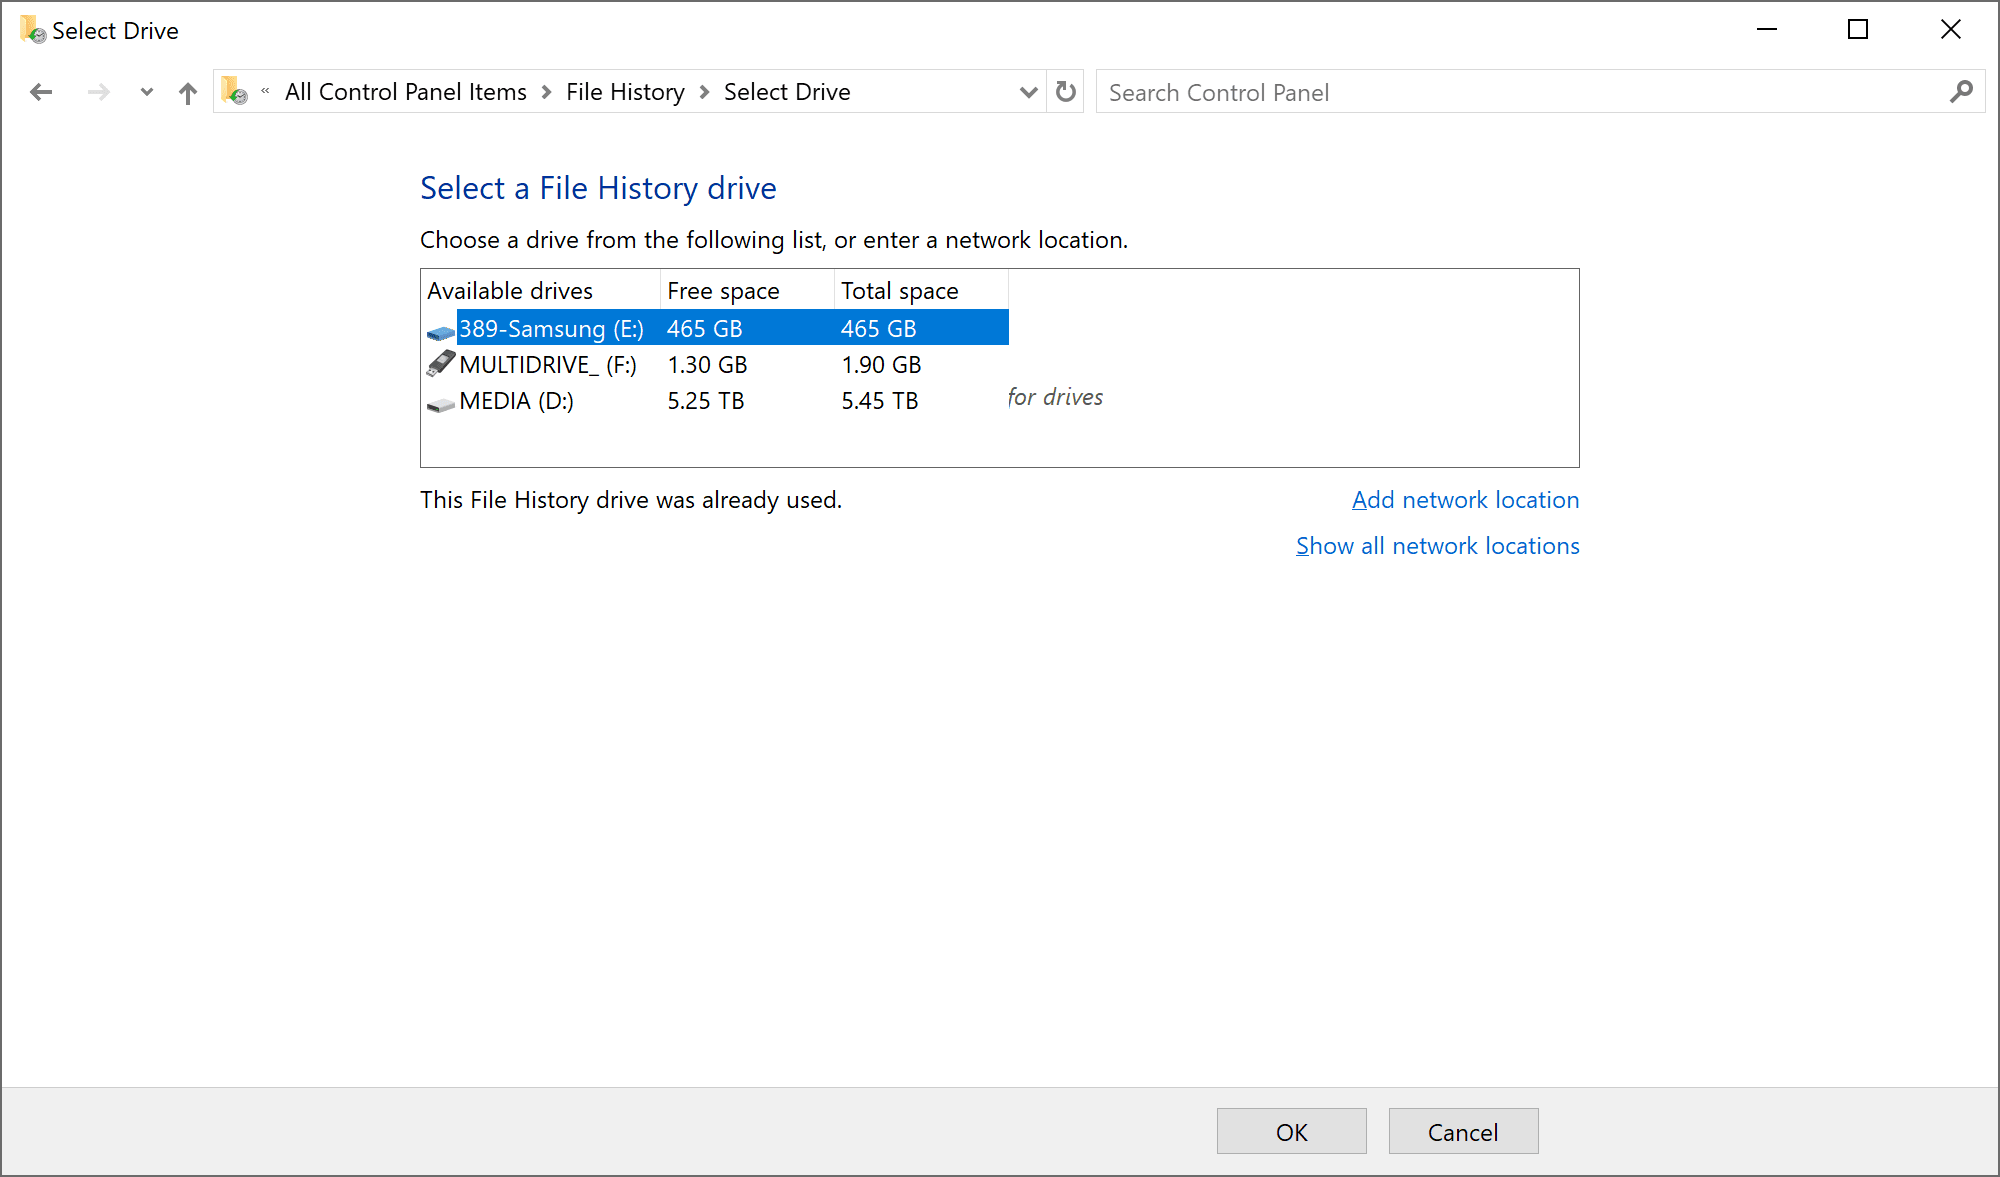
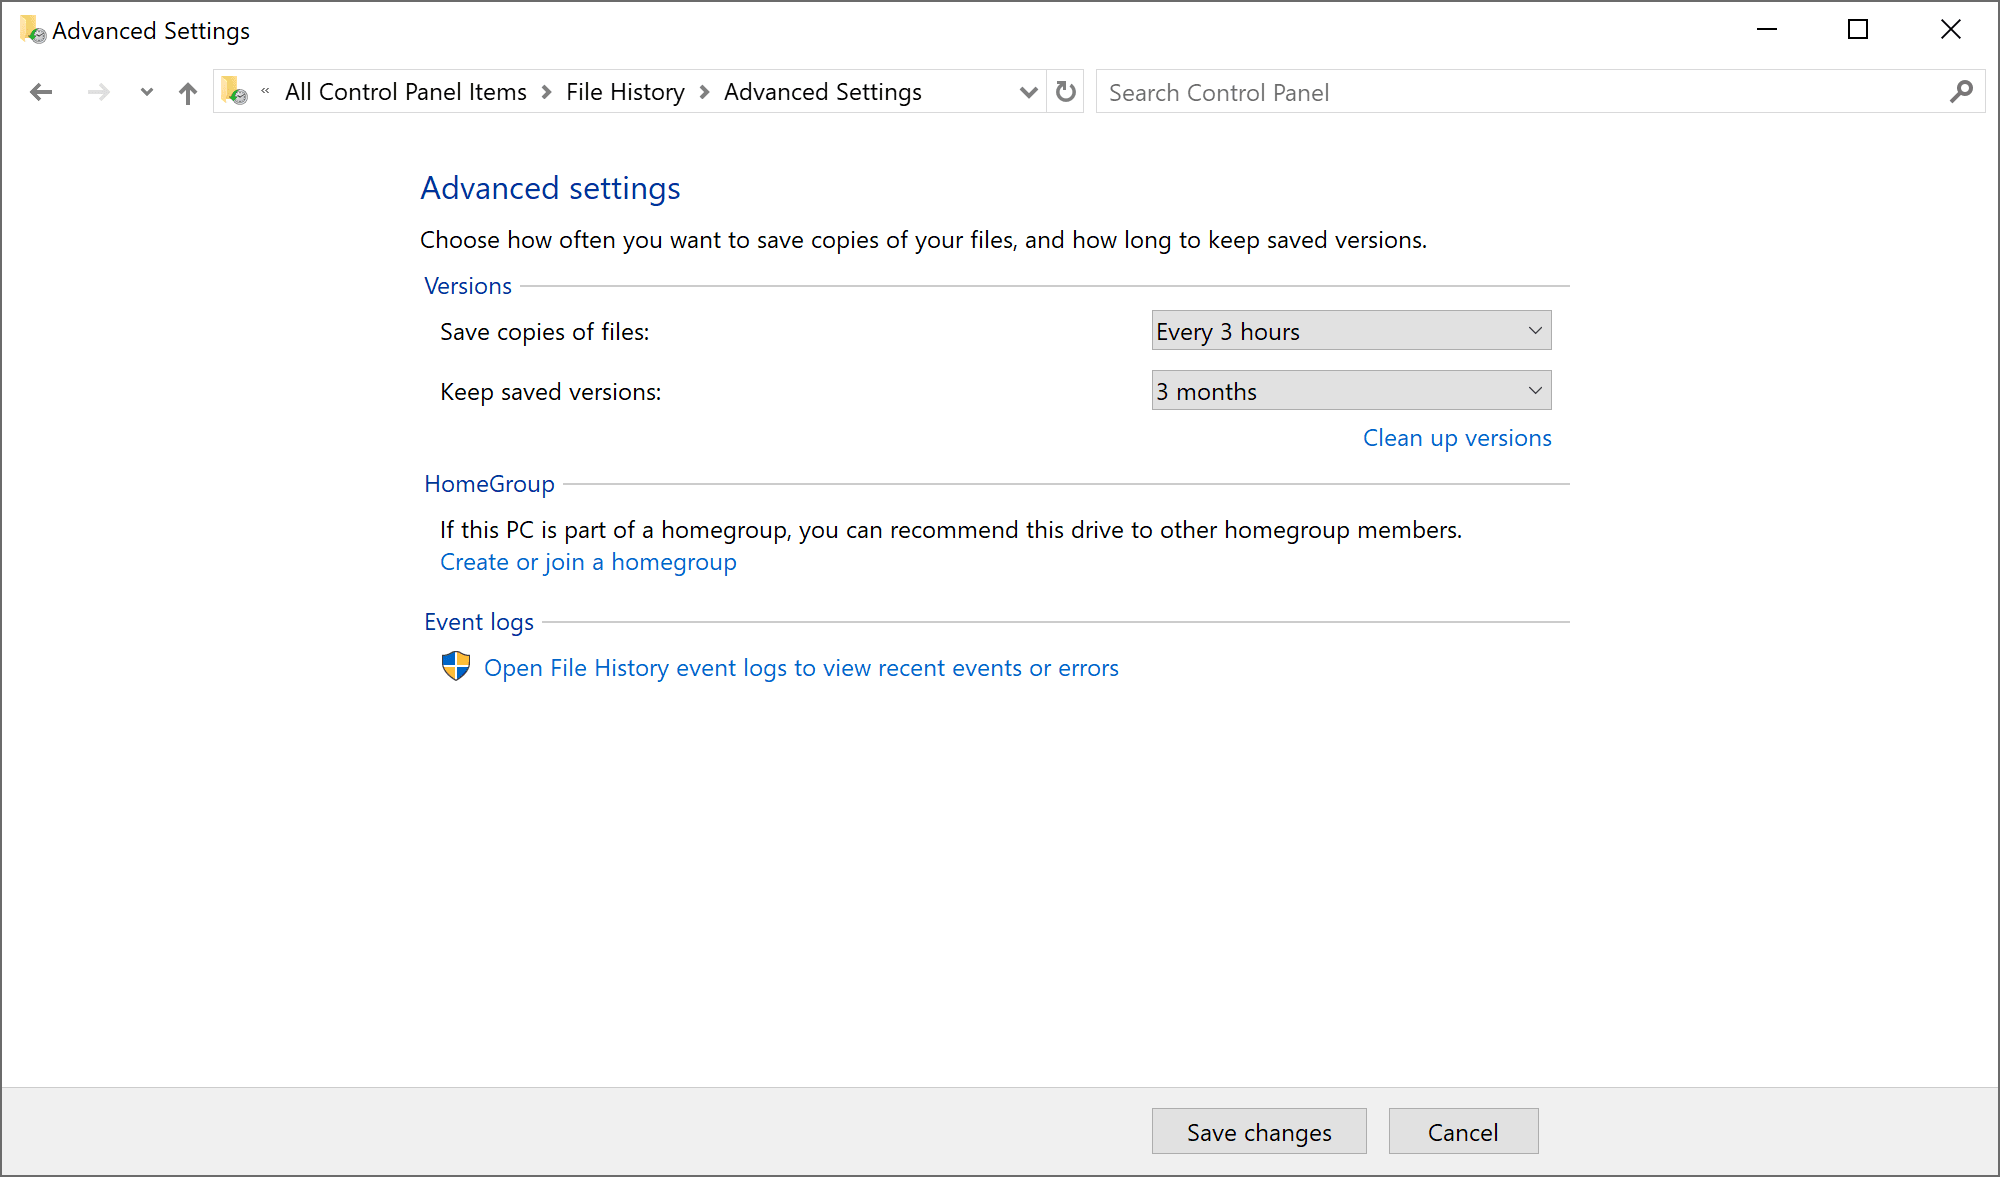
- On the left, click Advanced settings, select how often you want to make copies of your files and how long to keep saved versions, then click Save changes.
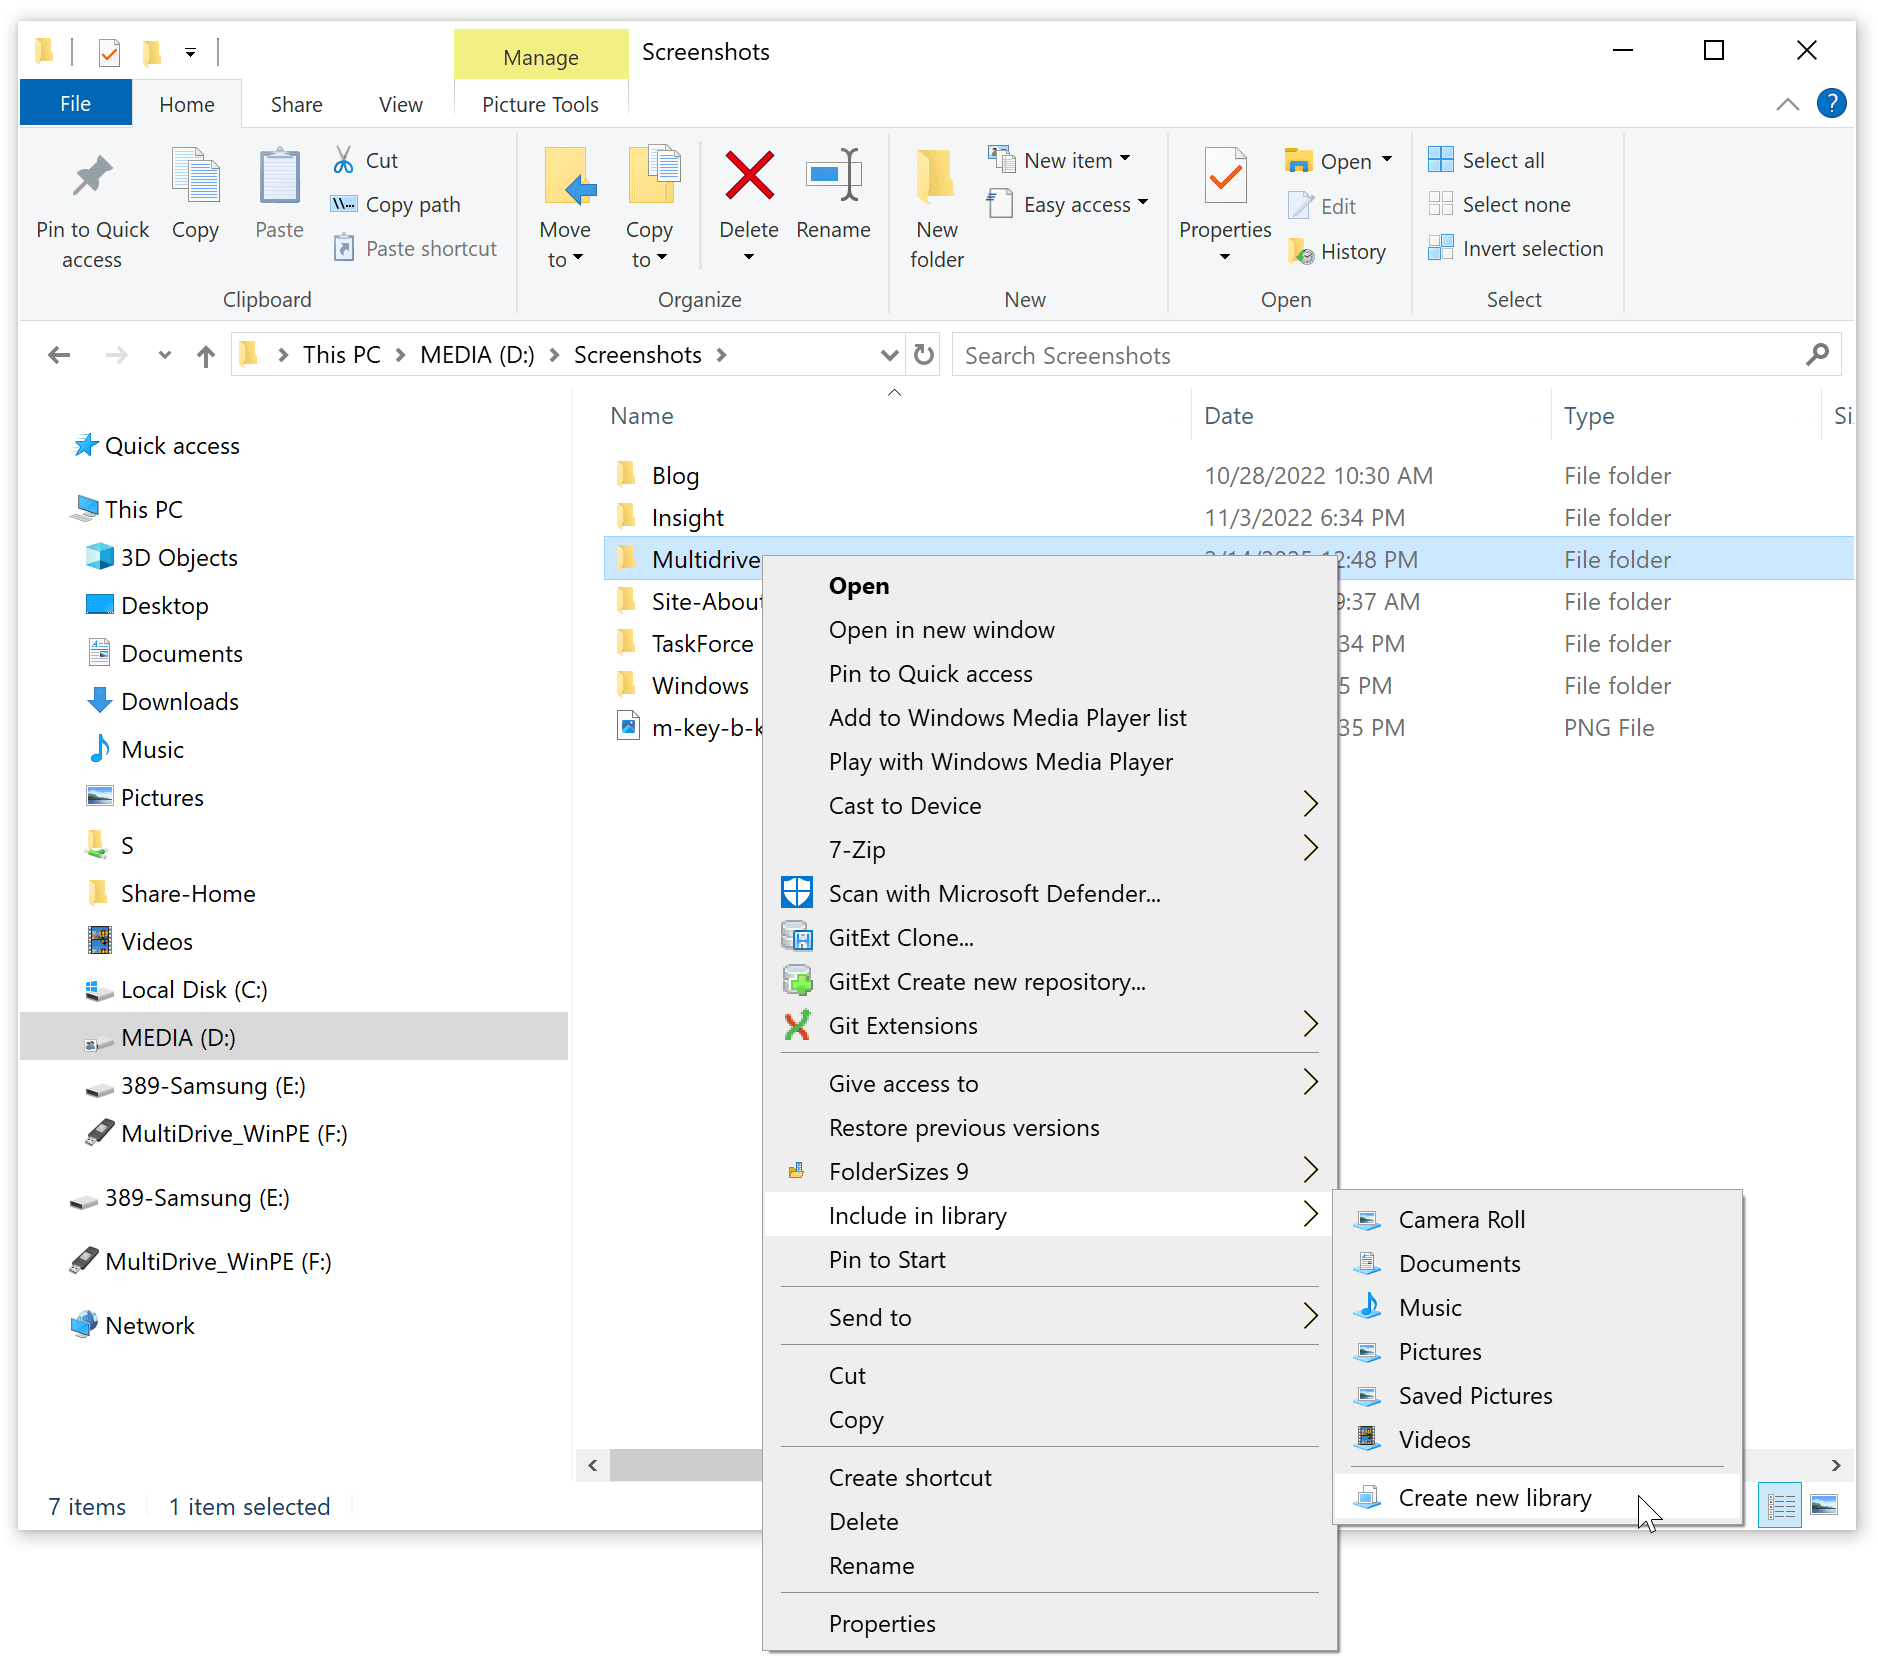
- By default, File History backs up standard user folders like Documents, Pictures, Videos, and Desktop. To add other folders, include them in a library that File History already backs up (such as Documents): in File Explorer, right-click the folder, choose Include in library, and select an existing library or create a new one. You can also use Advanced settings in File History to review what is included and excluded.
What to consider
File History is not a substitute for a full-system backup. Pair it with Method 1 (MultiDrive WinPE) or Method 3 (Windows System Image) if you also want the ability to recover your whole PC, not just your files.
To run automatically in the background, File History requires that your external drive be constantly connected to the PC. It might be OK for desktops, but a real headache for laptops.
Restore files from a backup with File History
- Connect your external drive with backups.
- Open the Control Panel by typing it into the Start Menu search bar.
- Select Save backup copies of your files with File History (if Category view is enabled, look under System and Security).
- On the left, click Restore personal files.
- The File History browser opens. Switch between versions using the arrow buttons at the bottom or Ctrl + the Left or Right arrow key on the keyboard.
- Select the folder or file you wish to restore.
- Restore folders or files:
- To the original location: at the bottom, click the green Restore button.
- To a custom location: at the top right, click the gear icon and select Restore to.
Method 5: Creating file backups by manual copying
Sometimes you just need to back up a few important files or folders. In that case, a simple copy-paste in the File Explorer will do the job.
Best for: quickly grabbing a handful of important files, right now, with nothing to install.
Pros
- Works on any Windows PC out of the box.
- Full control over exactly which files and folders get copied.
- Fastest option if you need just a few files and do not want a lengthy setup.
- Various storage types: external drive, USB flash drive, or a network folder all work the same way.
Cons
- Entirely manual. Nothing runs unless you remember to do it yourself, so it's easy to fall out of the habit.
- No automation and no version history. Each copy simply overwrites or sits alongside the last one. You can't roll back to an earlier version the way you can with File History.
- Skips system files that are in use by Windows. Windows will show an error for such a file and skip it rather than copying a snapshot of it.
- Doesn't preserve everything. Some Windows-specific file permissions and metadata can be lost when copying to a non-NTFS drive, and this method captures none of your OS, installed apps, or settings.
How to copy files to an external drive manually
- Open File Explorer by pressing Win + E.
- Go to the files or folders you want to back up.
- Select what you want to copy:
- Click one item, then hold Shift and click another to select everything in between.
- Hold Ctrl and click individual items to select multiple files that aren't next to each other.
- Press Ctrl+A to select everything in the current folder.
- Copy the selection: press Ctrl+C, or right-click and choose Copy.
- Open your external hard drive, then open the folder where you want to store the copies.
- Paste: press Ctrl+V, or right-click and choose Paste.
Two alternative ways to copy folders and files:
- Drag and drop them between two File Explorer windows.
- Right-click the folder or file, choose Send to > Your external drive.
What to consider
It is better not to use manual copying as your primary backup method. If you're copying large, deeply nested folders and run into the "Destination Path Too Long" error, try copying a shallower folder at a time, or switch to Method 4 (File History), which handles this without the manual hassle.
How to check your USB version
The USB version of your port, cable, and drive directly influences the data transfer speed and, therefore, the backup time. The slowest element (port, cable, or drive) sets your real-world speed, no matter how fast the other two are.
| USB Version | Time to Copy 1 TB | Port Color (for USB type A) |
|---|---|---|
| USB 2.0 | ~8 hours | Black or white |
| USB 3.2 Gen 1 | ~42 minutes | Blue |
| USB 3.2 Gen 2 | ~19 minutes | Teal / light blue |
| USB 3.2 Gen 2x2 | ~8 minutes | Varies by manufacturer |
| USB4 / Thunderbolt 3/4 | ~6 minutes | Not color-coded (USB-C only) |
These estimates assume a fast external SSD. A mechanical hard drive is usually very slow. It can only copy 1 TB in 2–3+ hours, even if you are using USB 3.0 or a faster connection.
For USB ports on your PC:
- Check the PC or motherboard manufacturer's specs — it's the most reliable source of information.
- If you have several USB port types, check the port markings and color:
- blue usually means USB 3.0/3.2 Gen 1 (5 Gbps)
- teal or light blue often means USB 3.1/3.2 Gen 2 (10 Gbps)
- SuperSpeed trident logo (a small "SS" with a fork-like symbol) supports USB 3.0 or higher
For external drive and cable:
- Check the drive's product page or packaging.
- Check the color of a cable connector (USB type A).
- Check the markings on a cable.
In the How long will the backup take section we cover what else can influence the time needed to make a backup.
How to restore an individual file from MultiDrive's RAW backup file with 7-Zip
The free and open-source tool 7-Zip can extract an individual file or folder from MultiDrive backup files. RAW is the most straightforward workflow; ZIP also opens in any ZIP-aware archiver, and ZSTD opens in 7-Zip and other ZSTD-aware tools. The steps below use a RAW backup as the example. It might be useful if you have only a few files corrupted or deleted and do not want to wait for a full drive recovery.
To restore an individual file from a MultiDrive RAW backup file with 7-Zip:
- Download and install 7-Zip.
- Connect your external drive with backups.
- Run 7-Zip and select your external drive.
- Select your last backup file with .raw extension and press Enter (or double-click it).
- Select the largest partition (for example, Basic data partition.ntfs) and press Enter.
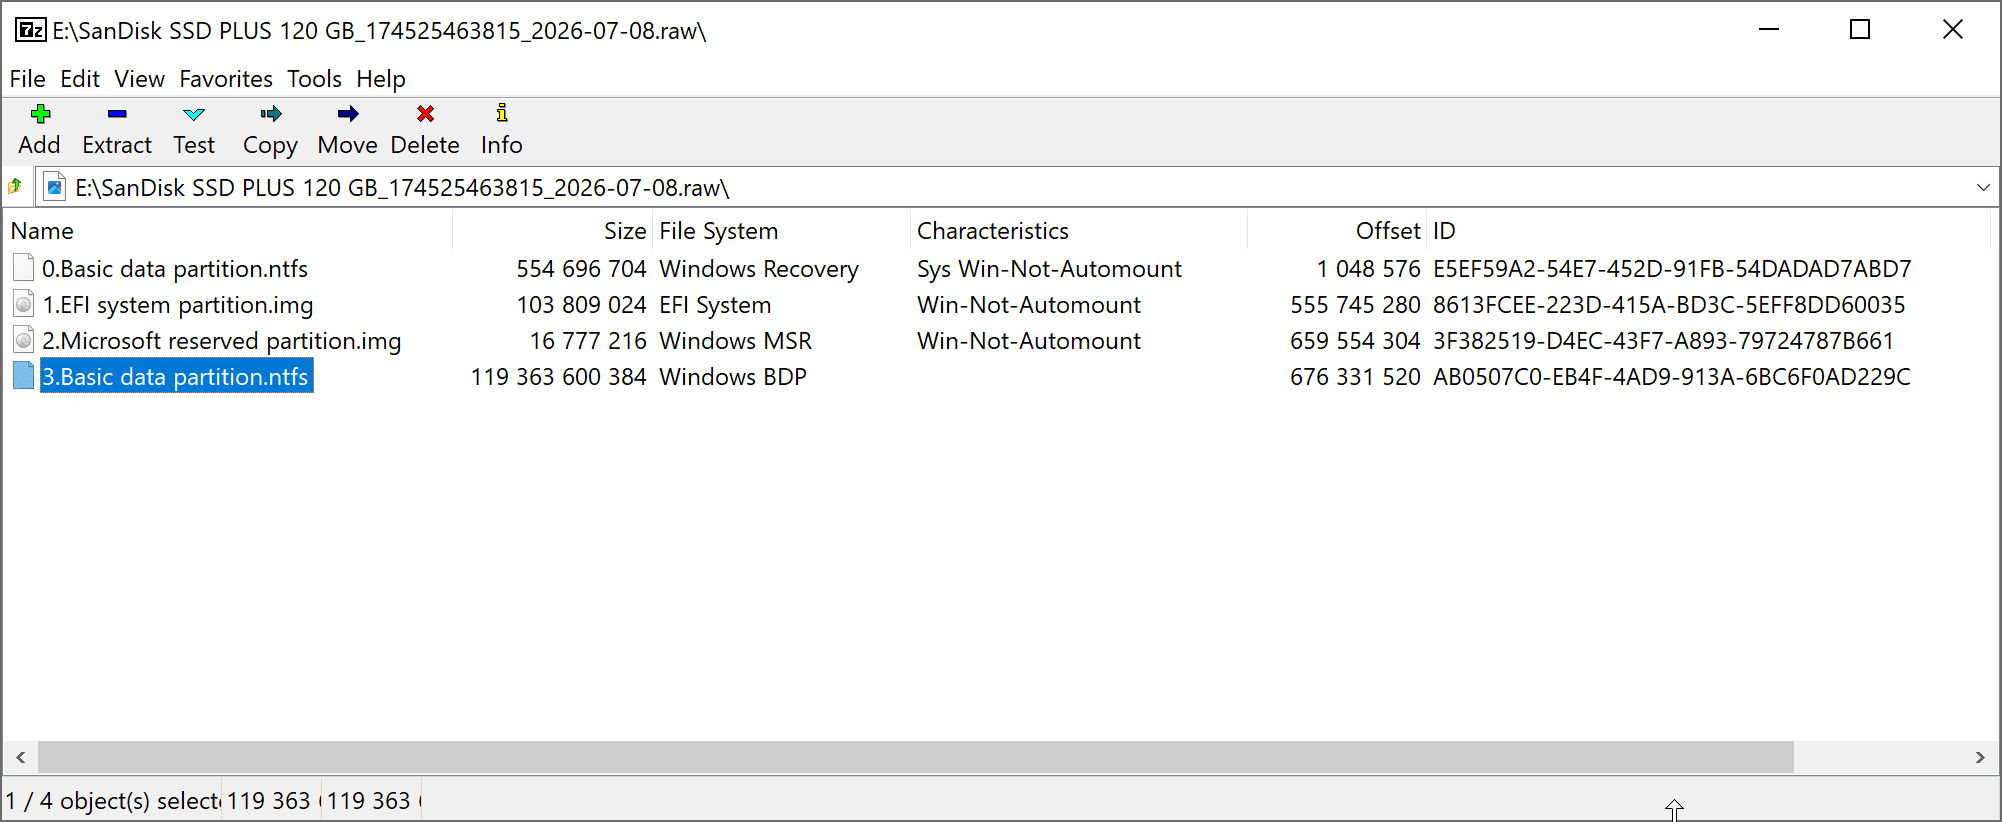
- Wait for the opening process to complete.
- Find your folder or file and press F5 (or right-click and select Copy To…).
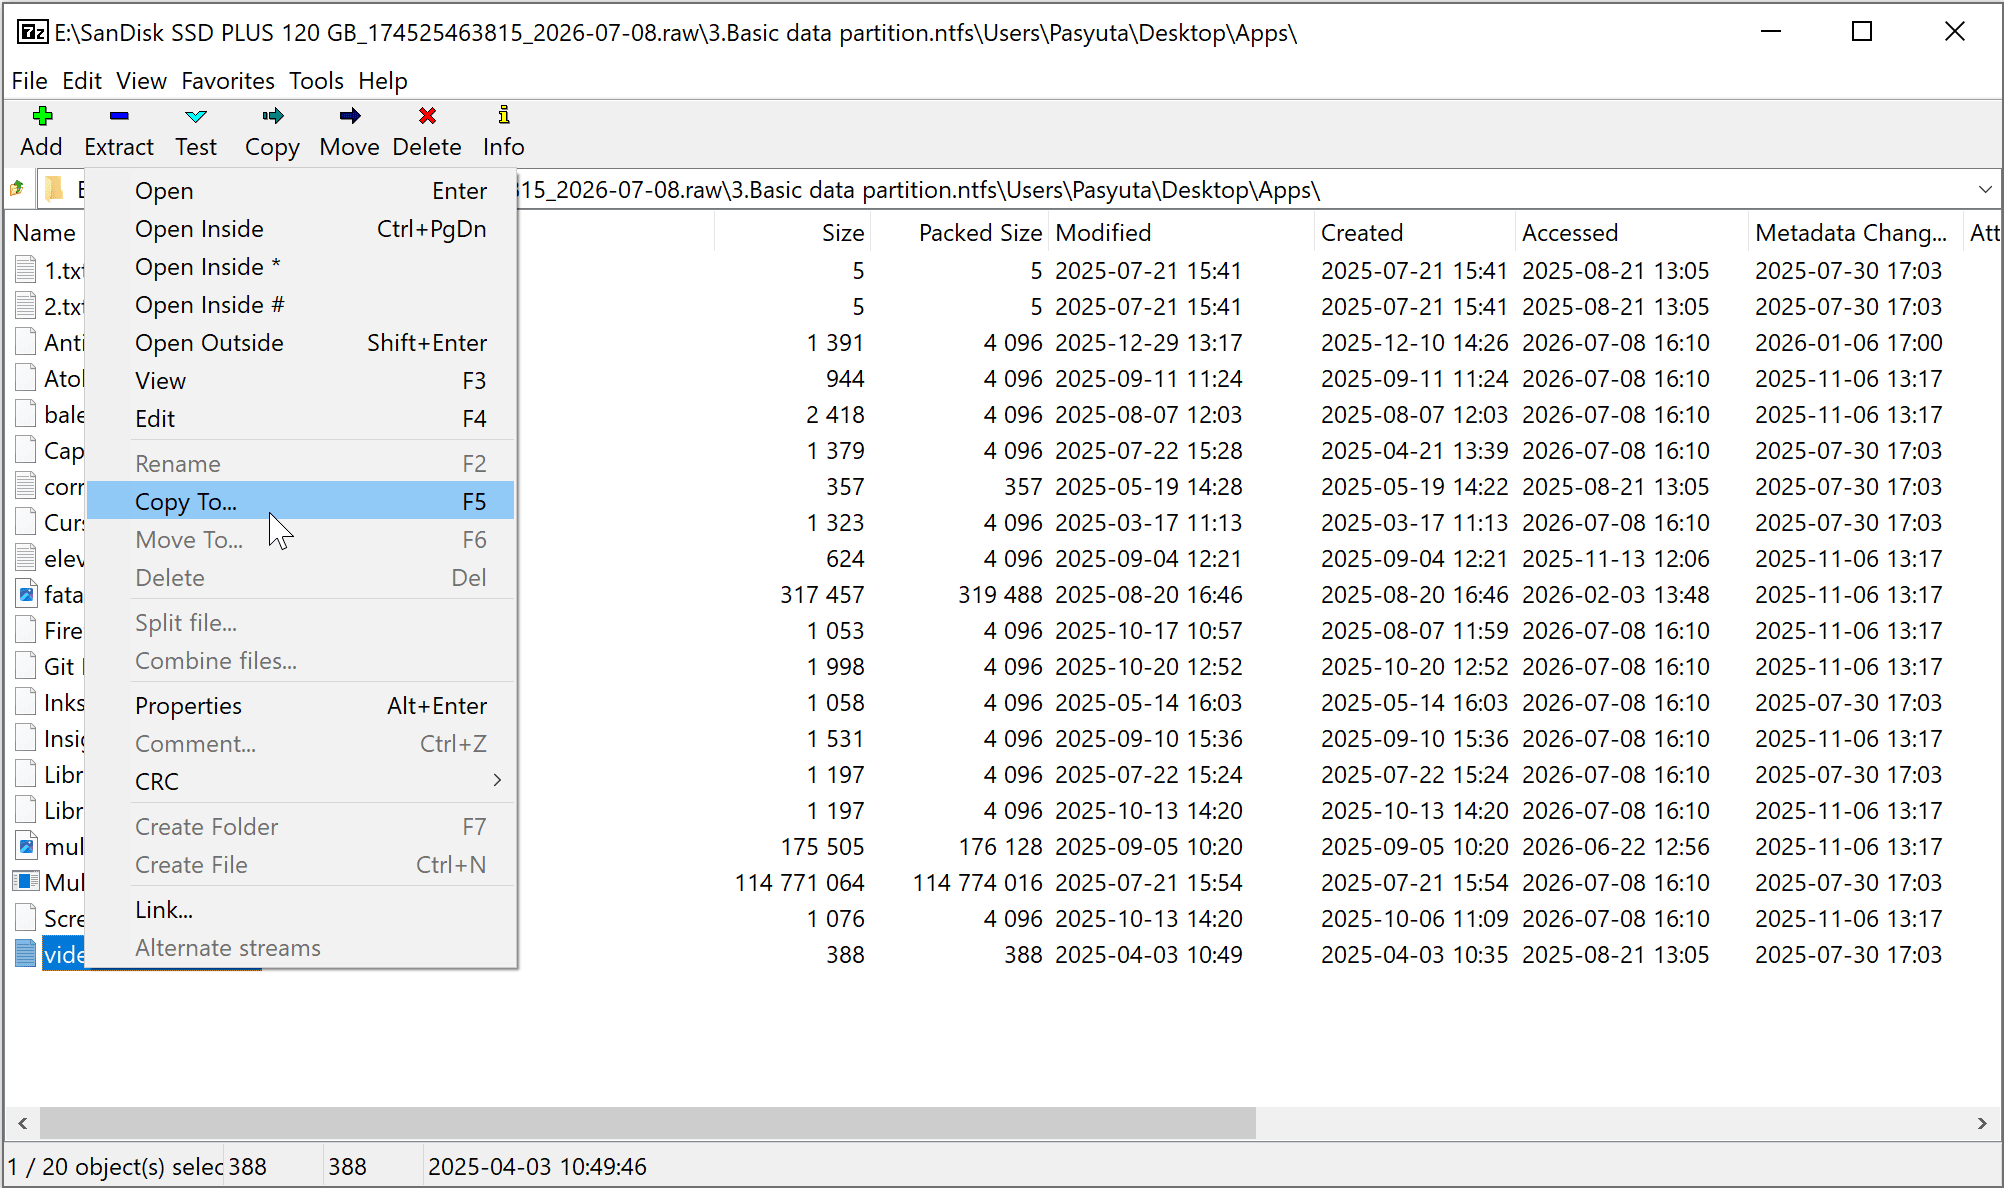
- Select where you want to restore your folder or file and click OK.
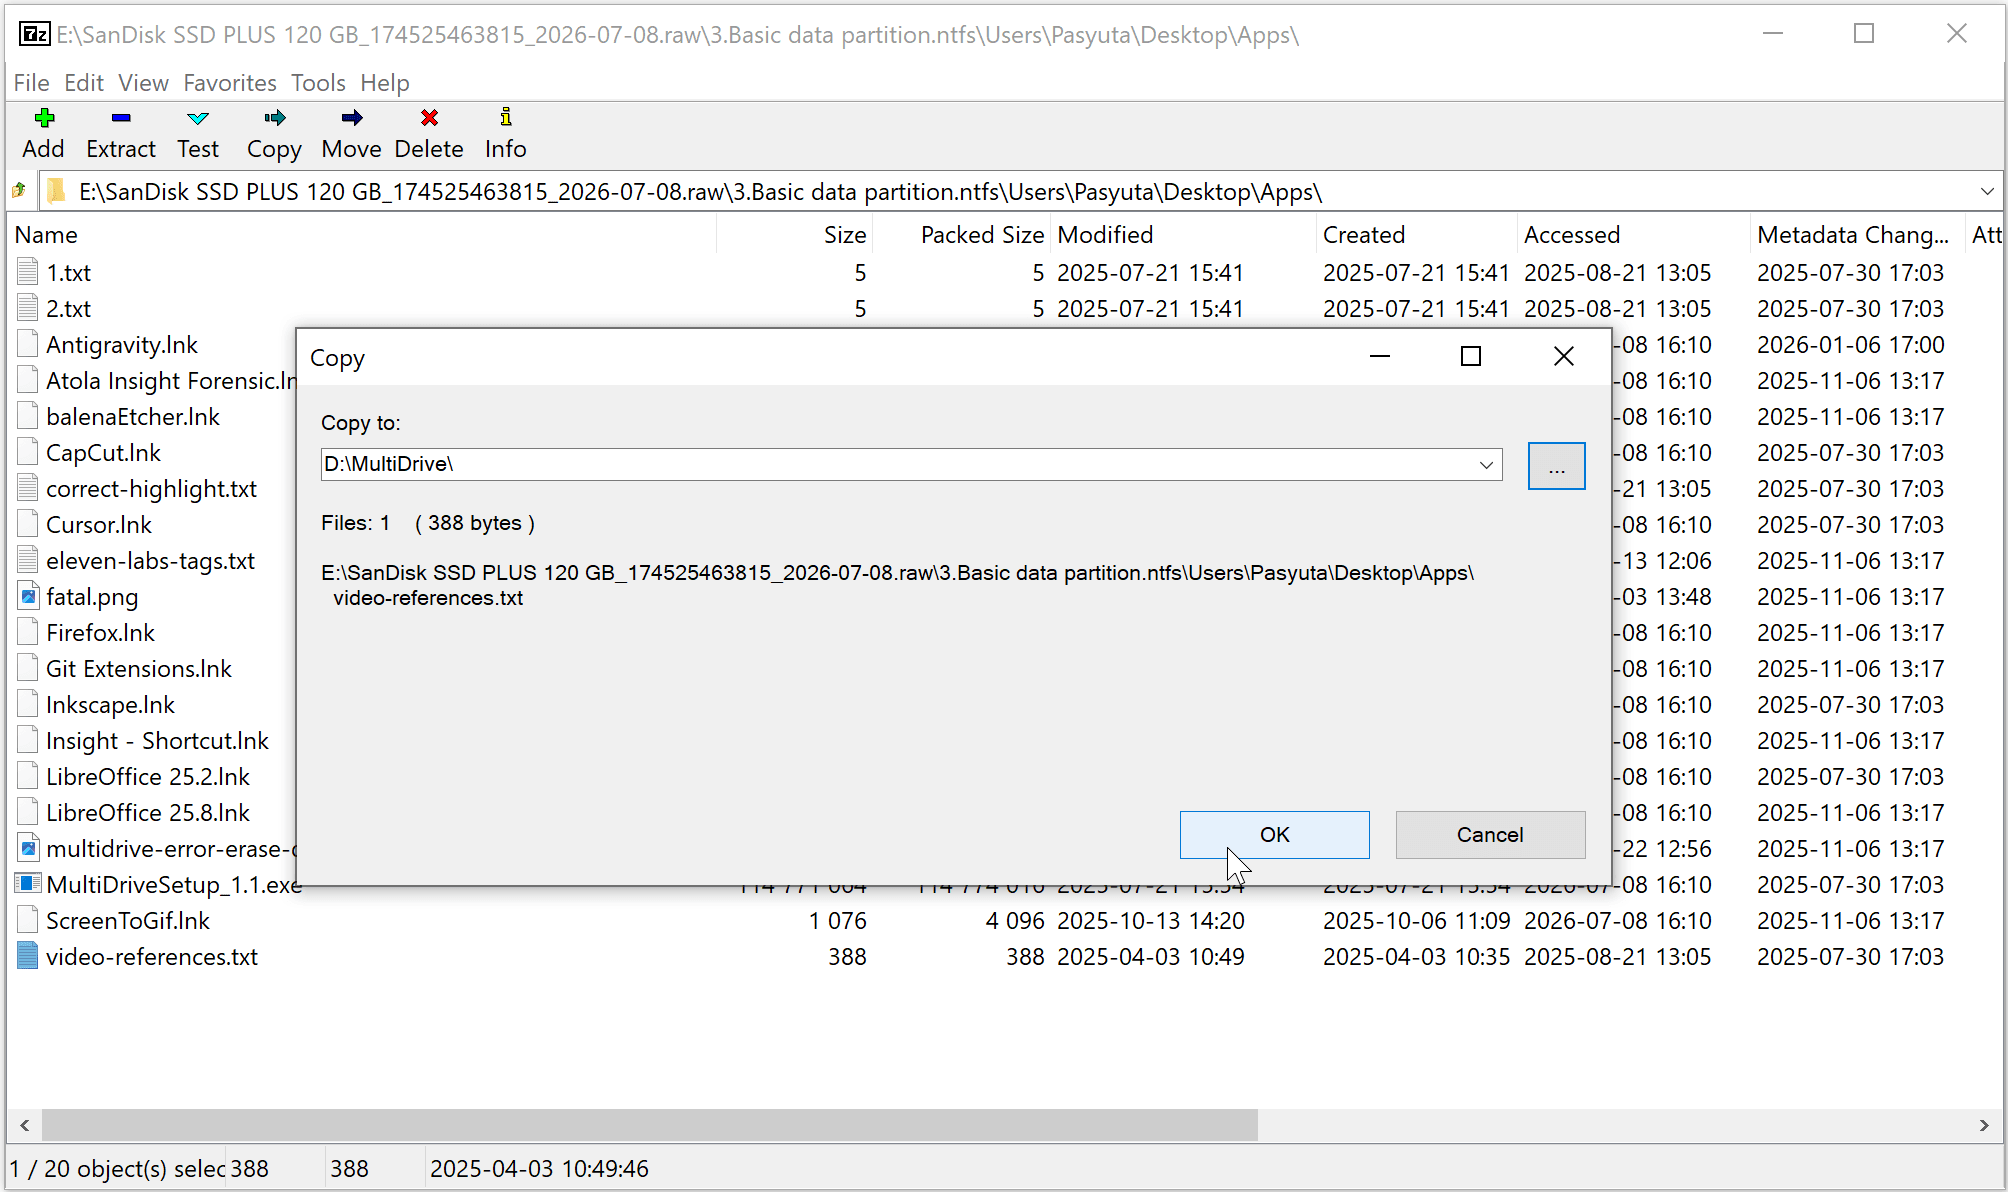
7-Zip restores the selected folder or file to a specified location.
Troubleshooting tips
- External drive not recognized? Try using a different USB port, updating drivers, or restarting your PC.
- Backup taking too long? Ensure your external drive supports USB 3.0 and close any unnecessary applications.
- Not enough space on the external drive? Delete old backups or use a larger-capacity drive instead.
- Backup fails with a read/write error? See how to fix disk read/write errors — often a cable, port, or power issue rather than a damaged drive.
Author