How to Fully Wipe a Computer
Quick answer
- Decide your goal: clean start, secure resale, recycle, or keep a disk as storage
- Back up files you still need
- Identify every drive; disconnect drives you are not wiping
- Boot MultiDrive WinPE from USB
- Check the drive against the label on it
- Start erasing it with a real progress ETA
Want to wipe your PC completely, with all its apps and files? Or maybe you just need a fresh start? Deleting and formatting will not get you there. Here is how to do a full disk wipe on Windows 11/10.
In this article
- Choose what “wipe a computer” means
- Formatting and clean installation do not erase everything
- Identify every storage drive
- Unreachable SSD data areas
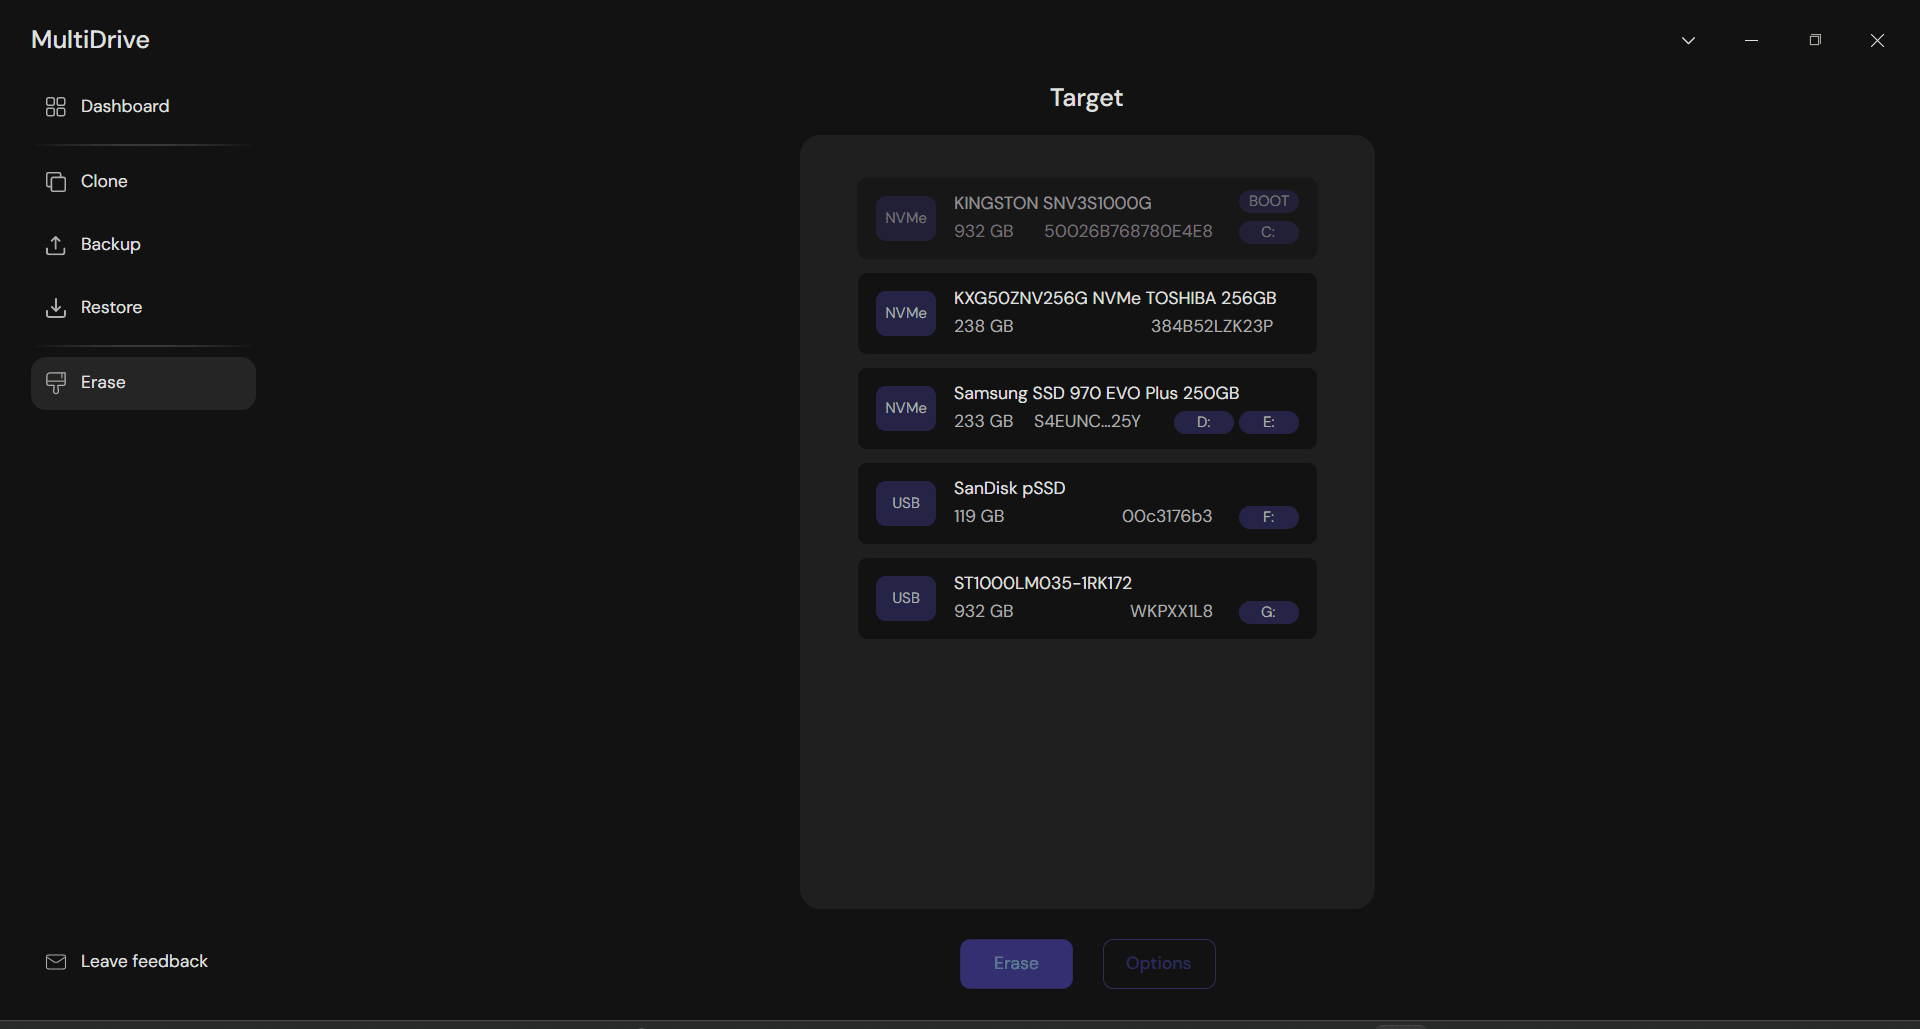
- Protected disk selection: model, capacity, serial, volumes
- Back up first
- Bootable USB with graphical user interface
- Steps to fully wipe the computer
- How long the wipe takes
- DBAN alternative for SSD & NVMe
- FAQ
Decide what “wipe a computer” means for you
“Wipe a computer” means different things to different people. Some want all files and folders gone. Others just want a fresh Windows installation. Some only need to turn an old drive into blank storage.
Find your case below:
| Your goal | What you actually need | Recommended path |
|---|---|---|
| Clean start | A clean, working Windows without old apps and clutter. Privacy isn’t the main concern | Windows “Reset this PC” > Remove everything (clean data optional), or reinstall Windows |
| Safe resale / gift | The next owner must never recover your photos, passwords, or other personal data | Full wipe of every hard drive that leaves with the PC |
| Recycling / disposal | Drive leaves your control forever; recovery risk must be zero | Wipe of all media. For highly sensitive data on failed drives, physical destruction is recommended. |
| Secondary drive reuse | Keep the PC; turn an old drive into your blank storage | Wipe only that secondary disk in MultiDrive while Windows runs. Don't touch the boot drive. |
| Malware recovery | Get rid of notorious malware and end up with a usable machine | Either boot from a clean USB and wipe the drive, or reinstall Windows from trusted media. Ensure that all personal files you back up first are malware-free. |
Formatting and clean installation do not erase everything
Formatting is the most common wipe mistake. It does not move your data anywhere. It rebuilds the map that tells Windows where each file lives. The drive looks empty because Windows can no longer find anything, but the files are still sitting on the HDD platters or in the SSD flash memory.
Here is what each of the usual “that should be enough” methods really does:
| Process | What it actually does |
|---|---|
| Deleting partitions or wiping the partition table | Windows now sees unallocated space, but recovery software still digs up the old files |
| Quick format | Rebuilds an empty file system catalog. The data blocks stay untouched until something writes over them |
| DiskPart clean (without the all switch) | Clears partition metadata. That is not the same as overwriting every sector |
| Clean install of Windows | Gives you a fresh OS on top of large untouched areas of the old drive, which recovery software can read |
A real secure wipe overwrites the entire user-accessible surface of the drive, so recovery tools find nothing. If you want a deeper dive into drive-level wiping, check out how to wipe a hard drive and MultiDrive erase software.
Identify every storage drive
Before you erase everything, check what is inside your PC. Most machines built in the last decade have more than one place where your files can live:
| Storage type | What it is | What to know |
|---|---|---|
| HDD | The classic spinning drive | Overwrite wiping is a complete answer here |
| SSD | Flash storage (SATA or NVMe SSD) | Check that your wipe tool sees the drive at all before you trust it. Older-generation utilities were written for HDDs and frequently miss NVMe SSDs. SSDs keep spare blocks an overwrite cannot address. See Format vs Overwrite vs Secure Erase. |
| Secondary internal drives | Extra drives with data | Easy to forget, and they keep your personal files even after you reinstall Windows on C: |
| Removable media | USB sticks, SD cards, external HDDs | Unplug anything you don’t want wiped before you start |
| Soldered storage | eMMC or soldered NVMe chips found in many laptops | You cannot pull the module out and wipe it on another machine, so it has to be erased in place from a bootable environment. This is the case where booting from USB is not optional. |
Disconnect or unplug any disk you plan to reuse as storage before starting. This could be a backup drive or a second PC disk. Selecting the wrong disk for wiping is irreversible.
Double-check the drive model, capacity and serial number before you hit Erase.
Unreachable SSD data areas
On an HDD, overwriting is the whole story. Every sector the drive reports gets new data, and the old contents are gone.
Flash works differently. SSD and NVMe controllers hold back spare capacity that the host never sees: over-provisioned blocks, blocks retired by wear leveling, and remapped bad blocks. An overwrite fills everything the drive reports and nothing it hides, so fragments of old data can survive in those blocks.
For a personal machine that you are selling, donating or recycling, this is not worth losing sleep over. Reading those fragments back means desoldering the NAND chips and reconstructing the controller’s translation layer, which is lab work rather than something consumer recovery software can do. Two situations are different:
- You have a sanitization standard to satisfy. Regulated or classified data usually calls for the drive’s own ATA Secure Erase or NVMe Format command, or physical destruction. MultiDrive fills the drive with a byte pattern and does not issue those commands, so it is not the right tool for a compliance sign-off.
- The drive is self-encrypting. Discarding the encryption key wipes the whole device instantly, hidden blocks included, because what is left is undecryptable ciphertext.
Protected drive selection: model, capacity, serial, volumes
Never pick a drive by drive letter alone. Volume letters may shift between Windows and WinPE, so a safe wipe tool has to show you more than that:
- Model. Samsung 980 PRO, WDC WD10EZEX, and so on.
- Capacity. Matches the sticker or the size you bought (500 GB vs 2 TB).
- Serial number. Unique to the device. Compare it with the label when two drives look alike.
- Volumes. Which partitions and letters are on that physical disk (C:, D:, EFI).
MultiDrive shows all of this for every physical drive, and it will not let you erase the active Windows boot drive from inside a running OS. To wipe the system disk, you need to boot from a USB drive (WinPE) first. More on that here: erase drive safety features.
Back up first
A full wipe permanently removes personal data. Copy anything you still need to an external drive or cloud before you proceed. If you are transferring to a new PC, consider free PC transfer software or a full backup to an external hard drive first.
Only after backing up is wiping your old computer the safest option.
Bootable USB with graphical user interface
You cannot always entirely overwrite the drive that Windows is running from. Windows holds its own system files open, and the wipe would destroy the OS from underneath as it runs. The fix is to boot the machine from a USB stick and run the wipe from there, with the internal drives sitting idle.
MultiDrive WinPE is a bootable Windows PE image with MultiDrive preinstalled. Write it to a USB stick, boot the PC from it, and the MultiDrive interface opens on its own. From there you wipe the internal drive using the same workflow as on a normal Windows desktop.
You do not need to change permanent firmware settings. Tap the one-time boot menu key as the machine powers on and pick the USB stick. On most models that key is:
- Dell, Lenovo, Acer, Toshiba: F12 (some Lenovo models use the small Novo button instead)
- HP: Esc, then F9
- ASUS: Esc or F8
- MSI: F11
If nothing appears, F2 or Del opens firmware setup, where you can select the USB drive manually. On a machine with Secure Boot and Fast Startup enabled, you may need to hold Shift while clicking Restart in Windows to get a reliable boot menu.
Steps to fully wipe your computer
Follow this path if you are preparing a PC for resale, recycling, or just want to securely clear the hard drive.
- Confirm your goal using the table above.
- Back up your files, then unplug the backup drive so it cannot be wiped by mistake.
- Download MultiDrive WinPE and MultiDrive.
- Launch MultiDrive and click Restore.
- Select the downloaded WinPE ZIP as the source and your USB drive as the target.
- When the task is finished, shut down the PC.
- Power on the PC, open the boot menu, and select the USB drive.
- When MultiDrive opens, go to Erase. Read the label on the drive and match it against the drive you are about to select. This is the last point where you can avoid erasing the wrong drive.
- Start the Erase task and wait until Success appears for the selected drive.
- Optionally reinstall Windows if the PC will be reused or sold with an OS. For flash media reuse tips, see how to clear a USB drive.
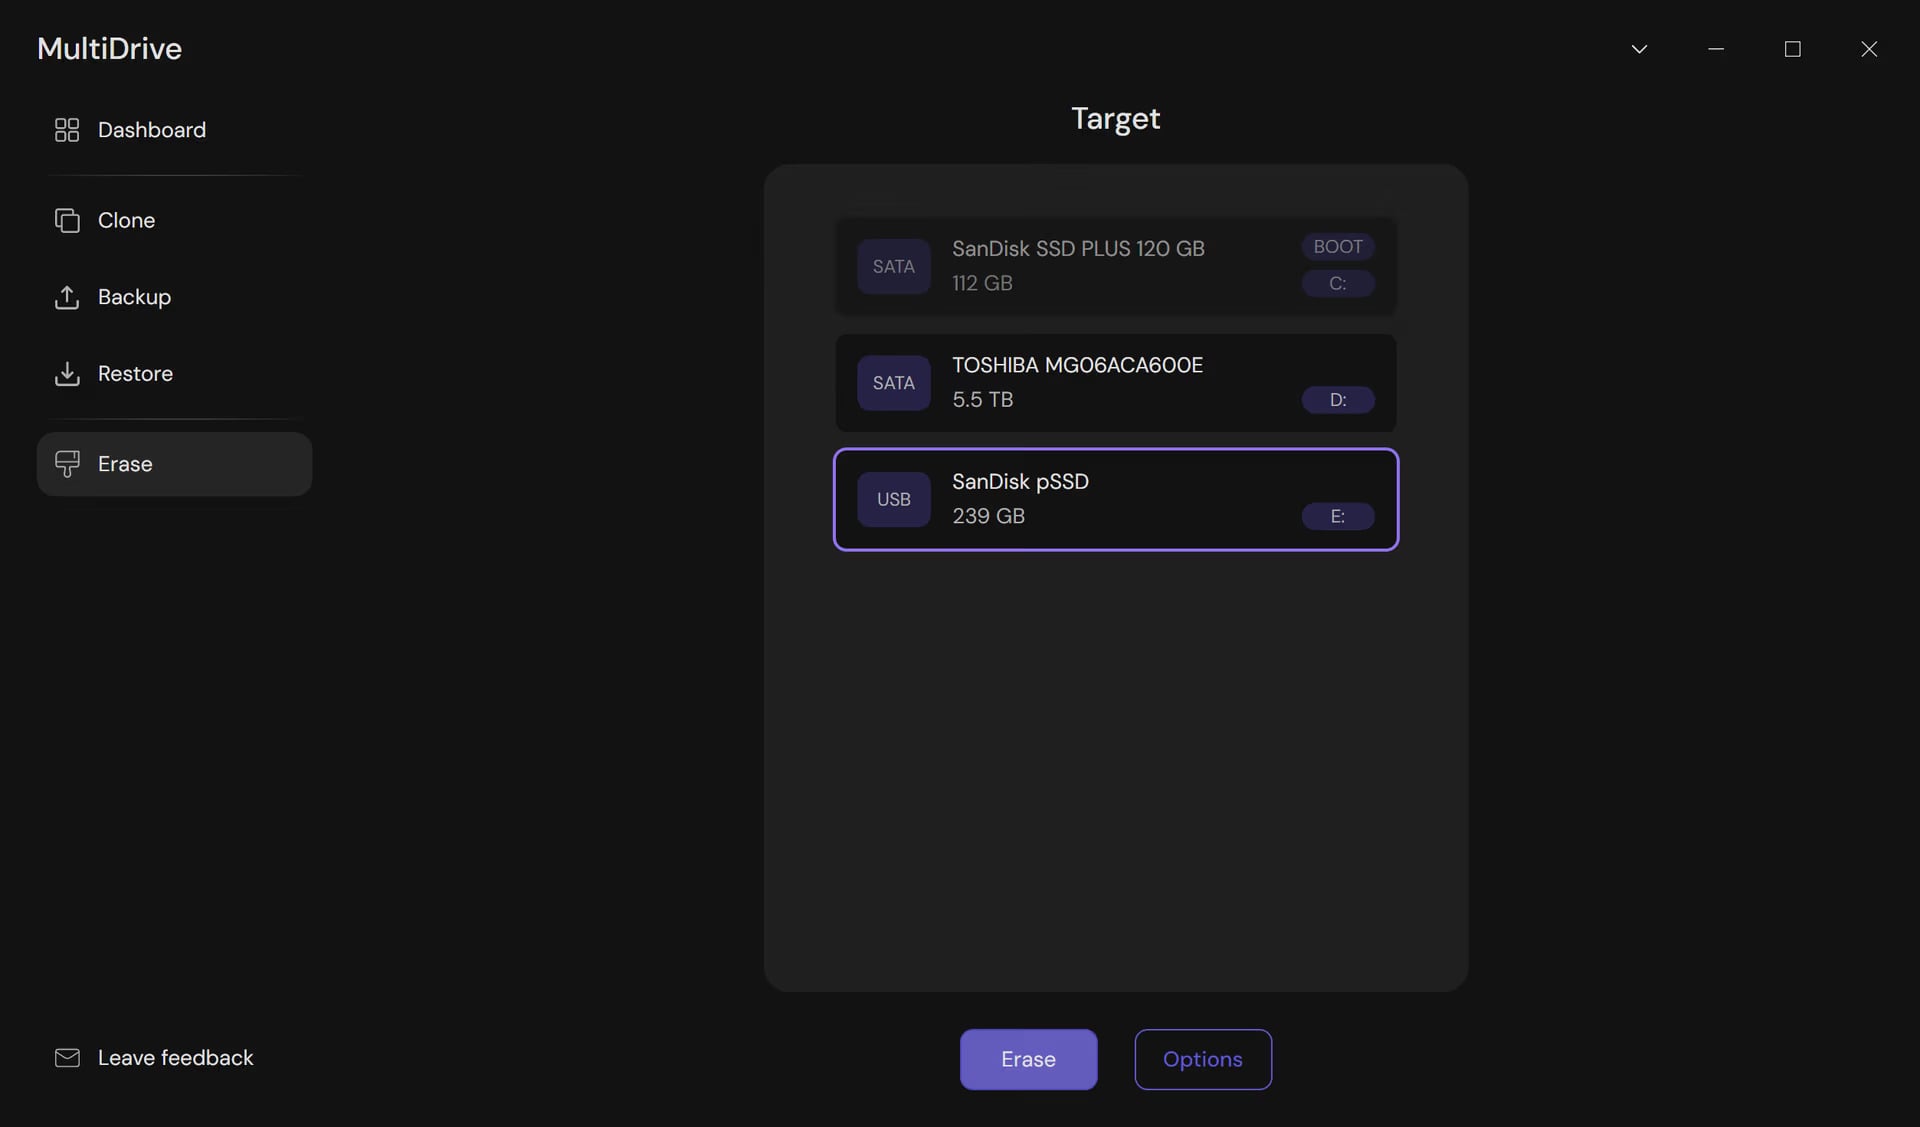
Step 8 - Drive selection and matching
Step 9 is the Stats panel after the overwrite — wait until the result shows Success.
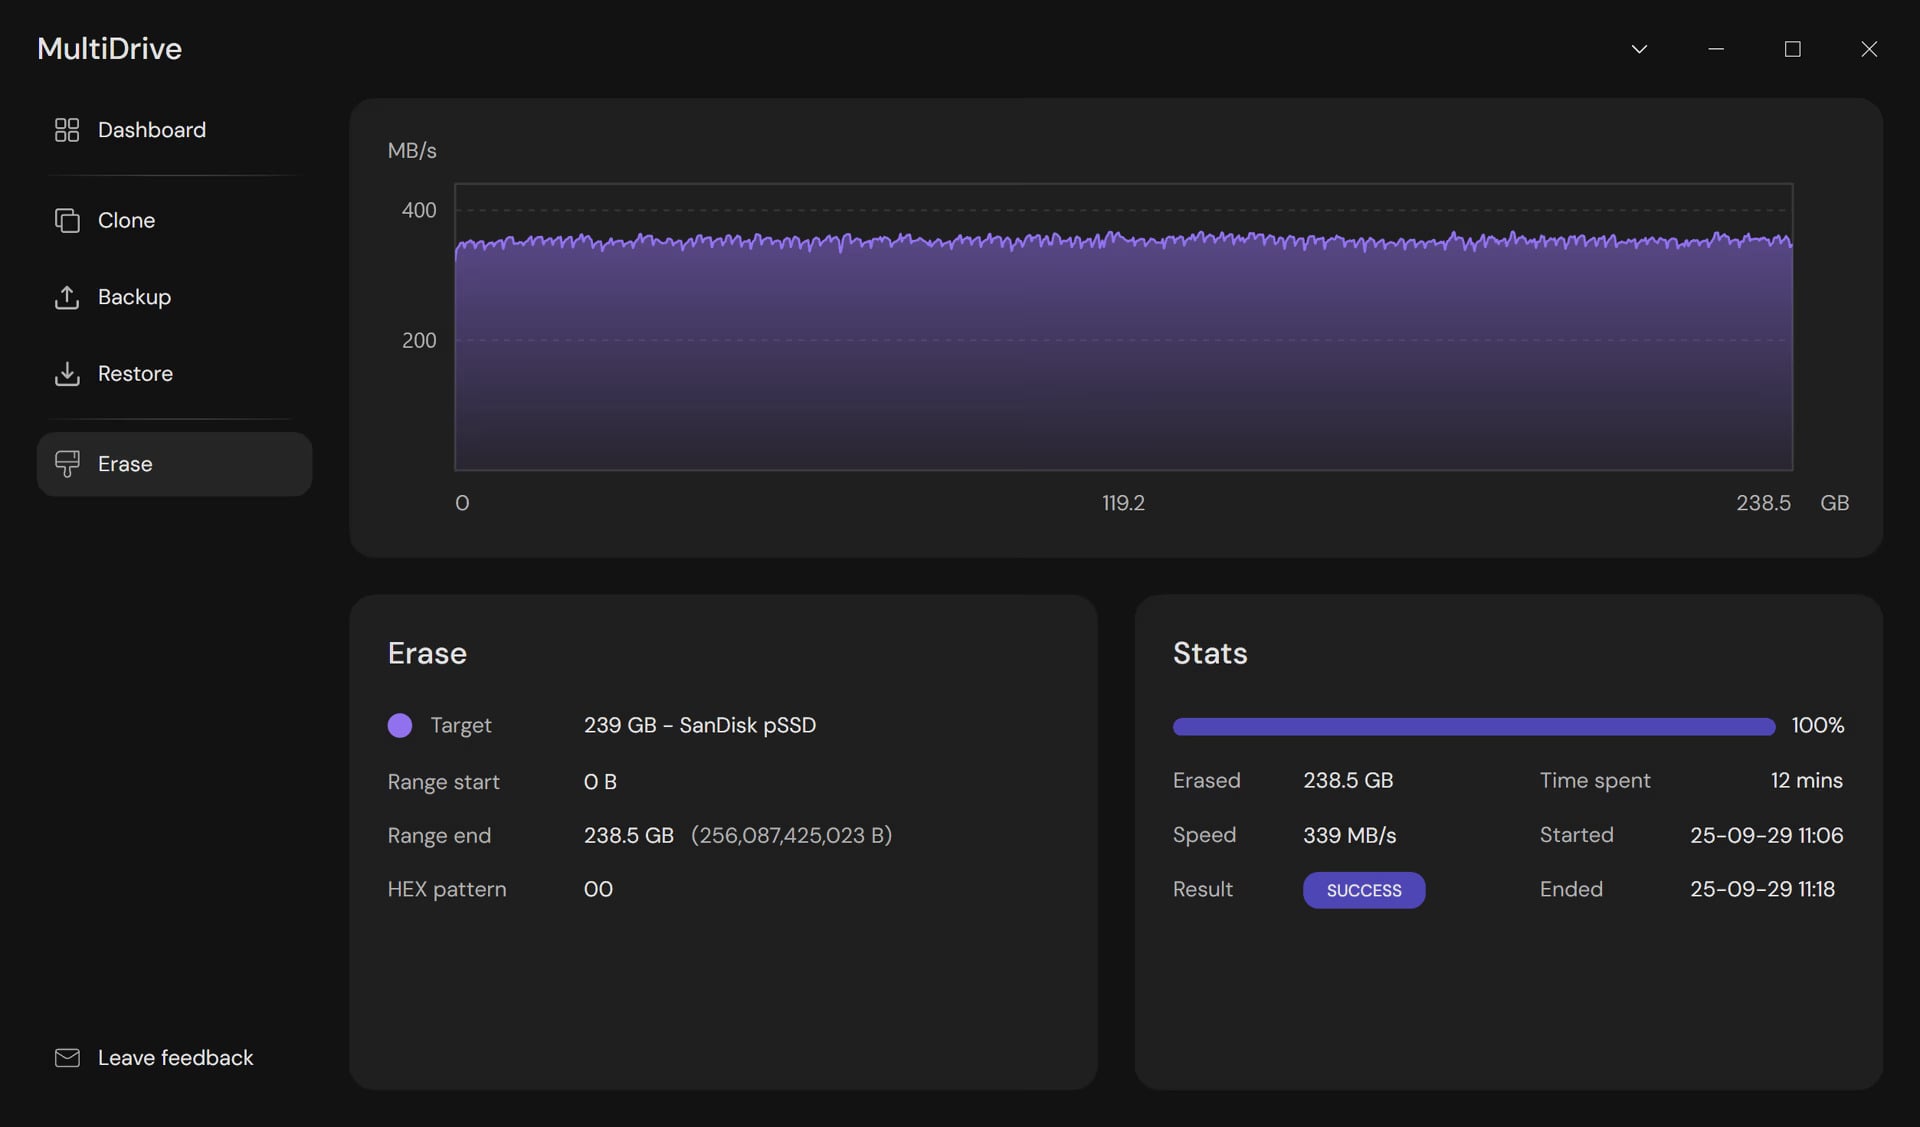
Step 9 - Erase task completed successfully with Stats showing Success
How long the wipe takes
A full-disk overwrite runs at the drive’s sustained write speed, so the honest answer is capacity divided by throughput. Here is what that works out to on sequential MultiDrive overwrites of the drives below:
| Drive | Capacity | Time to wipe |
|---|---|---|
| Samsung 990 PRO (M.2 NVMe) | 2 TB | ~20 minutes |
| Kingston DataTraveler Max (USB flash) | 512 GB | ~35 minutes |
| Samsung 870 EVO (SATA SSD) | 2 TB | ~1 hour |
| WD Black (SATA HDD) | 8 TB | ~12 hours |
How we timed this: Each figure is a wall-clock MultiDrive Erase run on that model until Success appeared in Stats. Full table: how long to wipe a drive.
The table is a rough guide, though. In practice, MultiDrive shows live throughput and time remaining. Once the transfer rate settles, the on-screen estimate is worth more than any table here. You can pause and resume if you need to step away.

DBAN alternative for SSD & NVMe
Lots of “wipe your PC” guides still send people to DBAN (Darik’s Boot and Nuke). DBAN has not had a release in years, and it was built around good old HDDs. On a laptop it frequently cannot see an M.2 NVMe drive at all. If that is your only disk, you either get stuck at the drive list or, worse, walk away believing you wiped a machine when you did not.
MultiDrive is built for the storage Windows machines actually ship with today: HDDs, SATA SSDs, USB SSDs and flash drives, and M.2 NVMe SSDs. Whichever tool you use, confirm your drive appears in the list with the right serial number before you start. If you are wiping multiple drives or doing this regularly, check how to automatically wipe drives and parallel erase.
Fully wiping a computer FAQ
First decide whether you need a clean start or a secure wipe. For a clean start, use Windows Reset this PC. To wipe a hard drive so the files cannot be recovered, boot MultiDrive WinPE and overwrite every disk within your PC. The step-by-step instructions are above.
Encryption is a strong starting point. However, it is not a wipe on its own: the drive stays readable while the key is available, and a PC handed over unlocked, still signed in, or with the recovery key within the buyer’s reach is not protected. If you are selling or recycling, overwrite the drive anyway. It costs you one run and removes the question entirely.
One pass is enough on any drive you can buy today. The 35-pass Gutmann method was designed in 1996 for MFM and RLL encoding schemes that no modern drive uses, and its author has since said it is pointless on current hardware. NIST SP 800-88 treats a single overwrite pass as sufficient for magnetic media. Extra passes multiply the hours and add nothing.
It erases all addressable data areas that the drive exposes to the host. It does not reach over-provisioned and wear-leveled blocks, where fragments can survive. That is fine for resale or recycling of a personal machine. For a compliance sign-off you want the drive’s own ATA Secure Erase or NVMe Format command, or physical destruction. Details above.
The usual cause is the SATA controller mode. If the firmware is set to RAID or Intel RST rather than AHCI, WinPE may not load a driver for the disk. Switch the mode in firmware setup and boot again. On laptops with soldered storage, also check that the drive is not locked by a firmware password or hardware encryption. A drive that appears with the wrong capacity usually has an HPA/DCO/AMA area hiding part of the disk.
Not always. If you keep the PC and mainly want old apps and clutter gone, Reset this PC or a clean Windows install may be enough. Choose a full wipe when privacy matters, for example when selling, donating or recycling, or, in particular, when malware leaves you distrusting the whole disk.
Yes. MultiDrive supports both NVMe and SATA SSDs and HDDs. The major limitation of DBAN on modern PCs is the lack of NVMe support.
Author